Category: Tutorial

  • Microsoft Exchange – how to update your SPF, DKIM and DMARC records

    Microsoft Exchange – how to update your SPF, DKIM and DMARC records

    If you’re domain is using the Microsoft 365 email – otherwise known as MS Exchange – it’s likely you will need to update your SPF, DKIM and DMARC records within your domain DNS at some point. From February 2024, Yahoo (Yahoo Mail) and Google (Gmail) require email validation for large volume email senders, but it’s good practice to add these records now nevertheless as they’re also often used by spam filters to distinguish between junk and legitimate email. As far as I’m aware, there are no current plans to require these changes for everyday email users, however, in my opinion it’s only a matter of time.

    Microsoft Exchange – add required SPF record

    Your domain DNS should already contain the following SPF record:

    • Record: TXT
    • Host Name: @
    • Points to address or value: v=spf1 include:spf.protection.outlook.com -all
    • TTL: 1 hr

    Microsoft Exchange – enable / add DKIM

    Generate DKIM keys within the Microsoft 365 Admin Centre:

    1. Sign-in through the M365 admin centre as a global administrator
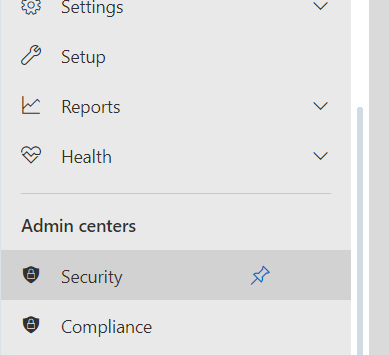
    2. In the left-hand menu, click on Security under Admin Centres. This will take you to the Microsoft Defender Portal.
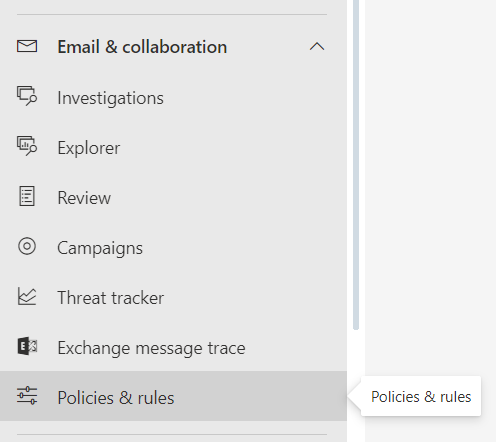
    3. From there, Under Email & Collaboration – click on Policies and Rules –> Threat policies –> Email Authentication Settings
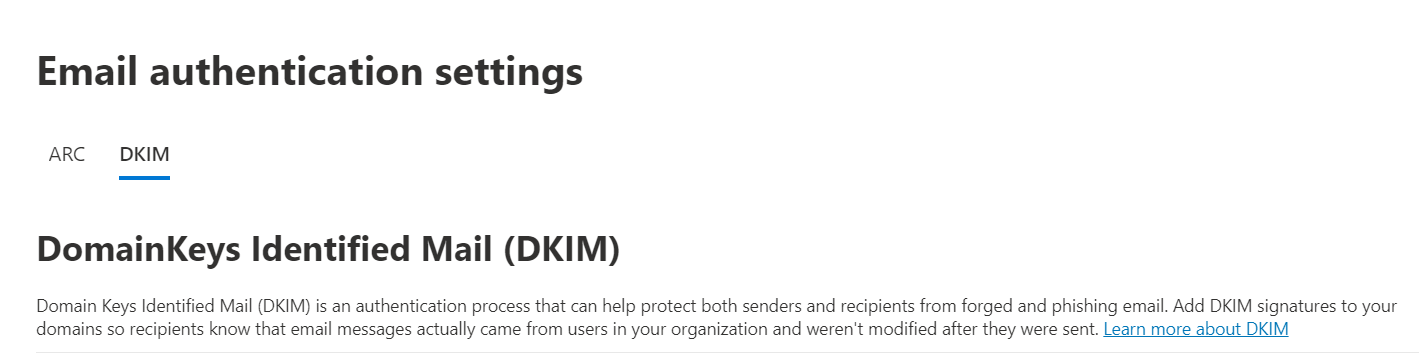
    4. choose the DKIM tab and you’ll see the ‘DomainKeys Identified Mail (DKIM)’ tab with your domain name(s) below it
    5. Click on the domain name you’d like to activate DKIM on and enable the DKIM under ‘Sign messages for this domain with DKIM signatures’

    At this point, you will probably be shown an error message saying that the required CNAME records do not exist. Within this error message you’ll be shown the CNAME records you need – add them to your domain DNS. Once they have been added, updated and they have resolved, you will need to go back to step 1 and follow the instructions again (see below for the client error message example)
    How to configure and add a DMARC to your domain:

    Your DMARC record will need to be generated before being added to your domain name. Many hosts will do this for you. Here is how to do it manually:

    1. Generate your DMARC record using a third party record generator such as: https://dmarcian.com/dmarc-record-wizard/ (this is a third-party website and the link opens in a new tab)
    2. Once your record has been generated, add your DMARC record to your DNS

    Microsoft 365 Admin Centre – DKIM error message example

    As mentioned above, if you try to activate DKIM before you have the correct CNAME records within your DNS, you will get an error message. Here is an example of that message where you will find your CNAME records:

    Client Error

    |Microsoft.Exchange.Management.Tasks.ValidationException|CNAME record does not exist for this config.

    Please publish the following two CNAME records first.

    Domain Name : *****.***

    Host Name : selector1._domainkey

    Points to address or value: selector1-*****.***._domainkey.********.onmicrosoft.com

    Host Name : selector2._domainkey

    Points to address or value: selector2-*****.***._domainkey.********.onmicrosoft.com .

    If you have already published the CNAME records, sync will take a few minutes to as many as 4 days based on your specific DNS. Return and retry this step later.

    The basic syntax of the DKIM CNAME records for custom domains that send mail from Microsoft 365 is:

    Hostname: selector1._domainkey Points to address or value: selector1-<CustomDomain>._domainkey.<InitialDomain>

    Hostname: selector2._domainkey Points to address or value: selector2-<CustomDomain>._domainkey.<InitialDomain>

    Further healp

    Here is the Microsoft help page for how to Set up DKIM to sign mail from your Microsoft 365 domain: https://learn.microsoft.com/en-gb/microsoft-365/security/office-365-security/email-authentication-dkim-configure?view=o365-worldwide
  • Photoshop error – Could not complete this operation. An error occurred while reading the endian type

    Photoshop error – Could not complete this operation. An error occurred while reading the endian type

    WebP is a modern digital image format developed by Google that offers significant advantages over traditional formats like JPEG and PNG. However, editing and saving this new type of image in Photoshop isn’t always as fast or straight-forward as you’d hope.

    Problem 1 – Photoshop doesn’t natively support WebP files

    Versions of Photoshop prior to 23.2 don’t not natively support WebP files, so the first thing you’ll need to do is install a new plugin. The good news is, however, that the Photoshop plug-in is free. See this page on the Adobe website for download links

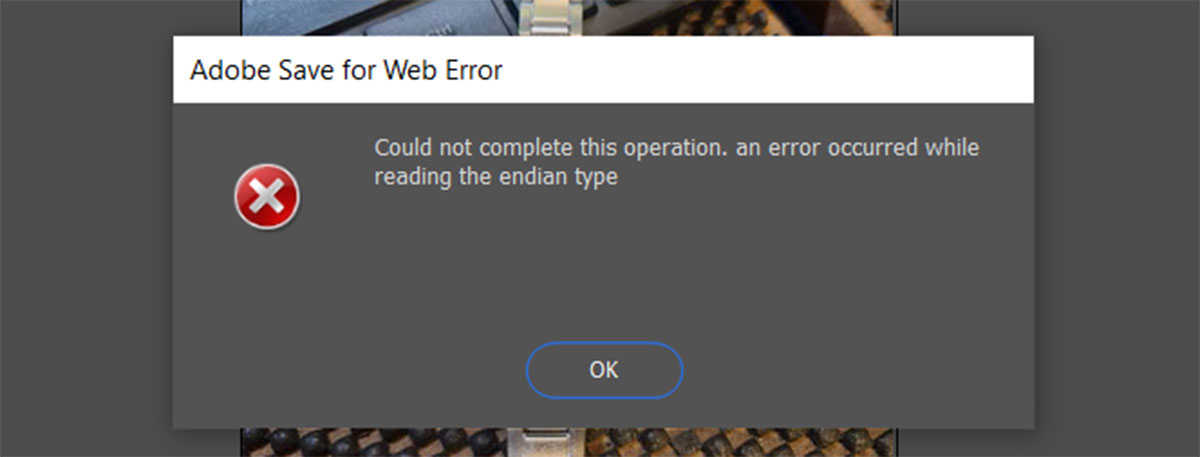
    Problem 2 – Photoshop error when trying to save the WebP image “Could not complete this operation. An error occurred while reading the endian type”

    The Photoshop ‘Save for web’ function is what’s known as a legacy feature. I’ve been using Photoshop for about 25 years so I’ll instinctively just press CTRL+SHIFT+ALT+S, but this is no longer being updated which is where the problem lies (you might notice this option isn’t in the file menu anymore). The most recent ‘Save for Web’ update precedes the WebP technology. Sadly there’s no way to update this.

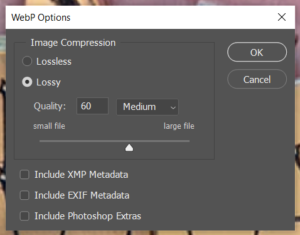
    To save your WebP image you’ll need to use the more modern ‘Save as’ or CTRL+SHIFT+S. Here you’ll get the option to compress the image as you do with JPEGs in the old ‘Save for web’ function.


    More about the WebP technology

    Web technology is improving and changing at an incredible speed, and WebP is a modern image format developed by Google that offers significant advantages over traditional formats like JPEG and PNG.

    It offers superior Compression:

    • Lossy and Lossless options: WebP offers both lossy and lossless compression, allowing you to choose the trade-off between file size and image quality.
    • Smaller file sizes: In general, WebP images can be 25-34% smaller than JPEGs and 26% smaller than PNGs while maintaining comparable quality. This makes websites load faster and saves bandwidth.
    • Advanced algorithms: WebP utilizes algorithms optimized for specific image types, like photos, graphics, and text, further enhancing compression efficiency.

    WebP additional Features include:

    • Transparency: WebP supports alpha transparency, allowing you to create images with transparent backgrounds for logos, icons, and overlays.
    • Animation: WebP can also be used for simple animations, offering an alternative to GIFs with significantly smaller file sizes.
    • Open Format: WebP is an open-source format, meaning it’s free to use and implement by anyone.

    WebP is increasing in popularity but there are still some challenges:

    • Growing Popularity: WebP is seeing increasing adoption on the web, with major browsers and content delivery networks supporting it.
    • Compatibility Issues: Some older browsers and applications may not yet support WebP natively, but workarounds and converters are available.

    Ultimately, WebP is a powerful and versatile image format that can significantly improve website performance and image quality. It’s a strong contender for replacing older formats like JPEG and PNG, and its popularity is likely to continue growing in the future.

  • What is a URL shortener and should I use one?

    What is a shortened link?

    A URL link shortner is a way of shortening or disguising a link. They’re normally used to create a shorter version of a very long link but can also be used to track click-throughs or often to disguise a link (commonly for nefarious purposes!).

    What does a shortened link look like?

    Here are some examples:

    Example 1 – shorten long URLs

    Seven Creative publish a new article but the URL is very long. They want to post the link to their Facebook page but the link is just too long. So they decide instead to use a URL shortener before posting:

    The URL: https://staging.sevencreative.co.uk/seven-creative-shortlisted-for-digital-communication-award-at-sheffield-business-awards/

    Is shortened to:

    bit.ly/3f9rDCB

    The shortened link is posted to their Facebook page. When someone click the link it opens the long link

    Example 2 – track links

    Seven Creative are conducting an integrated marketing campaign to promote their SEO services. They’re using a combination or viral marketing, paid for placement, and organic social media. In order to track their ROI they need to be able to see which links are brining in the most traffic:

    The URL: https://staging.sevencreative.co.uk/seo-agency-in-sheffield/

    Is shortened to:

    bit.ly/35qAhIj

    https://bit.ly/2Wfpc8W

    and

    bit.ly/2xnYCBZ

    All of which resolve to the original URL. And they also create a final shortened URL (for other SEO purposes):

    bit.ly/sheffield-seo (although still a shortened link, this also more user-friendly)

    When people click on these links, the source is tracked giving them an indication of where the traffic came from and which marketing activity is having the biggest effect

    Example 3 – disguise links

    A scammer hacks someone’s website and places several pages there selling fake designer clothes.

    They want to send out a million spam emails to get people to get them to visit their new pages, but, not only do they have to disguise the URL (or the fact they’re hosting their content on a hacked website), they also have to disguise the link to avoid it being picked up by spam filters – with a shortcode link, as you saw in example 2, you can have many links as you like all resolving to one URL

    How do I get a shortened link or link shortener?

    There are several options for links shortners but the easiest is to use one of the many free link-shortening services – the most well-known of these is Bit.ly

    Alternatively, you can install some free link-shortening software on your website and do it that way, or finally you can simply create 301 redirects for short URLs to the longer ones

    Should I use a URL shortener?

    These days we don’t really have need to use a link shortener as the places we share our links (like on social media) will often shorten our links for us.

    However, there’s not real reason why you shouldn’t use one if you feel you need to. Just remember that people are more web-savvy and cautious these days so may not click on a link if they can’t see its destination

  • How do I change my Outlook email account to use SSL?

    SSL is an encryption method for sending emails and will help avoid the emails you send being seen by unintended recipients.

    It stands for Secure Socket Layer and this quick tutorial will show you how to configure Outlook to send using the SSL method.

    The example below uses Outlook 2007, however, this will still apply to similar version of this email client.

    Remember, making changes to your Outlook settings may result in you not being able to collect or send email any more so if you’re not 100% sure what you’re doing, please get help from an expert

    1. Open Outlook

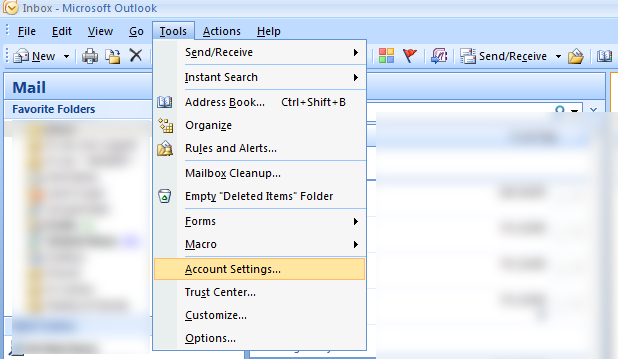
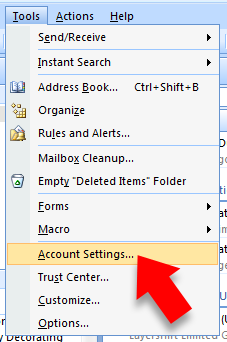
    2. Select ‘Tools’ then ‘Account settings’

    Select 'Tools' then 'Account settings'
    Select ‘Tools’ then ‘Account settings’

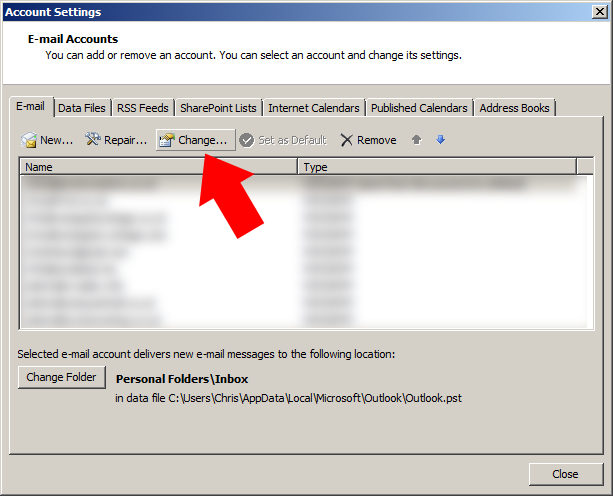
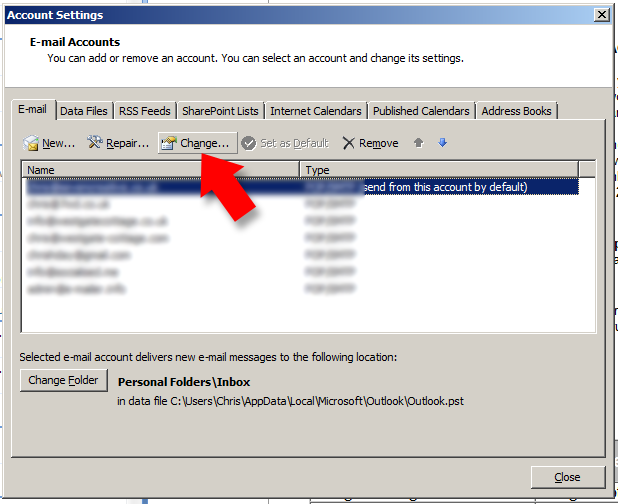
    3. Highlight the email account you need to change and press the ‘change’ button

    Highlight the email account you need to change and press the 'change' button
    Highlight the email account you need to change and press the ‘change’ button

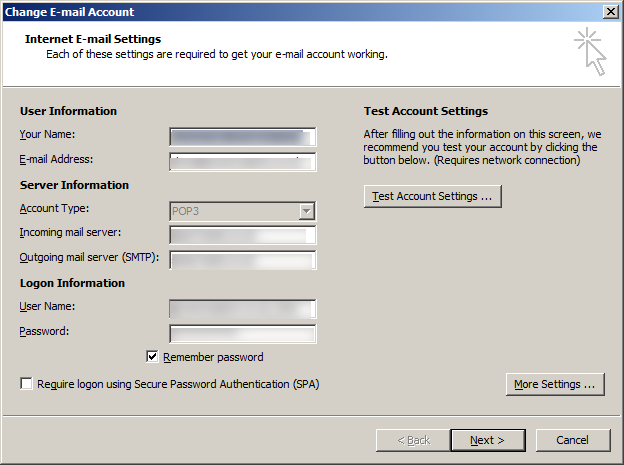
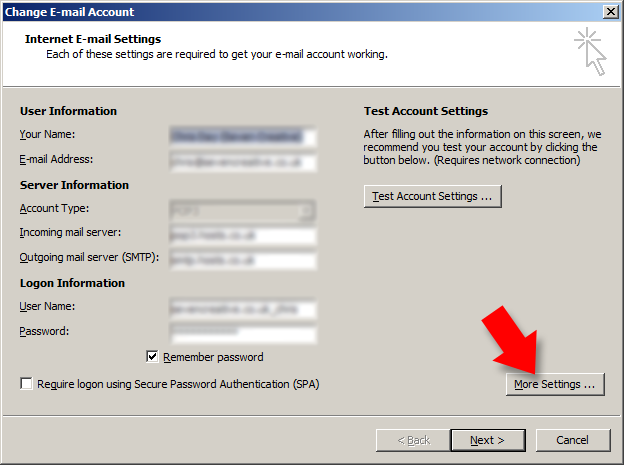
    4. Select ‘more settings’

    Select 'more settings'
    Select ‘more settings’

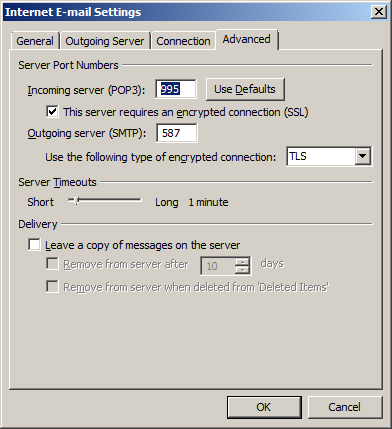
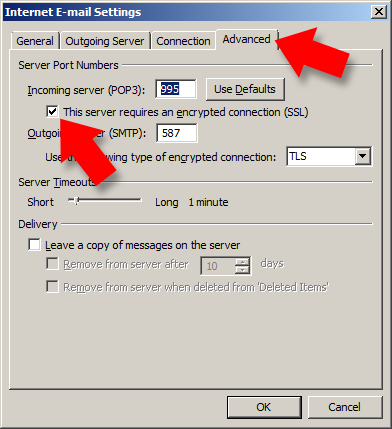
    5. From the ‘Internet email settings’ dialogue box, select the ‘advanced’ tab

    From the 'Internet email settings' dialogue box, select the 'advanced' tab
    From the ‘Internet email settings’ dialogue box, select the ‘advanced’ tab

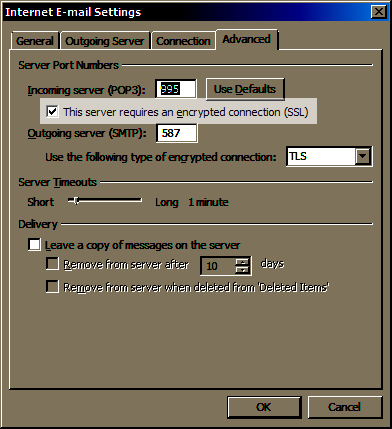
    6. Tick the box that says ”the server requires an encrypted connection’

     Tick the box that says ''the server requires an encrypted connection'
    Tick the box that says ”the server requires an encrypted connection’

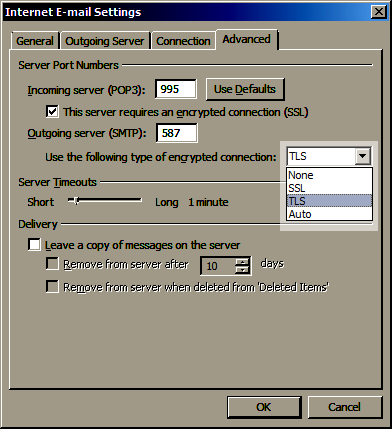
    7. Choose your required type of encryption from the drop-down box

    Choose your required type of encryption from the drop-down box
    Choose your required type of encryption from the drop-down box

    8. Click ‘OK’ then ‘next’ on the ‘Internet email settings’ page, then ‘finish’

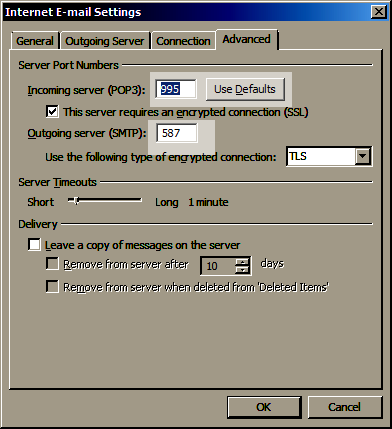
    9. If your email account is not able to send emails, follow the steps 1 to 5 again then try changing your incoming port to 995 and your Outgoing port to 587, then step 8. If this doesn’t work you can follow steps 1 to 5 then select ‘restore defaults’, then step 8

    If your email account is not able to send emails, follow the steps 1 to 5 again then try changing your incoming port to 995 and your Outgoing port to 587, then step 8. If this doesn't work you can follow steps 1 to 5 then select 'restore defaults', then step 8
    If your email account is not able to send emails, follow the steps 1 to 5 again then try changing your incoming port to 995 and your Outgoing port to 587, then step 8. If this doesn’t work you can follow steps 1 to 5 then select ‘restore defaults’, then step 8

  • How to reset your Zen Cart ecommerce admin password manually

    Disclaimer and warning: manually editing your Zen Cart database runs the risk of corrupting your site and losing everything so only attempt this if you’re confident you know what you’re doing and are happy to take the risk. This tutorial is intended as a quick guide and relates for standard Zen Cart installations only. If you have any concerns or are not experienced with PHP MyAdmin, MD5 hashes or editing a database, please ask an expert to do this for you instead. We can’t be held responsible for anything that might go wrong as a result of attempting to fix this yourself.

    If you’d prefer us to manually reset your Zen cart password, get in touch.

    If you’re using Zen Cart and lose your password, for whatever reason, and the ‘resend password’ option isn’t working, it is possible to manually reset your password directly through the database.

    Here is how you do it:

    1. Log in to your Zen Cart database using PHP MyAdmin
    2. Find the ‘admin’ table
    3. Replace the MD5 hash with the following: 351683ea4e19efe34874b501fdbf9792:9b
    4. Go back to the login page on your Zen Cart site and login again using the password ‘admin’

    Once you’re logged in to your site again you’ll need to reset the password straight away to something more secure. Good luck!

    More information on Zen Cart passwords

    An MD5 hash is an algorithm generally to encrypt a password. This algorithm is one-way meaning you can’t de-encrypt the phrase or word from the hash.

    There are, however, several openly available databases allowing you to look up an MD5 hash to find the corresponding word or phrase so this is why it’s very important to choose a complicated string when you pick your password. All the commonly occurring words and common passwords can be easily found but a password that is long, unique and complex will be almost impossible to discover.

    Long, complex passwords are, however, not very user friendly for us humans so many people still decide to go against the advice and choose something simple for their password so one way to get round this problem is by using a ‘salt’

    A ‘salt’ is a word or phrase that is combined with the required password to create the MD5 hash. When you log into your website, this is how the site checked you’ve entered the right password:

    1. Combines what you’ve entered in the ‘password’ field with the predefined ‘salt’
    2. Creates an MD5 hash from this combination
    3. Compares this hash with the correct password hash stored in the database
    4. Match means the password is correct

    Let us know if you need any help with your Zen Cart passwords


  • How to take a screen capture and send it by email

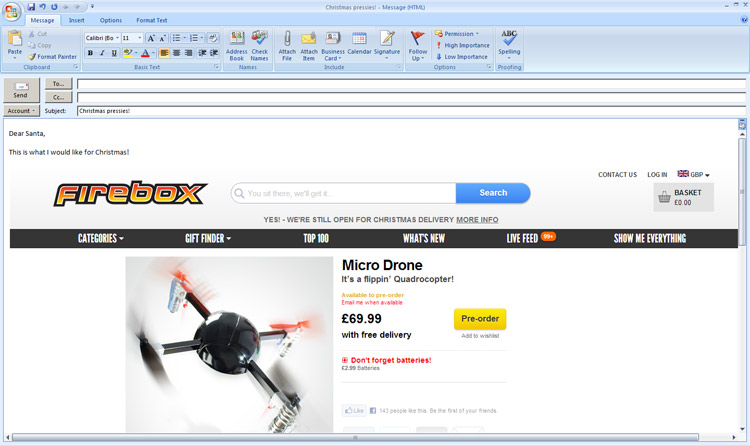
    This tutorial is about taking a shot of your computer screen and sending it – very useful when asking for technical support by email. This assumes you are using a PC and a local email client such as Outlook.

    1. Get whatever it is you’d like to get a screen capture of up on your screen
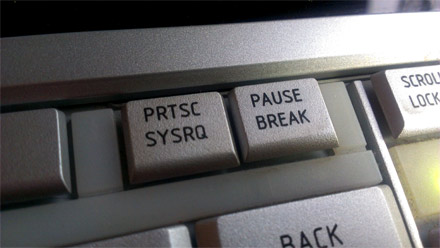
    2. Press the ‘PRTSC’ button. This is short for ‘Print Screen’ and will take a snapshot of your computer screen before sending it. Note: if you’re sending a screen capture of a website, you can press F11 to go full screen before taking the capture (press F11 again to exit full screen mode)

      PRTSC - press to take a screen capture
      PRTSC – press to take a screen capture
    3. Open your email client and open a new email
    4. With the cursor in the body of the email at the appropriate place, press and hold ‘CTRL’ then press ‘v’ once. This will paste the screen capture from your clipboard into the email.

      Insert screen capture into your email
      Insert screen capture into your email
  • Updating your password in Outlook 2010 tutorial

    It is very simple to update your email collection (POP3) password in Outlook 2010 by following the steps below:

    1. Open Outlook
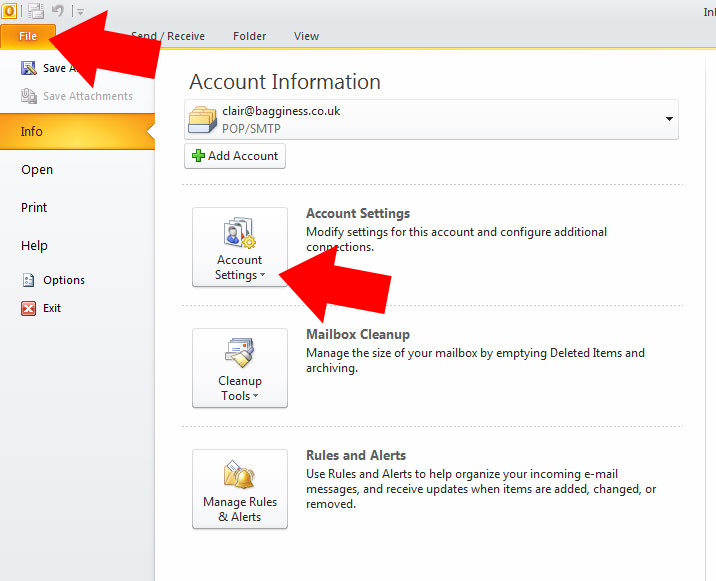
    2. Click on the ‘File’ option at the top of the page
    3. you’ll now have an option for ‘account settings’ – click here

      Open Outlook 2010, click 'file' option at the top of the screen, then click on 'account settings'
      Open Outlook 2010, click ‘file’ option at the top of the screen, then click on ‘account settings’
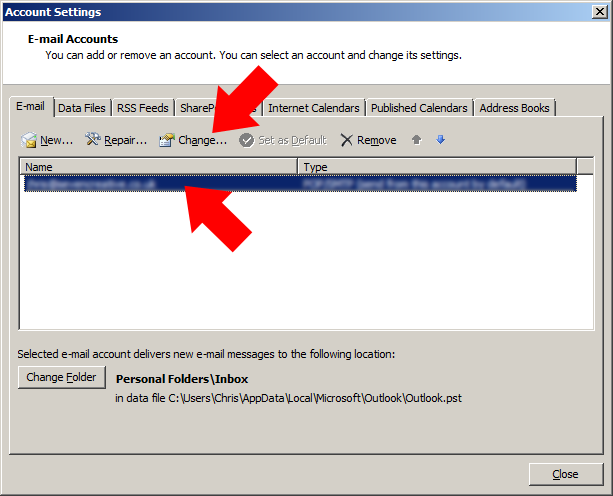
    4. click on the account you’d like to change then select ‘change’

      Click on the email account you's like to change then select 'change'
      Click on the email account you’s like to change then select ‘change’
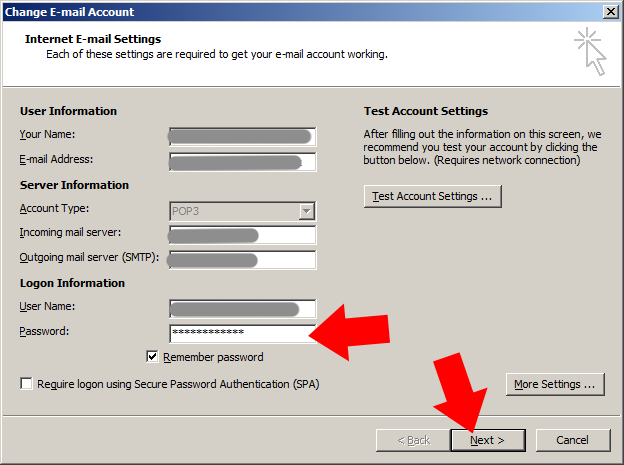
    5. from the ‘account settings page, type in your new password in the ‘password’ box

      From the 'account settings' page, type in your new password into the 'password' box then press 'next'
      From the ‘account settings’ page, type in your new password into the ‘password’ box then press ‘next’
    6. click ‘next’
    7. click ‘finish’
  • Updating your email password and security settings on Outlook 2007

    Here is a short tutorial on how to update your email password and change the connection to the SSL security type.

    Note: this tutorial relates to email collection (POP3 or IMAP) not email sending (SMTP) and email collection connection security only.

    Updating the email collection security type to SSL

    Step 1 – open Outlook and select ‘account settings’ from the ‘tools’ menu

    open Outlook and select 'account settings'
    open Outlook and select ‘account settings’

    Step 2 – from the ‘account settings’ dialogue box, highlight the account you’d like to change then press the ‘change’ button

    from the 'account settings' dialogue box, highlight the account you'd like to change then press the 'change' button
    from the ‘account settings’ dialogue box, highlight the account you’d like to change then press the ‘change’ button

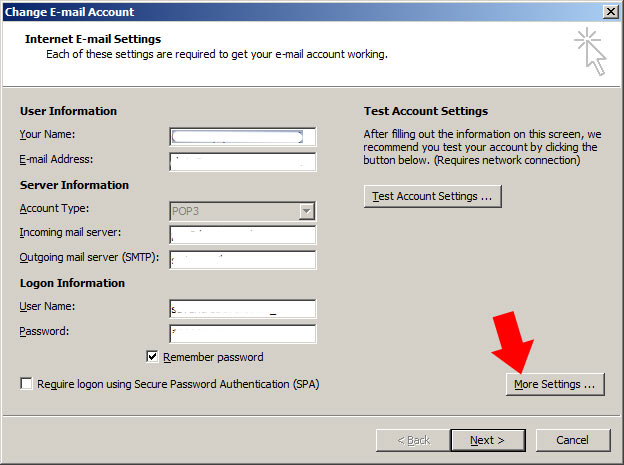
    Step 3 – from the ‘change email account’ dialogue box select ‘more settings’

    from the 'change email account' dialogue box select 'more settings'
    from the ‘change email account’ dialogue box select ‘more settings’

    Step 4 – from the ‘internet email settings’ dialogue box choose the ‘advanced’ tab from along the top then make sure the ‘this server requires an encrypted connection (SSL)’ tick box is ticked

    from the 'internet email settings' dialogue box choose the 'advanced' tab from along the top then make sure the 'this server requires an encrypted connection' tick box is ticked
    from the ‘internet email settings’ dialogue box choose the ‘advanced’ tab from along the top then make sure the ‘this server requires an encrypted connection’ tick box is ticked

    Step 5 – click ‘OK’ and then from back at the ‘change email account’ dialogue box press ‘next’ then ‘finish’

    click OK then from the 'change email account' dialogue box press 'next' then 'finish'
    click OK then from the ‘change email account’ dialogue box press ‘next’ then ‘finish’

    Updating your email collection password

    to update the password used to collect your email:

    Step 1 – follow the above steps 1, 2 and 3

    Step 2 – type in your new password into the ‘password’ box on the ‘change email account’ page

    type in your new password into the 'password' box on the 'change email account' page
    type in your new password into the ‘password’ box on the ‘change email account’ page

    Step 3 – press ‘next’ then ‘finish’


  • How to use Gmail as your SMTP server using Outlook

    This tutorial will show you how to use your free Gmail SMTP server to send emails from your personal email accounts using Outlook (this example uses Outlook 2007 but still applies in principle to the other versions of Outlook and other local email clients)

    This has been prompted by the news that many Virginmedia customers have recently been informed that they will no longer be able to use their Virginmedia SMTP address to send emails other than from their Virginmedia email address. This tutorial will show you how to use your Gmail SMTP address instead


    Step 1.

    Open Outlook and select 'tools' (from the top menu) then select 'account settings'

    Open Outlook and select 'tools' (from the top menu) then select 'account settings'
    Open Outlook and select 'tools' (from the top menu) then select 'account settings'

    Step 2.

    Highlight the account you would like to modify then press 'change'

    Highlight the account you would like to modify then press 'change'
    Highlight the account you would like to modify then press 'change'

    Step 3.

    From the 'internet email settings' page, select 'more settings'

    From the 'internet email settings' page, select 'more settings'
    From the 'internet email settings' page, select 'more settings'

    Step 4.

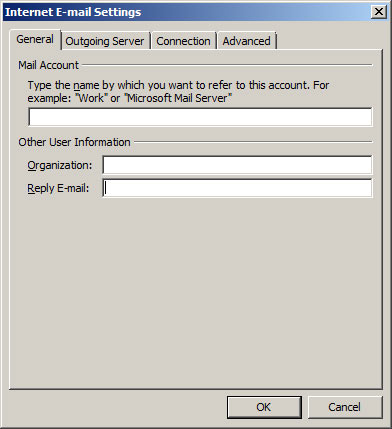
    Fill in the information in the three boxes on the 'general' tab (the name you'd like to call this account can be anything, you can leave organisation blank and the reply-to addrsess is the address you'd like people to reply to)

    Fill in the information in the three boxes on the 'general' tab
    Fill in the information in the three boxes on the 'general' tab

    Step 5.

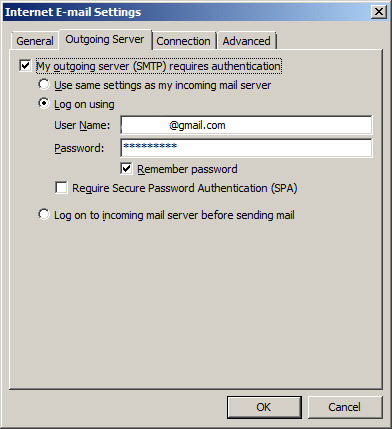
    On the outgoing server tab, fill in the following

    1. tick the box that says 'my outgoing server requires authentication',
    2. tick the 'log on using...' option
    3. in the 'user name' box, type in your full Gmail email address
    4. in the password box, type in your Gmail password (the same one you'd use to log into your Gmail account)
    5. un-tick the 'require secure password authentication' and 'log into mail server before...' options

    On the outgoing server tab, fill in the following
    On the outgoing server tab, fill in the following

    Step 6.

    No need to change anything on the 'connections' tab

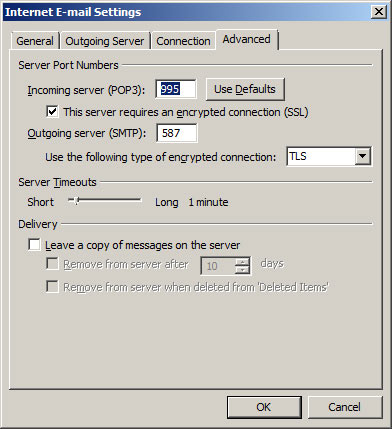
    Fill in the following on the 'advanced' tab

    1. change 'incoming server (POP3)' to 995
    2. tick the box 'the server requires an encrypted connection (SSL)'
    3. change 'outgoing server' to 587
    4. from the drop-down options, change the 'use the following type of encrypted connection' to TLS
    5. leave 'server timeouts' as is
    6. un-tick the 'leave copies of the messages on the server' (...which will download the actual email to your computer as opposed to just a copy - this helps avoid duplication)
    7. tick 'OK' to take you back to the 'internet e-mail settings' page

    Fill in the following on the 'advanced' tab
    Fill in the following on the 'advanced' tab

    Step 7.

    Back on the 'internet e-mail settings' page, click next to save the changes

    Back on the 'internet e-mail settings' page, click next to save the changes
    Back on the 'internet e-mail settings' page, click next to save the changes


  • How to Add Users to your Google Analytics Account

    If you want someone else to be able to view or use your Analytics account then you should carry out the steps below:

    1. Log in to your analytics account at google.com/analytics

    2. Go to your account dashboard or the dashboard for the domain you want to share access to

    3. Click on “Admin” at the top right of the screen (see below)


    4. On the next screen, click on “Users” (see below)


    5. On the next screen, click on “+New User” (see below)


    6. Insert an email address (or choose from one you have used previously) and assign them as either a user or administrator, then press “Create User” (see below).


    TA DAH!!

    The added user can now use view your analytics reports