Category: News

  • How to change your IP address using the Opera VPN

    If your IP address becomes blocked by server spam services and you’re no longer able to access some websites, you can temporarily change your IP using the Opera VPN. Your IP address is a series of numbers which are assigned to your internet connection and can be used to block access from certain computers. However, if you get blocked by accident, while the error is being fixed, you can usually use the following technique to circumvent the block.

    1. Download and install the Opera Browser here: https://www.opera.com/download
    2. Start the Opera browser and open an incognito browser window. The keyboard shortcut to do this is CTRL+SHIFT+N or click the ‘O’ in the top-left corner then select ‘New private window’
    3. In the new private window click the VPN option in the address bar at the top to the left of the magnifying glass icon
    4. You can now re-try accessing the website you had trouble accessing before

    Please note that Google may block VPN access using a CAPTCHA but the other search engines should still work such as Bing.com or DuckDuckGo.com

    https://vimeo.com/585366558/ba385603b4
  • Unable to send email to Hotmail or Outlook addresses – how to remove yourself from the Hotmail block-list

    Unable to send email to Hotmail or Outlook addresses – how to remove yourself from the Hotmail block-list

    If you find yourself suddenly unable to send email to Hotmail or Outlook.com email addresses from your website or work email address, you may have ended up on the Hotmail or Microsoft spam block-list. This can happen through no fault of your own as spammers will disguise the email they send as coming from someone else’s domain name (spoofing). Nevertheless, you’re the one who ends up paying the consequences. By the time the spammer has moved on to their next next victim, you find yourself unable to send emails to addresses you may have emailed a dozen times before with no problem – so what now? Follow this quick guide to submit a Microsoft block-list removal request and unblock your email from the Hotmail servers.

    Step 1 – find the error message in the bounced email

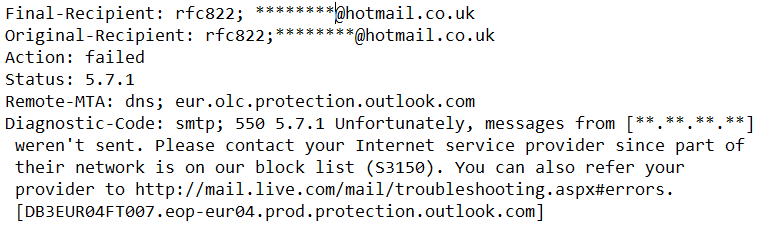
    The following is an example of the error message from an email bounced back from Hotmail. The sender’s domain is perfectly reputable – is many years old and has never sent spam – but they found themselves on the Microsoft email block list:

    host eur.olc.protection.outlook.com[104.47.12.33]
        said: 550 5.7.1 Unfortunately, messages from [**.**.**.**] weren't sent.
        Please contact your Internet service provider since part of their network
        is on our block list (S3150). You can also refer your provider to
        http://mail.live.com/mail/troubleshooting.aspx#errors.
        [DB3EUR04FT007.eop-eur04.prod.protection.outlook.com] (in reply to MAIL
        FROM command)
    

    Step 2 – fill in the Microsoft email blacklist removal request form

    Click the following button to open the Microsoft email blacklist removal form (will open in a new tab):

    Step 3- fill in the required fields

    The email blacklist removal form will ask you for several different things. Most are intuitive, others not so. Here are a few pointers:

    • Issue title – you could write something along the lines of ’email block list removal request’
    • Contact name, contact email address, time-zone, how you describe yourself – your details in these fields
    • which domain are you sending to? – This is the domain name part of the email your trying to send to e.g. Hotmail.com or Outlook.com
    • Domain your sending from & URL of your website – this is the domain name part of the email address that is blocked e.g. if your email address is yourname@yourdomain.com, in this field write yourdomain.com
    • Outbound IP range – here you just need the IP address you can find in the bounced email error message. It is a group of 4 numbers separated by full-stops. In the error message you see above I have changed the IP address to ‘**.**.**.**’ but your IP would look something like 23.122.54.233. Just one IP in this box is enough (you won’t normally need to input a whole IP range)
    • Server dedicated or shared? – if you don’t know, just put ‘shared’
    • Paste error message – copy and paste in the error message from your email which will look similar to the example above

    Step 4 – submit the form and wait

    You may get an email acknowledgement. In any case, it may take a couple of days to remove you from the block list

    For reference – the Hotmail blocklist error codes

    SMTP Error CodeExplanation
    421 RP-001The mail server IP connecting to Outlook.com server has exceeded the rate limit allowed. Reason for rate limitation is related to IP/domain reputation. If you are not an email/network admin please contact your Email/Internet Service Provider for help.
    421 RP-002The mail server IP connecting to Outlook.com server has exceeded the rate limit allowed on this connection. Reason for rate limitation is related to IP/domain reputation. If you are not an email/network admin please contact your Email/Internet Service Provider for help.
    421 RP-003The mail server IP connecting to Outlook.com server has exceeded the connection limit allowed. Reason for limitation is related to IP/domain reputation. If you are not an email/network admin please contact your Email/Internet Service Provider for help.
    550 SC-001Mail rejected by Outlook.com for policy reasons. Reasons for rejection may be related to content with spam-like characteristics or IP/domain reputation. If you are not an email/network admin please contact your Email/Internet Service Provider for help.
    550 SC-002Mail rejected by Outlook.com for policy reasons. The mail server IP connecting to Outlook.com has exhibited namespace mining behavior. If you are not an email/network admin please contact your Email/Internet Service Provider for help.
    550 SC-003Mail rejected by Outlook.com for policy reasons. Your IP address appears to be an open proxy/relay. If you are not an email/network admin please contact your Email/Internet Service Provider for help.
    550 SC-004Mail rejected by Outlook.com for policy reasons. A block has been placed against your IP address because we have received complaints concerning mail coming from that IP address. We recommend enrolling in our Junk Email Reporting Program (JMRP), a free program intended to help senders remove unwanted recipients from their email list. If you are not an email/network admin please contact your Email/Internet Service Provider for help.
    550 DY-001Mail rejected by Outlook.com for policy reasons. We generally do not accept email from dynamic IP’s as they are not typically used to deliver unauthenticated SMTP email to an Internet mail server. If you are not an email/network admin please contact your Email/Internet Service Provider for help. http://www.spamhaus.org maintains lists of dynamic and residential IP addresses.
    550 DY-002Mail rejected by Outlook.com for policy reasons. The likely cause is a compromised or virus infected server/personal computer. If you are not an email/network admin please contact your Email/Internet Service Provider for help.
    550 OU-001Mail rejected by Outlook.com for policy reasons. If you are not an email/network admin please contact your Email/Internet Service Provider for help. For more information about this block and to request removal please go to: http://www.spamhaus.org.
    550 OU-002Mail rejected by Outlook.com for policy reasons. Reasons for rejection may be related to content with spam-like characteristics or IP/domain reputation. If you are not an email/network admin please contact your Email/Internet Service Provider for help.
  • Protected: Email settings – POP, IMAP & ports

    This content is password-protected. To view it, please enter the password below.

  • How to add or remove Facebook Page administrators – edit page roles

    How to add or remove Facebook Page administrators – edit page roles

    This relates to the new Facebook Page layout (November 2020) and has to be done by a current Facebook Page administrator

    1. Log into Facebook and view the business page homepage
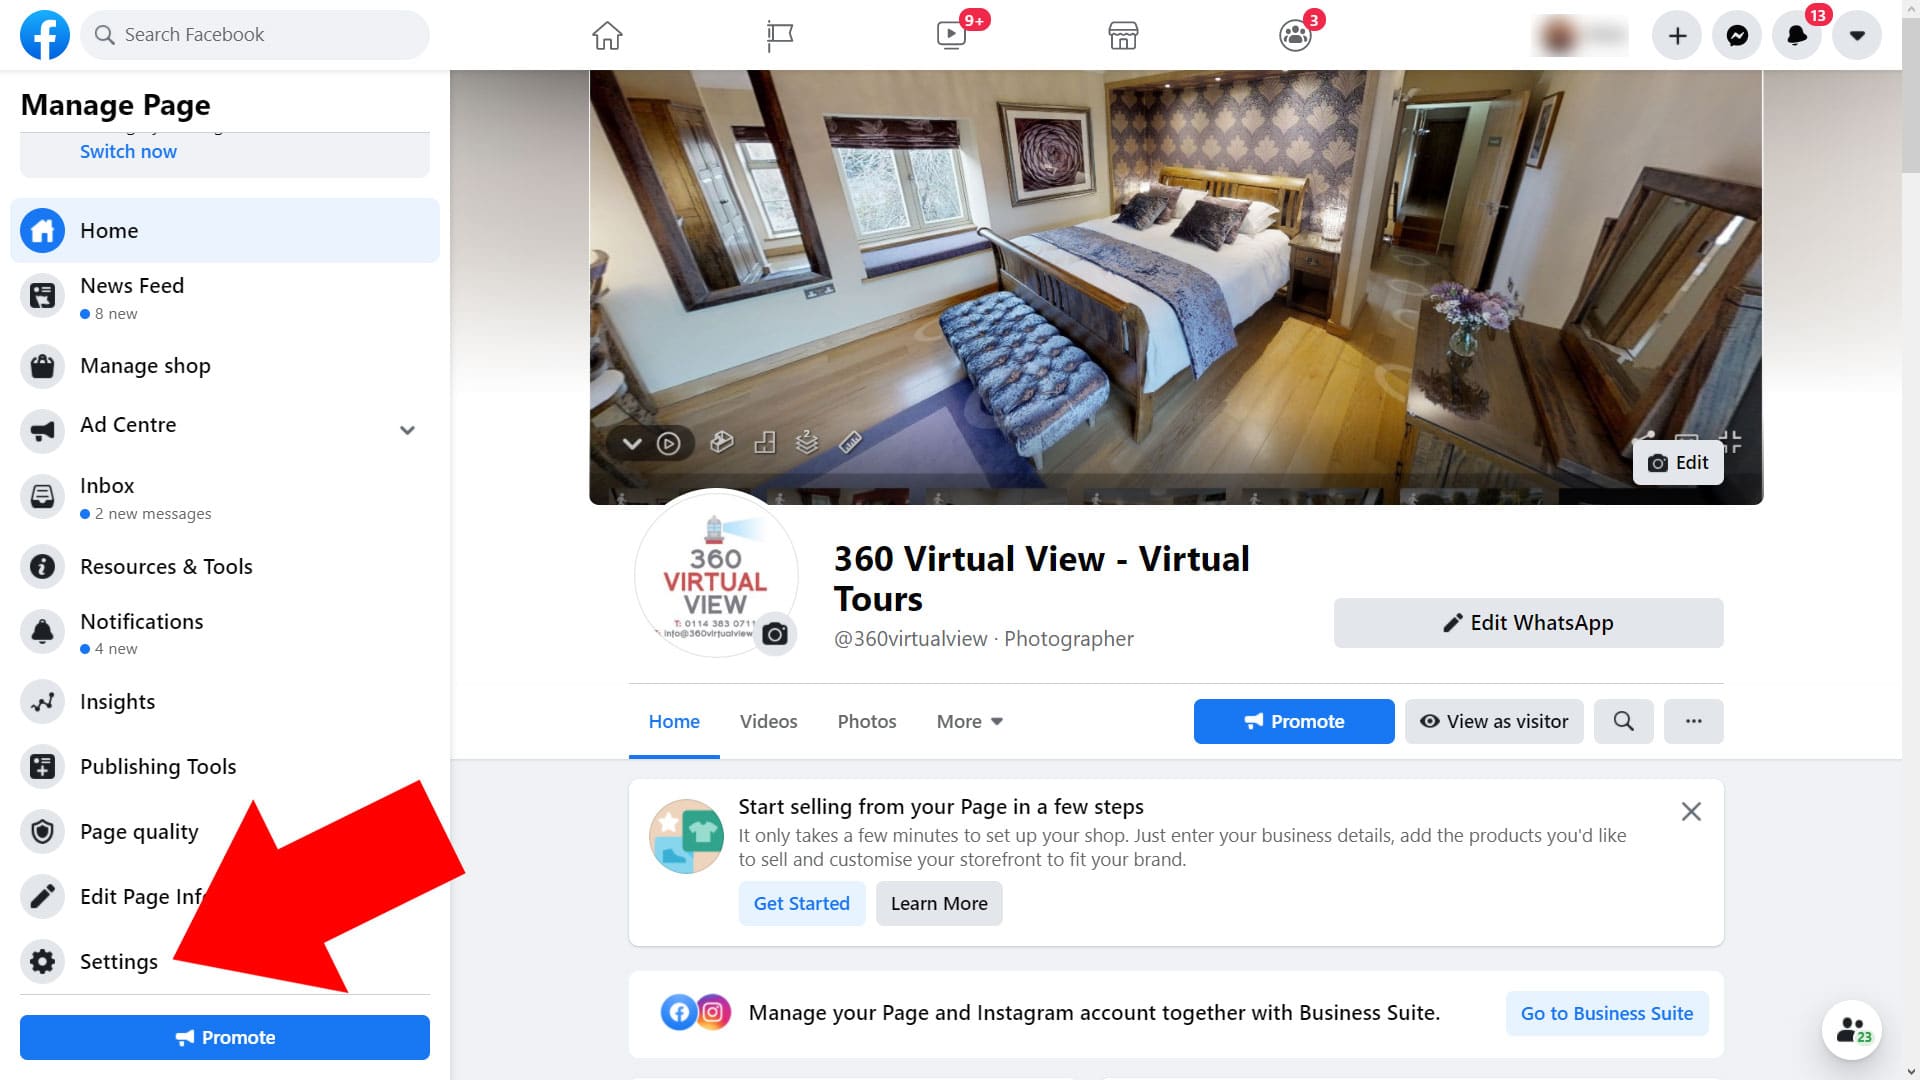
    2. From the ‘manage page’ options in the left column, select ‘settings’
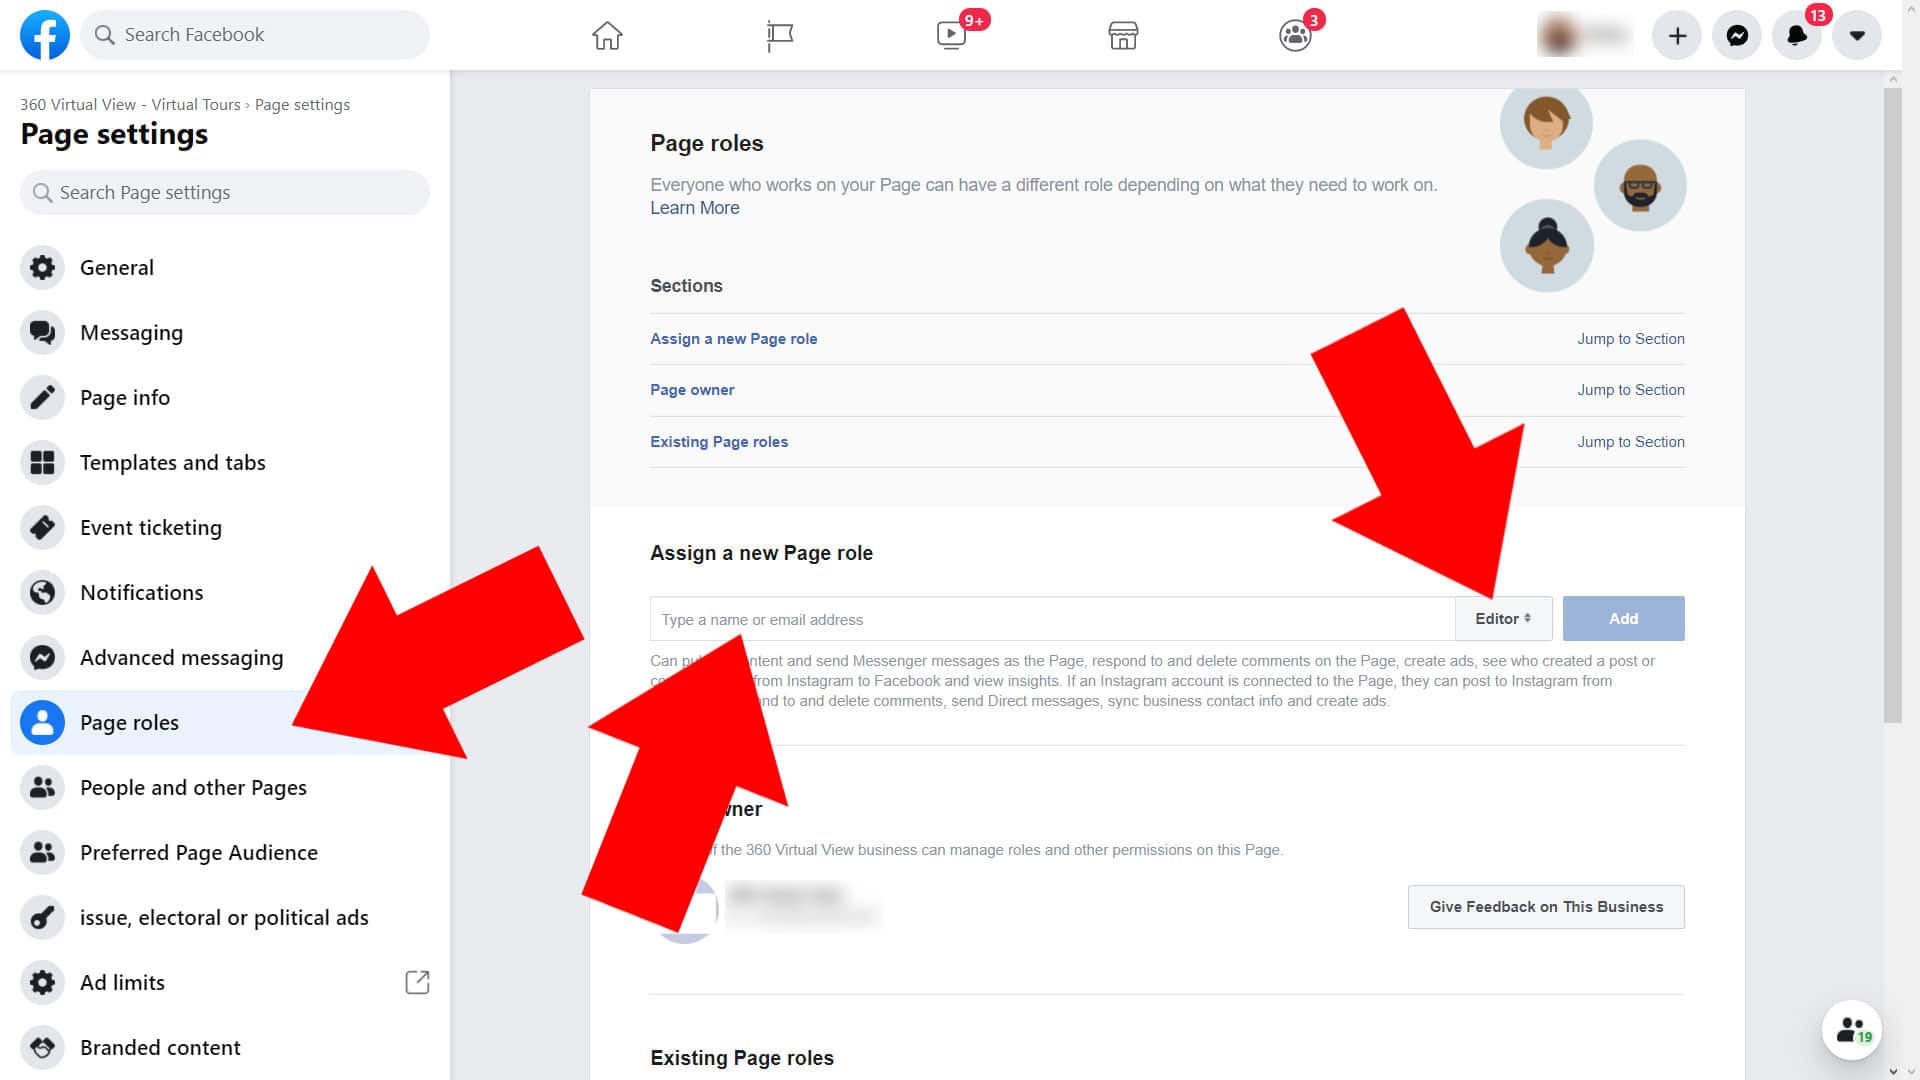
    3. From ‘settings’ go to ‘page roles’. Here you can assign a new page editor, moderator, administrator, etc. A page administrator can also remove current page administrators too
    4. Adding a new page role also requires that whoever you’ve added has a Facebook account and also accepts the invitation (it will appear in their notifications.

    Please note that if you give someone administrator rights for your page they will have the same rights as you including the ability to remove you as an administrator

  • Protected: Setting up Seven Creative email on Android

    This content is password-protected. To view it, please enter the password below.

  • Search Engine Optimisation (SEO) – what is a sitemap?

    Search Engine Optimisation (SEO) – what is a sitemap?

    If you’ve ever looked into search engine optimisation (aka SEO) in any detail you’ll probably have come across what’s known as a ‘sitemap’. And if you are new to SEO, you’ll also probably be asking yourself ‘what is a sitemap’? A sitemap, in its simplest form, is a file (or files) that provide information about files and pages on your website. It normally site with your other files but it used by search engines to more easily & quickly discover the content on your site. It’s normally simply called something along the lines of ‘sitemap’ and will also normally have an ‘.XML’ extension – e.g. ‘sitemap.xml’. Sitemaps are read by search engines and this information is used to get a clearer picture of things like which pages & files there are on a website; and what type of pages & files theses are (for example, contact pages, downloads, or blog posts)

    A sitemap is designed to help your site communicate with Google and the other search engines by providing detailed information about your sites pages and contents

    What is a sitemap and why does my website need one?

    Your main website navigation is how your website visitors find their way around your website, however, these links may not always provide the whole picture to visitors. For example, there may be pages that aren’t particularly relevant to a visitor so they may not be shown these. However, the website owner may actually want all the website pages to appear in Google (as this is an important source of website traffic for many sites) so a sitemap is a fast way of letting the search engine know things such as the following:

    • Which pages & files exist on a website
    • When each page was last updated
    • How often the page is updated
    • Alternate language versions of the individual page
    • For video, how long the video is, what is the appropriate age rating, what is the video category
    • For images, what is the image of, what type of image it is, and what is the image licence

    Having a sitemaps is particularly important for:

    • Sites that contain pages or areas that are not available through the site navigation
    • Sites that use technologies such as Ajax, Silverlight, or Flash which can’t be ready easily by search engines
    • Sites that are very large meaning web crawlers may miss some of the new or recently updated content
    • Sites that have a lot of pages that are isolated or not well linked together
    • Sites that have few external links for example, new websites)

    What does a sitemap look like?

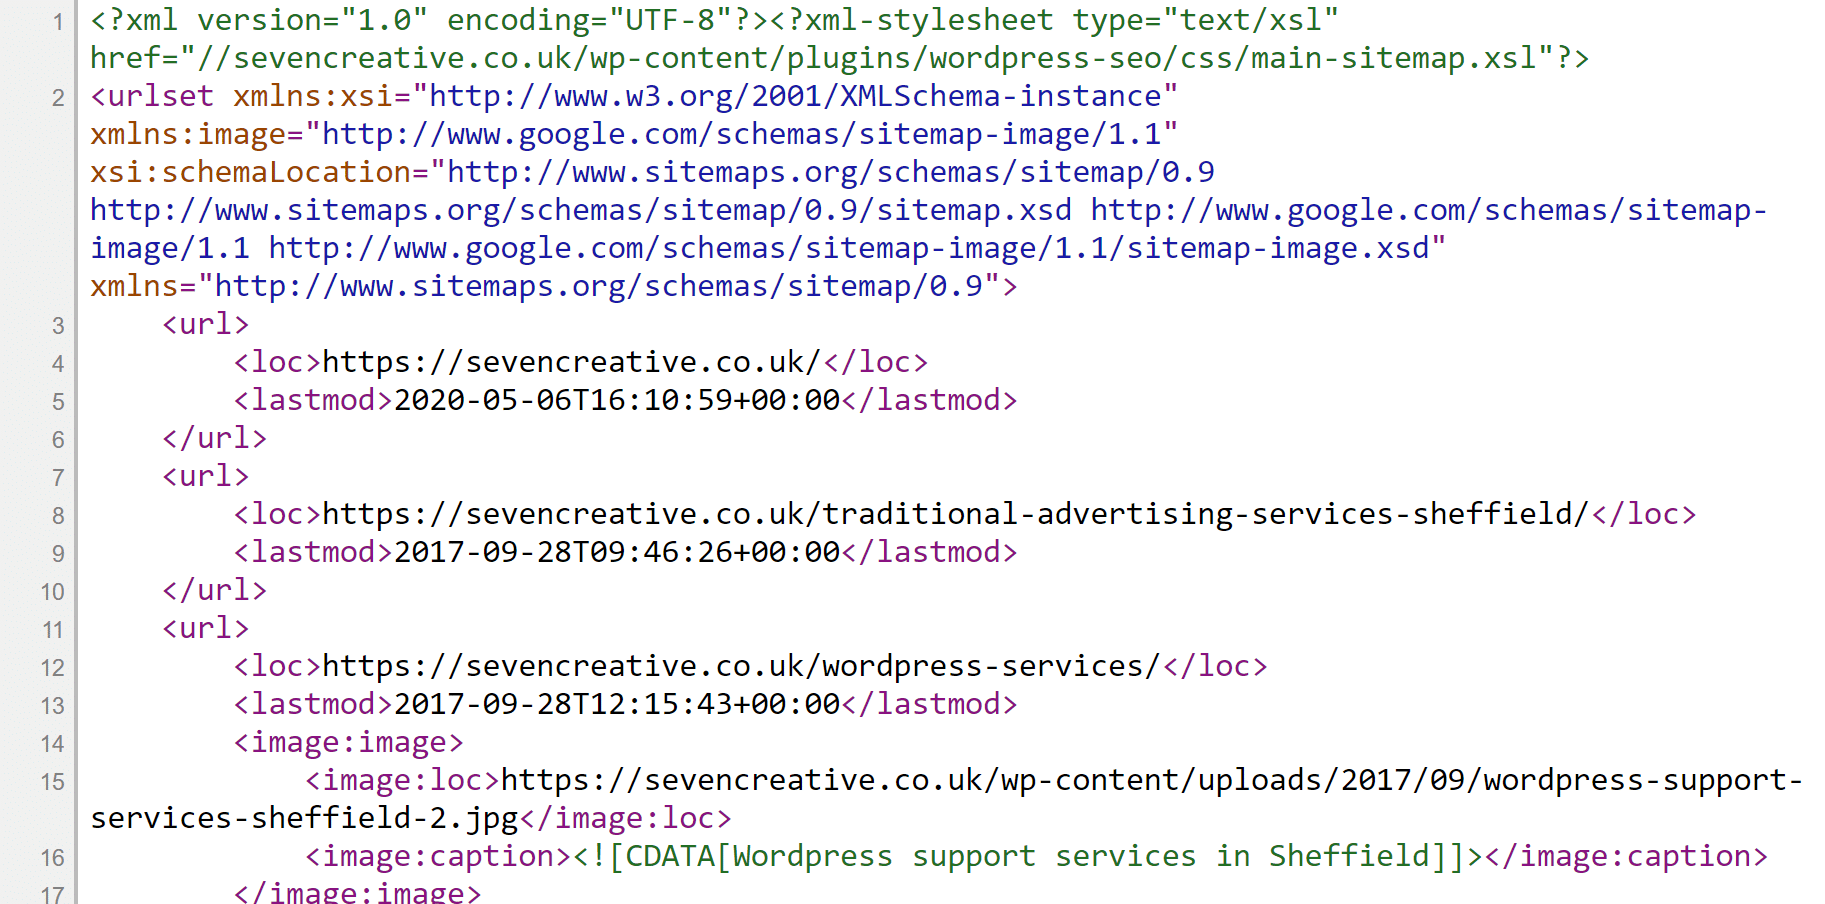
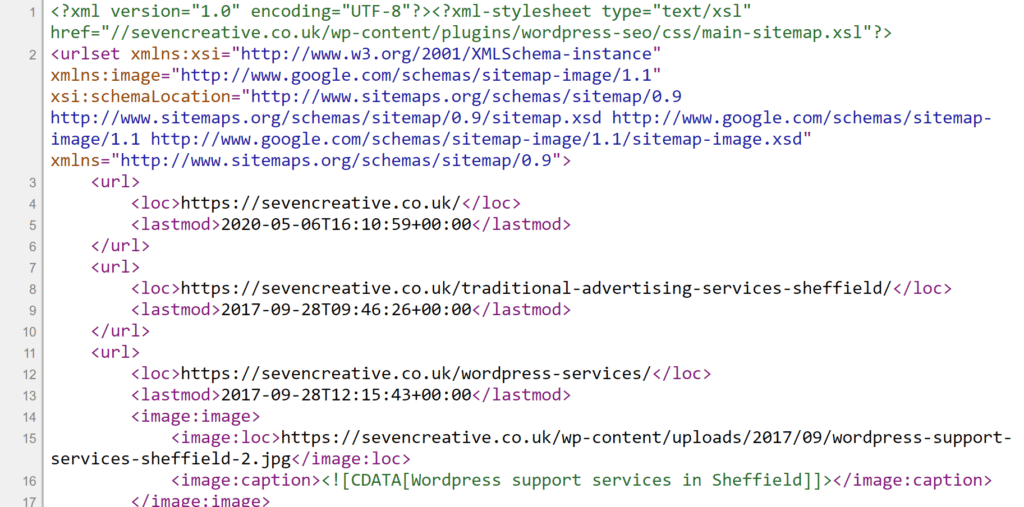
    Sitemaps for newer websites are often dynamically generated so change when new content is added. They use the XML mark-up which is like HTML but don’t have any styling information attached. Looking at the raw file may be confusing, but an XML viewer will show you the file in a more user-friendly format. Some internet browsers have an in-built XML viewer. Here is are the sitemaps for this website:

    Here is another example of a simpler sitemap:

    This particular site is quite big which hundreds of blog posts, articles, images and pages so the sitemap structure is quite big

    Website sitemaps are a very established part of a website structure (having been introduced in 2005) and continue to be important for search engine optimisation purposes. If you want your site to index properly within search engines, then making sure your sitemap is up-to-date and working correctly a very important part of your activity

    Is my website’s sitemap up-to-date?

    There are several ways to find out if your sitemap is up-to-date – some fast and some a bit more fiddly and slow. Some sites may not even have a sitemap which may be a problem from an SEO perspective. The best way to find out for certain is by asking an SEO expert to have a look.

    If you’re looking for an SEO expert or an SEO company in Sheffield for help with your website and its search engine optimisation (SEO), please give us a call on 0114 383 0711 or visit our contact section

  • Microsoft Exchange hacked? What now?

    Microsoft Exchange hacked? What now?

    If your Microsoft Exchange account has been hacked, you’re probably panicking and wondering what to do now. Here is a list of steps to take. It’s not exhaustive but should get you at least back up and running with a secure account.

    Why was your account hacked?

    Hackers want people’s usernames and passwords which may then allow them to access their online accounts. They’ll often do this using a technique known as ‘phishing’ – they’ll send an email purporting to come from a legitimate source but linking to fraudulent websites that are designed to steal personal data or information such as credit card numbers, passwords, account data, or other information.

    They hack your account to send their phishing links to your contacts as they know an email sent from a known contact is much more likely to be trusted by the recipient, and an email from a previous contact is much more likely to get through a spam filter. In other words, they want your contacts username and passwords and will pretend to be you to get them.

    Start by changing your password

    If you can still log into your account, change your password. If you can’t, can you do a password reset? If this isn’t setup, does your Exchange administrator have access to do this for you? If not, contact Microsoft Exchange support directly as soon as possible to secure your account

    Check your Mail Flow rules

    A hacker wants your account to remain accessible to them for as long as possible so it’s not always very likely that they’ll change your password themselves – you’ll know something’s wrong straight away if this happens. Rather they’ll make sure that any reply emails sent to you by confused contacts won’t arrive in your inbox meaning you’ll not see them. The only other place you’re likely to check if you stop receiving emails is your junk folder but it’s more likely that the hacker will have created a rule to instead send all received emails straight to your deleted folder. Therefore, check your mail flow rules to make sure emails aren’t being redirected somewhere else.

    Check your sent items

    I don’t necessarily mean your ‘sent items folder’ (although a look here too won’t go amiss). Rather check which emails have been sent using the ‘message trace’ search function in the ‘mail flow’ section of the Exchange admin. This will show you which emails were sent from your account and to whom they were sent. When you’re back up and running, you may decide to send an email to anyone who received an email from your account sent by the hacker – this is where you’ll find out who that was.

    Check your auto-responders

    Does everything here look how it should be and how you left it?

    Check your RSS feeds

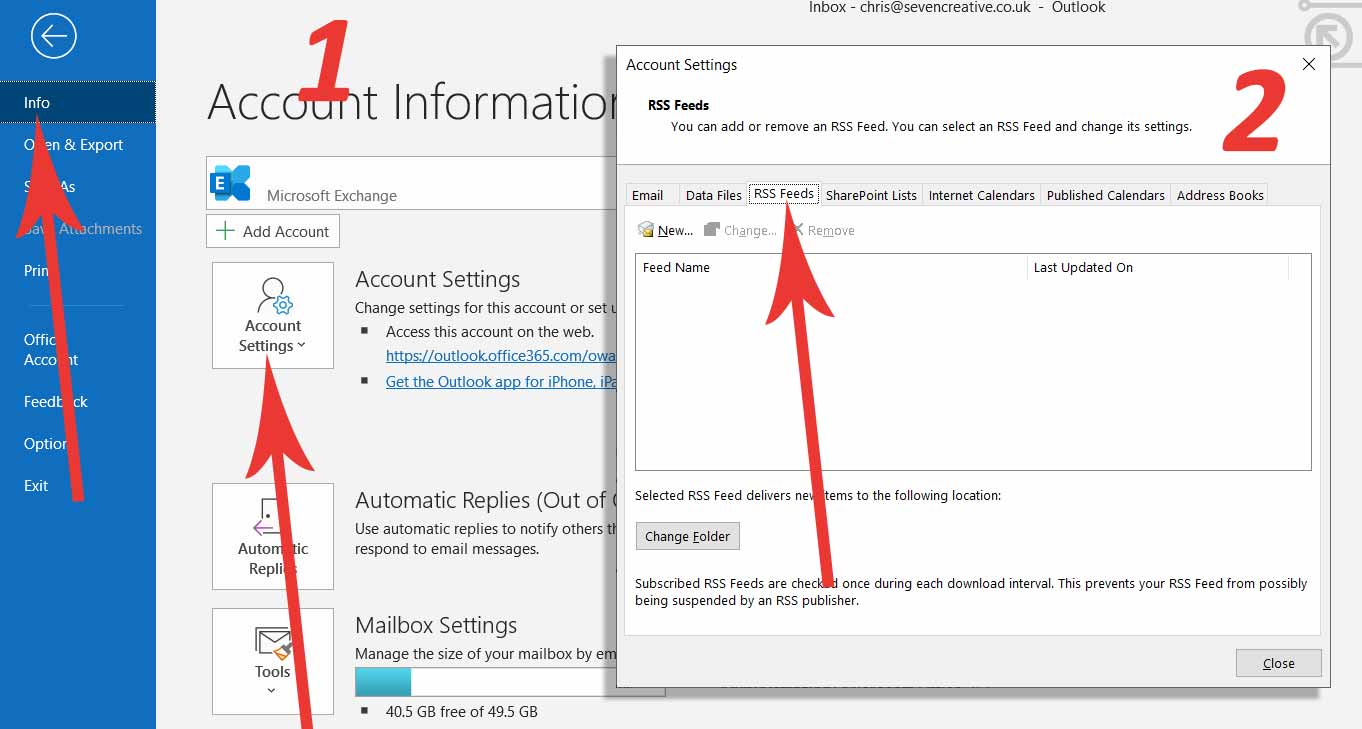
    One of the ways hackers will access important emails is by creating an RSS feed. To check this from Outlook, go to the file option (top-left), select ‘account settings’, then select the RSS tab in the following window.

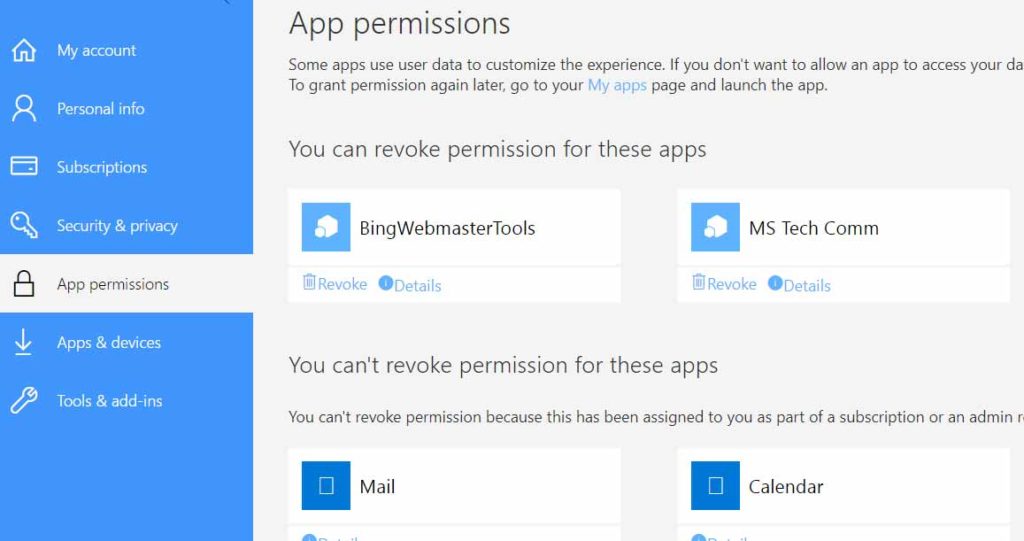
    Check app permissions via your online account

    Anything else?

    Once you’re back up and running and your Microsoft Exchange is secure, consider enabling 2-factor-authentication and of course it’s a good idea to make sure you’ve got good quality anti-virus software running.

  • A definitions for common online advertising & SEO jargon

    If you work in the field of web design and search engine optimisation, you simply can’t avoid a whole host of acronyms, abbreviations, and general jargon. However, I’m also conscious that what is familiar and perfectly clear to me, is not necessarily also that clear to everyone else. Therefore, this quick post simply defines some of the most common jargon you may come across whilst discussing or reading about PPC advertising, SEO, web design, or marketing.  

    EMD – exact match domain. These are domains that exactly match the keyword phrase they are targeting, for example, the domain sheffield-electrician.co.uk is targeting the search engine term ‘Sheffield Electrician’

    CTR – click through rate. This measurement is usually described and used to measure the interaction between the audience and the required action (the ‘click’). The click-through-rate is most commonly used when evaluating the effectiveness of a PPC campaign, for example, a sponsored Google PPC advert may receive 1000 impressions in a day but have only a 5% click-through-rate. The number of people who see the ‘link’ divided by the number of people who actually click on that link give you the click through rate.

    CRO – Conversion Rate Optimisation. This practice refers to changes made to a website or advert to attempt to positively influence the site visitors behaviour in terms of the site goals e.g. to make an enquiry, or to sign up to a newsletter.

    PPC – Pay Per Click. This refers to a type of advertising where the advertiser only pays an agreed amount when their link (usually on an advert) is clicked.  Google ads are generally paid for on a PPC basis these days.

    PPI – Pay Per Impression. This refers to a type of advertising where the advertiser pays an agreed amount based on their advert appearing a pre-agreed  number of times, for example, Facebook adverts are often sold on a PPI basis, for example, you pay per 1000 impressions. This form advertising does not rely on interaction (for example, people clicking on the advert link), the advert merely has to appear on a page in front of someone.

    SMM – Social Media Management. This refers to the activity of managing the social media activity by or on behalf of an individual or organisation

    SMO – Social Media Optimisation. This refers to optimising the  social media activity, usually in relation to supporting the main business activities.

    SERP or SERPs – Search Engine Results Page(s). This refers to the results returned by the search engine according to your search query. For example, a search on Google for a word or phrase will return a SERP  – i.e. a results page with links to websites relevant to the

    SEO – Search Engine Optimisation. This is the practice of both making changes to a website to allow it to be indexed properly by the search engines according to its purpose and for increasing the traffic visiting a website.

    SEM – Search Engine Marketing. The process of gaining traffic to your website and increasing online visibility

    Have I missed anything from this list?

    If I’ve missed anything from this list, let me know through the contact form or by email 

  • How to get Contact Form 7 check-boxes and buttons on new lines

    How to get Contact Form 7 check-boxes and buttons on new lines

    If you’re using Contact Form 7 on your WordPress site for the contact form, you may have come across an annoying little problem when you add checkboxes or radio buttons and they all appear one after another on one line. Unfortunately there isn’t currently an easy or quick fix for this as the best solution I’ve found is to add a line of CSS within the site. Before you start editing your theme files directly, look for an option in your WordPress installation that allows you to add ‘additional CSS’.

    Most importantly, before you start, make sure you have a full backup of your site. Seven Creative website hosting customers get in touch as you should have our ongoing 6-hourly, 7-day rolling backups to keep your site secure and protected.

    Using the ‘additional CSS’ option

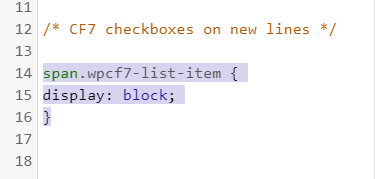
    If you have the option to add additional CSS to your theme, add the following and update:

    span.wpcf7-list-item {
    display: block;
    }

    Update your sites CSS directly

    I wouldn’t recommend updating the CSS within the Contact Form 7 plugin directly as it may be overwritten the next time the plugin updates. This also applies to your website parent theme. If you’re using a child theme, you can update the CSS in the theme file, normally found here:

    > wp-content > themes > *your child theme* > styles.css

    And add the following:

    span.wpcf7-list-item {
    display: block;
    }

    Include the CSS in the header of the site

    You can also add the CSS code directly into the header of the site – one way is by using a simple plugin like ‘Insert headers and Footers‘ by WPBeginner. Add the following:

    <style type="text/css">
    span.wpcf7-list-item {
    display: block;
    }
    </style>

    Need help?

    We provide the full range of WordPress website support and WordPress website development services. Get in touch for more information on 0114 383 0711 or visit our contact section of the site

  • How to increase WordPress maximum upload size

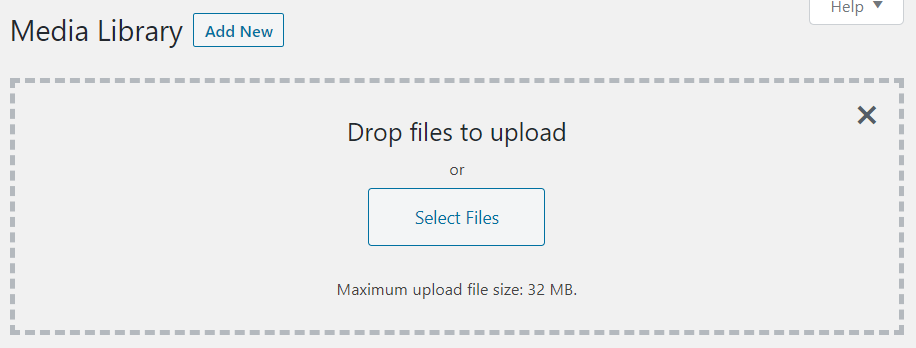
    As default, many WorePress installations have a limit of 32MB maximum file upload limit for uploading via the media manager. To see what your maximum upload file size is, log into your WordPress site, go to your media library, and click ‘add new’. Often you’ll see ‘Maximum upload file size: 32 MB’ or similar depending on your defaults.

    Increasing the ‘maximum upload file size’ for your media library isn’t always straight forward or easy but here in this post there are some options to try.

    Please note that if your site is hosted on a shared host then the global server settings may be the only way to increase limits. If this is the case you need to contact your web hosting provider. Need a new hosting provider? Call us on 0114 383 0711

    Before you start, please note this tutorial is designed for people who are already very proficient at editing important server files and updating server settings. Please remember to backup everything before you start as mistakes can cause the loss of your site. Get expert help if in doubt.

    Edit your theme functions file

    Occasionally you’re able to change the maximum upload size by simply adding a few lines of code to your WordPress functions.php file:

    @ini_set( ‘upload_max_size’ , ’64M’ );
    @ini_set( ‘post_max_size’, ’64M’);
    @ini_set( ‘max_execution_time’, ‘300’ );

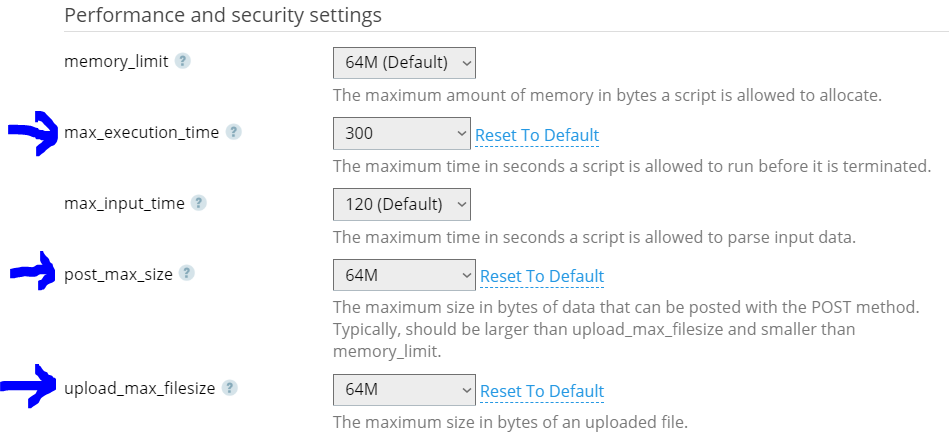
    Edit your server PHP settings

    If your functions file hasn’t fixed things, you can try changing your PHP settings directly on the server:

    Edit your PHP.INI file

    If you’re able to access your PHP.INI file (located in your WordPress site’s root folder) you can add the following. If you’re on a shared host, thought, it’s unlikely you’ll be able to access this so instead create a file called PHP.INI, add the following, and upload it to the site root:

    upload_max_filesize = 64M
    post_max_size = 64M
    max_execution_time = 300

    Edit your site’s .HTACCESS file

    If you’re familiar with the HTACCESS file you can try adding the following which works for some WordPress installations. Add the following:

    php_value upload_max_filesize 64M
    php_value post_max_size 64M
    php_value max_execution_time 300
    php_value max_input_time 300

    You may need to enable server side filtering to view this file by FTP

    Still not working?

    Give us a call on 0114 383 0711 and we’ll see if we can help you