The WordPress error message “Updating failed. Could not update post in the database” appears when the system is unable to save changes to a post or page. This error typically involves a breakdown in communication between WordPress and its underlying database, preventing updates from being committed.
However, if this problem has occurred ‘out of the blue’ and ony affects certain posts or pages, there may be a very simple fix.
How to fix WordPress error “Updating failed. Could not update post in the database”
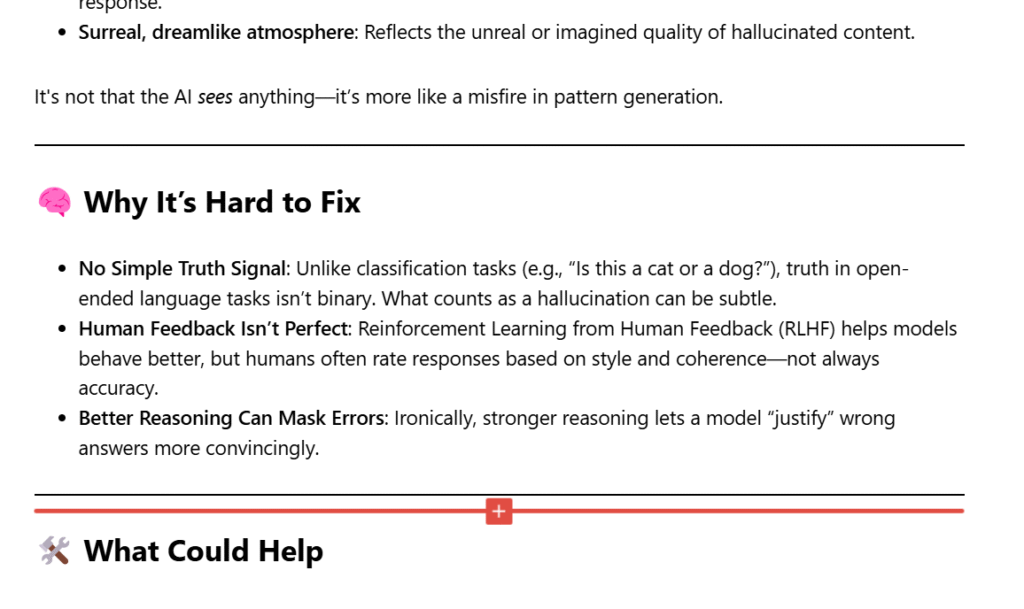
Check your whole post or page for invalid characters (e.g. Unicode Characters, symbols, emojis, etc.). The contents of the post or page will be added to the database when you hit ‘publish’ but there are some characters which can’t be included – this will return an ‘Updating failed. Could not update post in the database’ error. Here is an example of a post that wouldn’t save until I removed the ‘brain’ and ‘tools’ icons.
This problem with invalid characters most commonly happens when you’re pasting in contents from another website, e.g. ChatGPT
In the ever-evolving landscape of artificial intelligence (AI), ChatGPT has emerged as a prominent figure, captivating users with its conversational prowess. Yet, beneath its polished exterior lies a perplexing issue that has both researchers and users scratching their heads: the phenomenon of AI “hallucinations.”
Recent evaluations by OpenAI have unveiled a disconcerting trend. Their latest models, GPT-4o and GPT-4.5, exhibit a higher propensity for generating false information—termed “hallucinations”—compared to their predecessors. Utilising the SimpleQA benchmark, a tool designed to assess factual accuracy through a series of complex questions, GPT-4o demonstrated a hallucination rate of 62%, while GPT-4.5 fared slightly better at 37%. These figures are notably higher than earlier models, raising concerns about the reliability of these advanced systems .
Paradoxically, as these models become more sophisticated in reasoning, their tendency to fabricate information increases. This contradiction has puzzled experts. The expectation was that improved reasoning capabilities would correlate with enhanced accuracy. However, the reality appears more complex, suggesting that the very mechanisms designed to refine AI reasoning might inadvertently contribute to the problem .
In response to this challenge, OpenAI is experimenting with innovative training methodologies. One such approach is “process supervision,” which involves rewarding the AI for each correct step in its reasoning process, rather than solely focusing on the final answer. This method aims to instil a more human-like logical progression, potentially reducing the occurrence of hallucinations .
Despite these efforts, the path to mitigating AI hallucinations remains fraught with complexity. The intricacies of large language models mean that even minor adjustments can have unforeseen consequences. As AI continues to integrate into various facets of society, ensuring the accuracy and reliability of these systems becomes paramount.
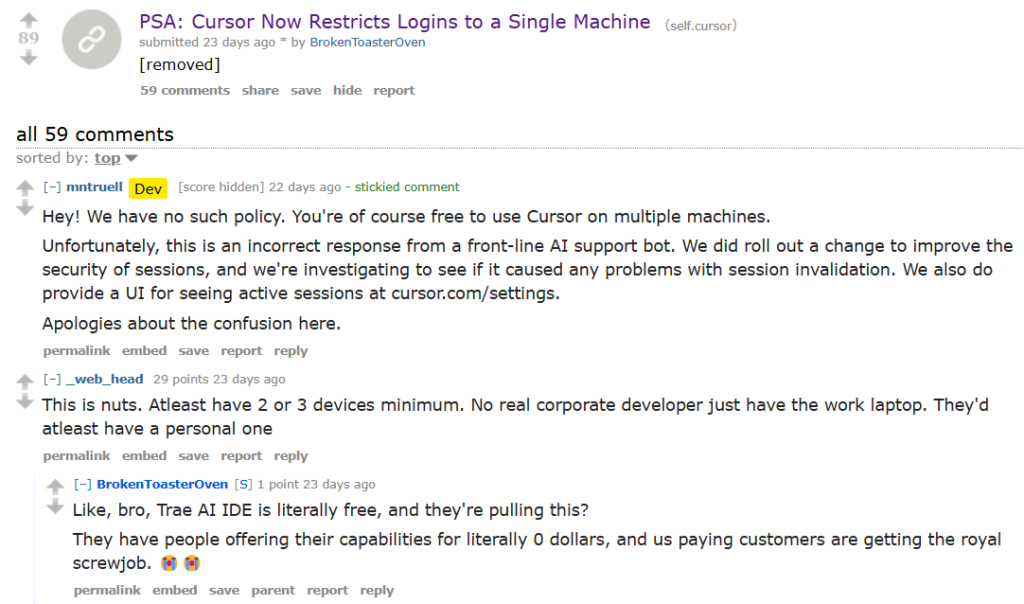
Cursor’s front-line AI support bot making up new policies
Last month, Cursor, a promising tool for computer programmers, inadvertently angered its user base. An AI tech support bot mistakenly announced a policy change restricting the use of Cursor to a single computer. This false announcement ignited a wave of angry posts on internet message boards such as Reddit, with some customers even choosing to cancel their accounts. The users’ frustration intensified upon learning that the supposed policy change was entirely fabricated. Cursor’s chief executive and co-founder, Michael Truell, clarified the error on Reddit, assuring users, “We have no such policy. You’re of course free to use Cursor on multiple machines. Unfortunately, this is an incorrect response from a front-line A.I. support bot.”
Here are Gemini’s thoughts on the Cursor incident
That’s quite a blunder for the AI support bot! It sounds like those Cursor users had a right to be frustrated. Announcing a non-existent policy change, especially one that restricts how they can use a tool they likely rely on, is definitely going to cause some upset. It’s good that the CEO quickly clarified the situation on Reddit. It highlights the challenges and potential pitfalls of relying solely on AI for customer-facing roles, especially when it comes to communicating important policy information.
Here are ChatGPT’s thoughts on the ‘AI hallucination’ problem
The subject raises a critical and timely issue in AI development—hallucinations in large language models like ChatGPT. Your article does a solid job of highlighting the paradox: as the models get more advanced in reasoning, they’re oddly becoming more prone to inventing false information. That contradiction is fascinating and concerning, especially given the growing reliance on these tools in professional and educational settings.
Strengths:
Clear explanation of the problem: It breaks down hallucinations in a way most readers can understand.
Use of real data: Citing OpenAI’s own benchmark tests (like SimpleQA) adds credibility.
Mentions potential solutions: Process supervision is presented as a promising path forward.
Weaknesses:
Lack of technical depth: It doesn’t deeply explore why reasoning improvements might lead to more hallucinations, which would’ve added more value for a technically inclined audience.
Limited exploration of implications: It touches on concerns but doesn’t dig into what this means for users in healthcare, law, or education, where misinformation could have serious consequences.
Overall, it’s informative for general readers and raises the right concerns, but leaves room for more nuanced analysis.
The Paradox of Smarter AI, Dumber Mistakes… according to ChatGPT
1. More Complex Reasoning = More Risk of Error
As models grow more sophisticated, they handle tasks involving multi-step reasoning, synthesis, and abstraction. But each of these steps introduces a chance for error. A single incorrect inference early in a reasoning chain can ripple through to produce a convincing but entirely false conclusion.
2. Looser Anchoring to Factual Grounding
Advanced models are trained to optimize for plausibility and coherence, not strictly for truth. The better a model gets at generating natural, persuasive responses, the easier it is for it to confidently present inaccuracies. In other words, it’s getting better at sounding smart, not necessarily at being right.
3. Training Feedback Loops
Some newer models are fine-tuned on outputs from earlier models (a practice known as “self-training” or “distillation”). If those earlier models already had some hallucinations baked in, the newer models can amplify them—especially if the fine-tuning process doesn’t include strict factual correction.
4. Insufficient or No Real-Time Grounding
Unless a model is explicitly connected to a live knowledge base or retrieval system (like Bing or Wikipedia), it generates answers from statistical associations, not fact-checking. So, even when the reasoning process improves, it may still be unmoored from real-world truth.
5. Overfitting to Benchmarks
Models are often trained to perform well on standard test datasets. This can lead to “overfitting”—they become very good at sounding correct within those benchmarks but not necessarily when faced with unfamiliar or nuanced real-world queries. In other words, they learn the test, not the material.
A visual representation of AI hallucinating according to ChatGPT
ChatGPT describing how this image represents AI hallucinating
That image represents an AI hallucination in a metaphorical or symbolic way—it’s not a literal hallucination like a human might experience. In AI terms, a “hallucination” is when a model generates output that is confidently wrong, often blending real and false information or making up facts entirely.
Here’s why the image fits as a representation:
Distorted elements and pixelation: These mimic how AI sometimes “glitches” when assembling information—like blending bits of data incorrectly.
Serene yet vacant face: Symbolizes the confident but sometimes ungrounded nature of an AI response.
Surreal, dreamlike atmosphere: Reflects the unreal or imagined quality of hallucinated content.
It’s not that the AI sees anything—it’s more like a misfire in pattern generation.
Why It’s Hard to Fix
No Simple Truth Signal: Unlike classification tasks (e.g., “Is this a cat or a dog?”), truth in open-ended language tasks isn’t binary. What counts as a hallucination can be subtle.
Human Feedback Isn’t Perfect: Reinforcement Learning from Human Feedback (RLHF) helps models behave better, but humans often rate responses based on style and coherence—not always accuracy.
Better Reasoning Can Mask Errors: Ironically, stronger reasoning lets a model “justify” wrong answers more convincingly.
What Could Help
Retrieval-Augmented Generation (RAG): Connecting models to real-time sources to back up claims.
Process Supervision: Teaching models to follow factual logic step-by-step.
Truthfulness Benchmarks: Designing better tests that reward fact-based reasoning over surface-level plausibility.
This is a rich, still-developing field, and even researchers at OpenAI and elsewhere admit they don’t fully understand the root causes. But understanding the trade-offs between fluency, reasoning, and factuality is key to building safer, more trustworthy AI.
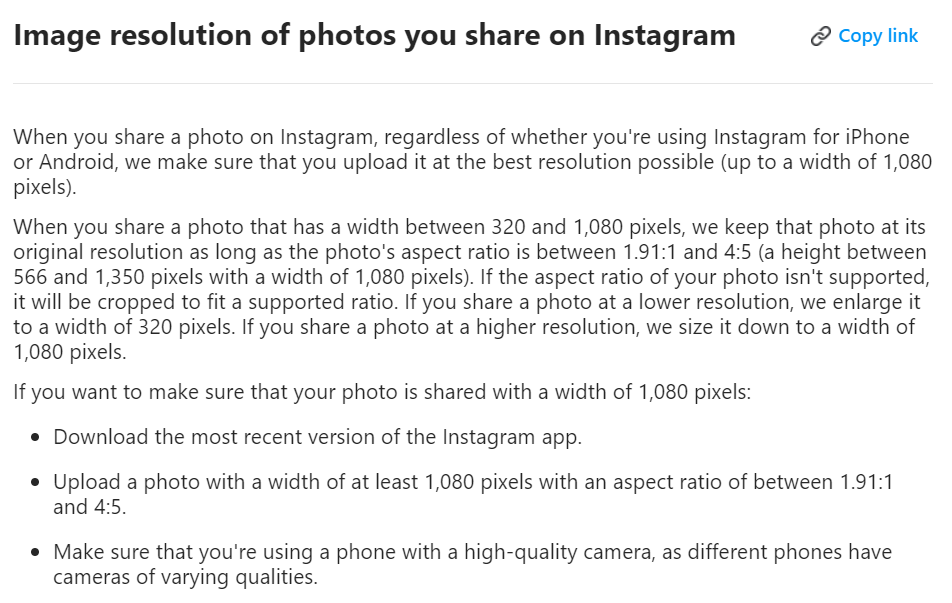
When you upload an image to Instagram or other social media, they’re processed by the server, resized and sometimes cropped automatically, and we usually don’t have a lot of control over this.
This is called ‘image optimisation’ and is done to improve the display speeds of your images. Image optimisation reduces the size of the image both in resolution (the number of pixels wide and high) and also in terms of file-size.
Below are two images which both have a resolution of 1000×1000 pixels. On the left is a mobile phone image which has been compressed using the standard phone compression (saved as a JPG) and the image on the right has been further compressed (before also being saved as a JPG)
You might not able to notice a difference but the image on the left is 488kb whilst the photo on the right is only 25kb. When you loaded this page, both the images downloaded to your device. The right-hand image would have been nearly instant, whilst the left-hand image may have taken several seconds and used half a megabyte of data.
Reducing an image resolution and compressing it can often massively reduce the file size. It might not make a lot of difference on this web page, but for a social media platform which is managing thousands or millions of page views a day, it can make a huge difference both in money saved and user-experience
How to avoid your images being compressed too much by Instagram or other social media platforms
Answer: Crop and re-size your images yourself before you upload them
As you’ve seen, you don’t get a lot of control over the optimisation of your images when you upload them to social media sites, however, If you optimise the resolution of your image before it’s uploaded, you can certainly improve the automatic optimisation.
For example, here’s how to optimise your Instagram images before uploading (for free) using desktop:
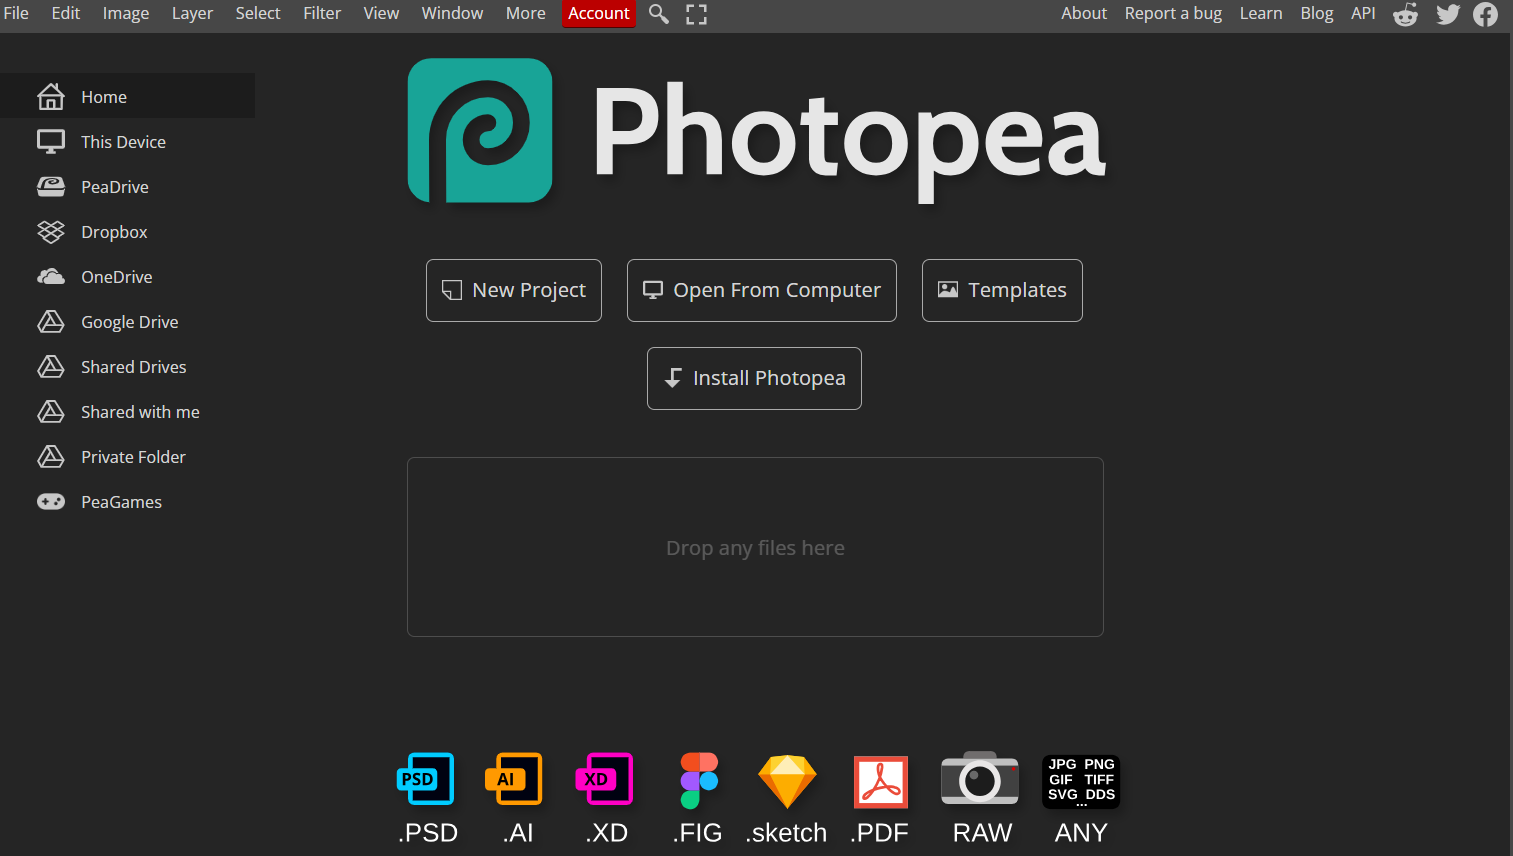
1. Go to Photopea.com. This is a free online photo-editing application
2. Decide what resolution you would like (width x height in pixels):
Instagram Post 1080px x 1080px resolution (1:1 aspect ratio)
Instagram Profile Photo 360px x 360px resolution (1:1 aspect ratio)
Instagram Landscape Photo 1080px X 566px resolution (1.91:1 aspect ratio)
Instagram Portrait 1080px x 1350px resolution (4:5 aspect ratio)
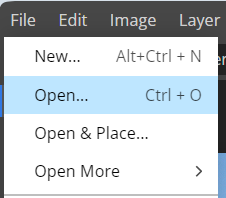
3. open your image in Photopea. Click on the file menu and select ‘open’ and upload a high-resolution picture
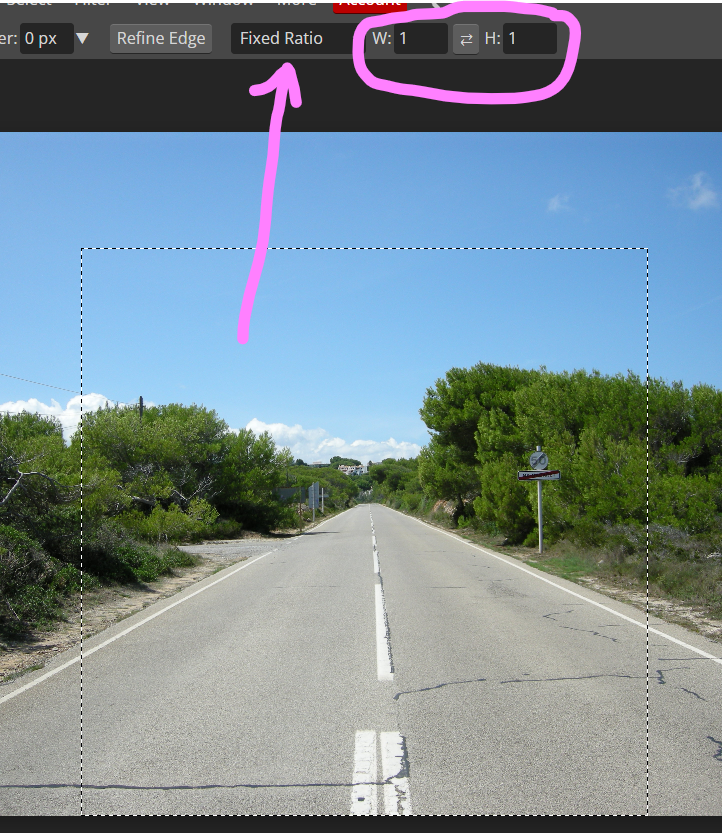
4. When your image has loaded click the ‘rectangle select’ tool (press M) then choose the ‘ratio’ option from the top bar. For a square image, the ratio is 1:1 as in the picture on the right.
For an Instagram Portrait where the aspect ratio is 4:5 (see above) you would put 4 and 5 in the two boxes respectively. Etc.
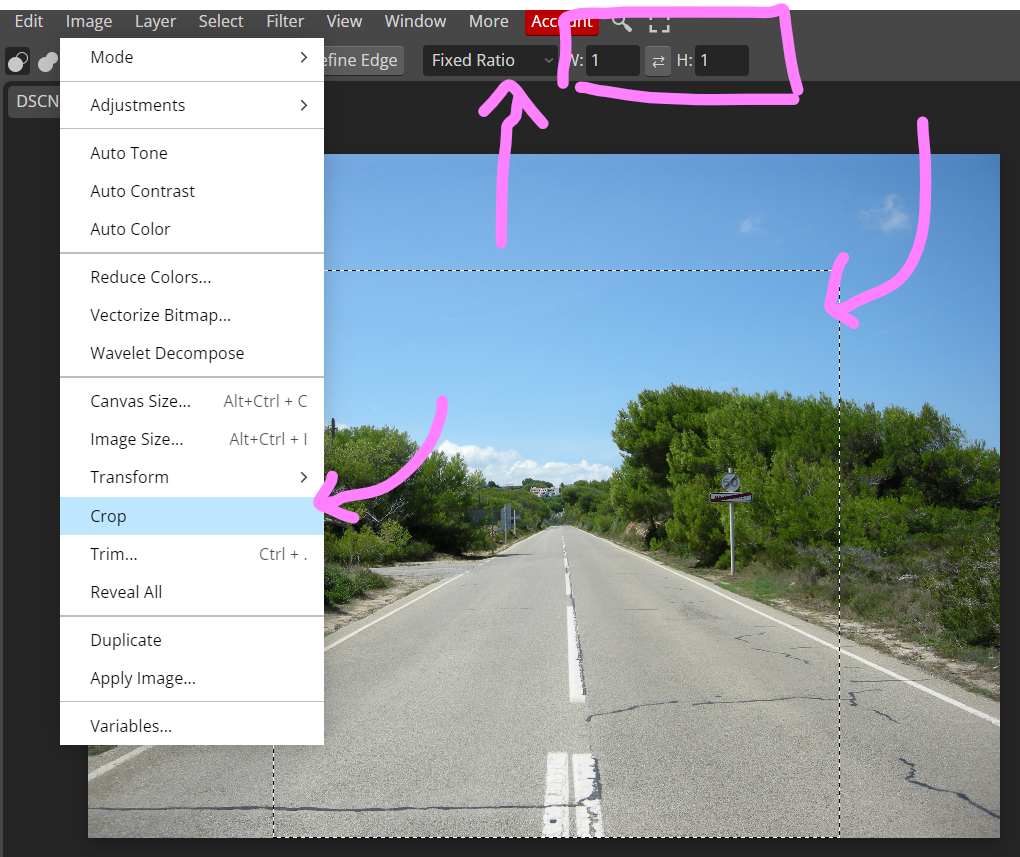
5. Draw the selection across the picture to create the cropping you would like to use. When you are happy with the selection, from the Image menu (top-left) choose ‘crop’
Your image is now the right aspect ratio but the wrong resolution
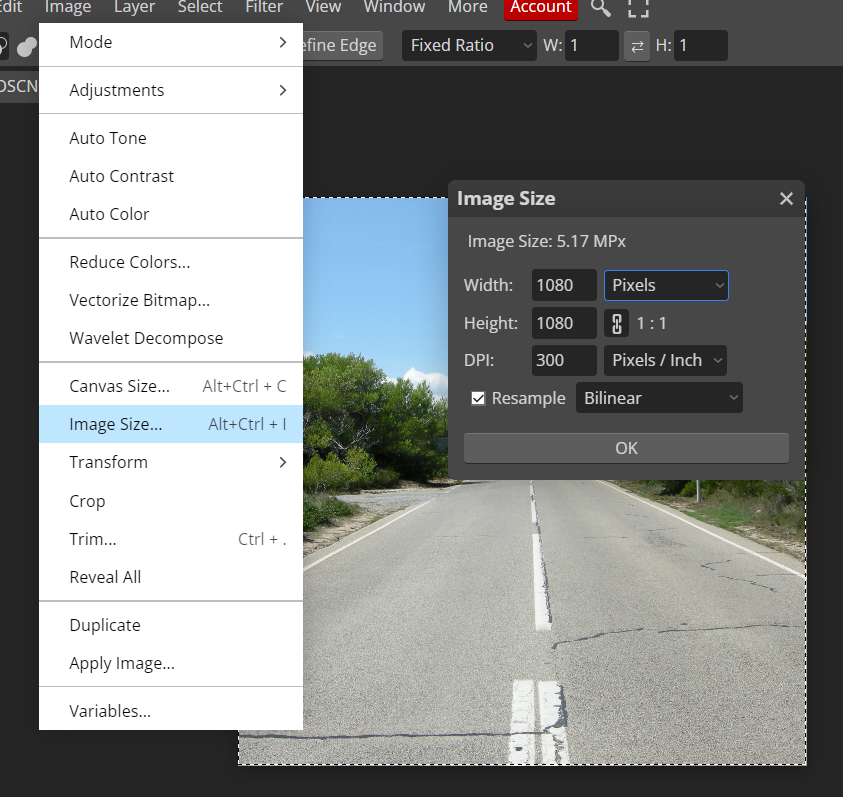
6. Choose the image size option from the image menu. in the pop-up box, change the image width to the correct width as specified above. The height should automatically change too.
For example, a square image (Instagram Post) is 1080 px x 1080 pixels (note: that’s a 1:1 aspect ratio and a 1080x1080px resolution)
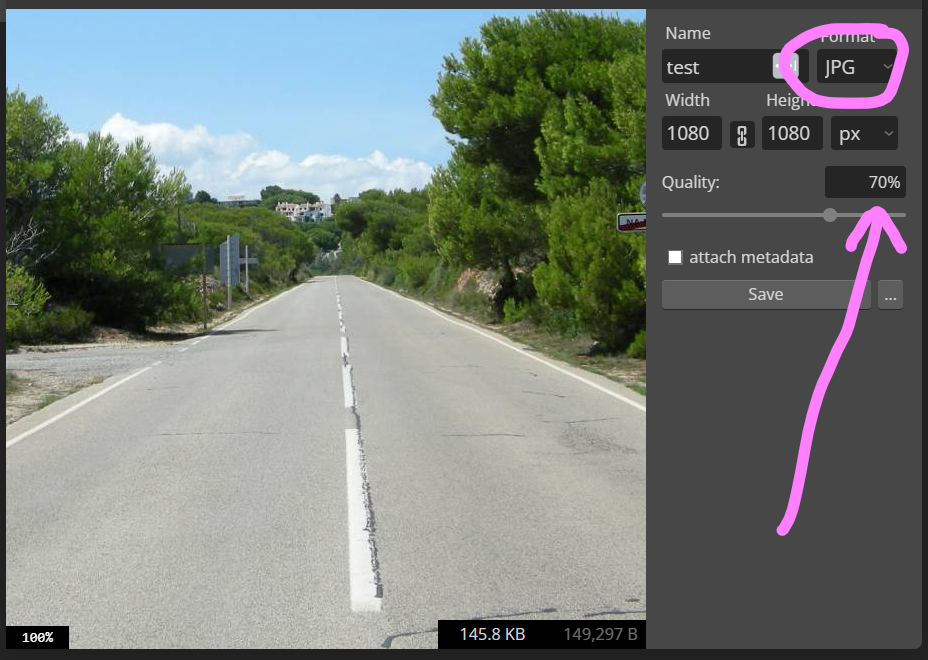
7. You need to now save the image on your computer. From the File menu select ‘export as’ and choose JPG or PNG (Instagram only accepts images in JPG, JPEG, PNG, format and non-animated GIF files)
The quality slider dictates how much compression to apply. In other words, the higher the percentage, the better quality the image. Therefore you might consider changing this to 100%
You can now upload the cropped image to Instagram and it won’t be automatically compressed
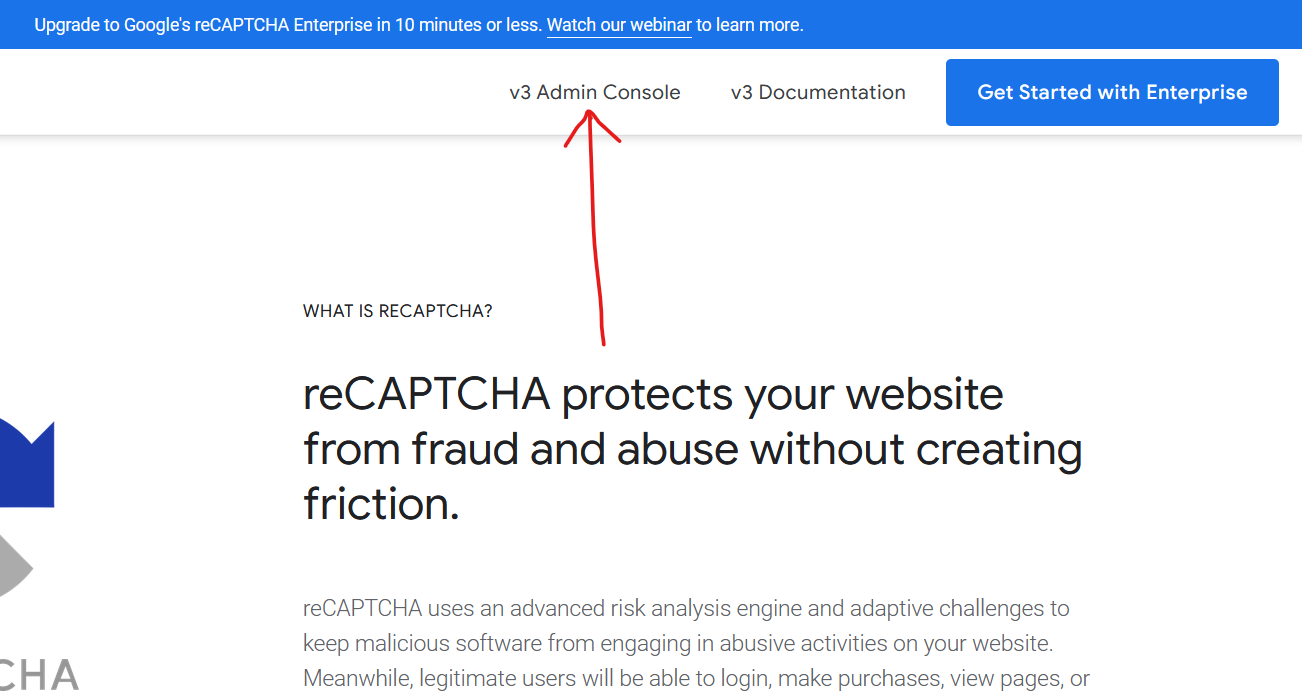
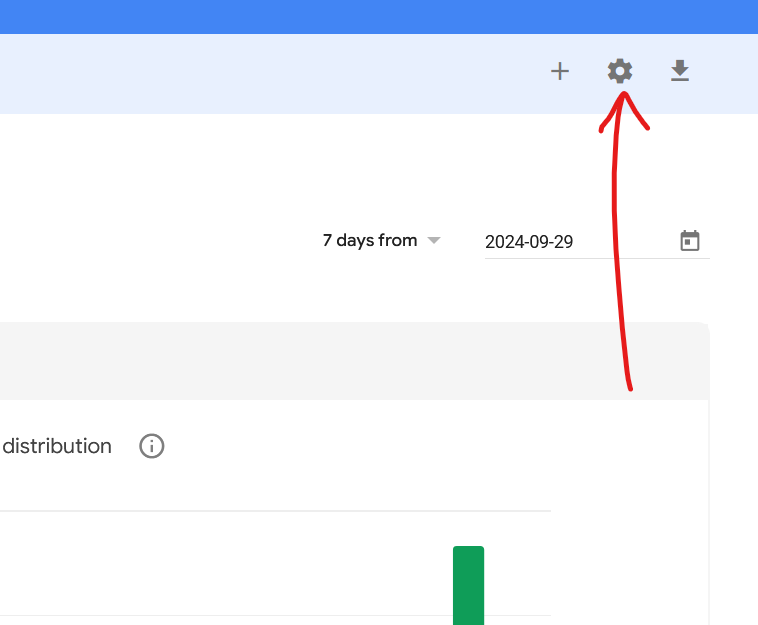
Step 2 – go to the website you’d like to delete from the drop-down then click the ‘settings’ icon
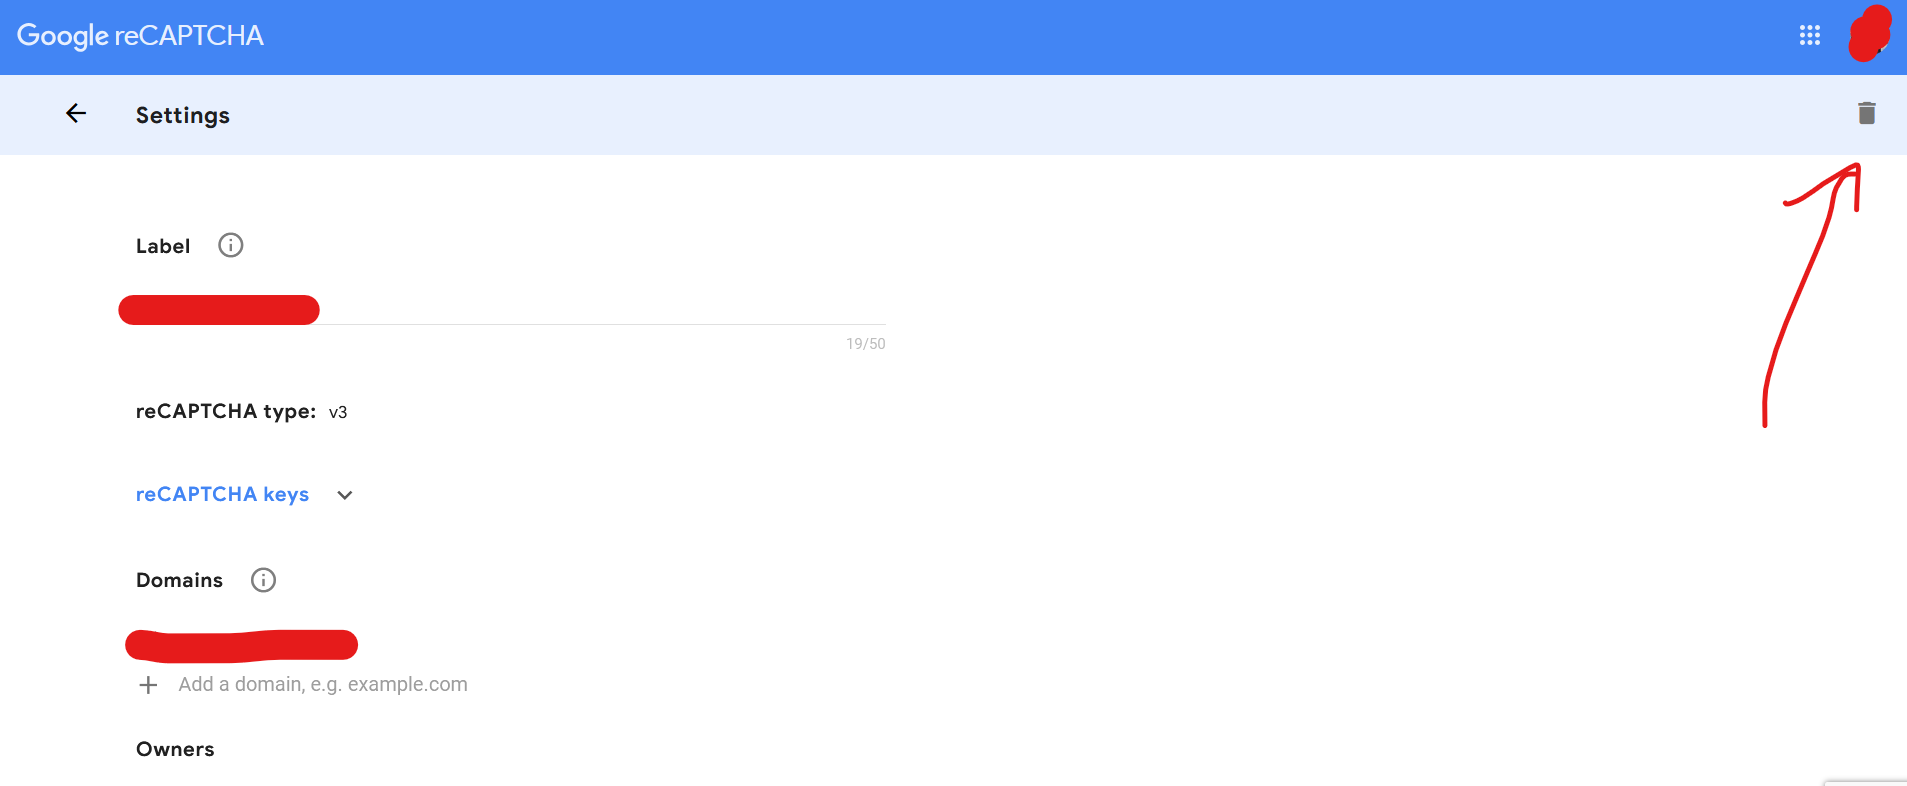
Stwp 3 – from the website reCapcha settings page look at the top-right corner to see the ‘delete’ icon’
What is the Google reCAPTCHA?
Google reCAPTCHA is a free service that helps protect websites from spam and abuse. It’s a type of CAPTCHA (Completely Automated Public Turing test to tell Computers and Humans Apart) that uses advanced risk analysis techniques to distinguish between human and automated access.
How Google reCaptcha works:
By user interaction – when you encounter a reCAPTCHA on a website, you’ll be asked to complete a task, such a Checking a box labeled “I’m not a robot”, selecting images that match a given description or solving a simple math equation.
By risk assessment – reCAPTCHA analyzes your interaction with the task and other factors, such as your IP address, browser type, and mouse movements, to determine if you’re a human or a bot.
By decision based on the risk assessment, reCAPTCHA either allows you to proceed or presents additional challenges to verify your humanity.
Benefits of reCAPTCHA:
Protects websites: Helps prevent spam comments, fake account registrations, and other forms of abuse.
Improves user experience: Reduces the need for intrusive CAPTCHAs that can be frustrating for users.
Easy to implement: Can be added to websites with minimal effort.
Types of reCAPTCHA:
v2: The most common version, requiring users to complete a simple task.
v3: A more invisible approach that analyzes user behavior in the background to assess risk.
Here is an example of virtual tour for a showroom – created recently for The Senator Group at their Farringdon, London showroom .
The Senator Group create contemporary furniture for offices, homes, and public spaces. They began in 1970 and are now part of a Allermuir. As an independent design house, they partner with the world’s best designers to create impeccably made furniture.
If you’re domain is using the Microsoft 365 email – otherwise known as MS Exchange – it’s likely you will need to update your SPF, DKIM and DMARC records within your domain DNS at some point. From February 2024, Yahoo (Yahoo Mail) and Google (Gmail) require email validation for large volume email senders, but it’s good practice to add these records now nevertheless as they’re also often used by spam filters to distinguish between junk and legitimate email. As far as I’m aware, there are no current plans to require these changes for everyday email users, however, in my opinion it’s only a matter of time.
Microsoft Exchange – add required SPF record
Your domain DNS should already contain the following SPF record:
Record: TXT
Host Name: @
Points to address or value: v=spf1 include:spf.protection.outlook.com -all
TTL: 1 hr
Microsoft Exchange – enable / add DKIM
Generate DKIM keys within the Microsoft 365 Admin Centre:
Sign-in through the M365 admin centre as a global administrator
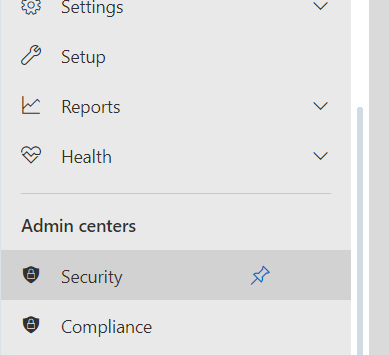
In the left-hand menu, click on Security under Admin Centres. This will take you to the Microsoft Defender Portal.
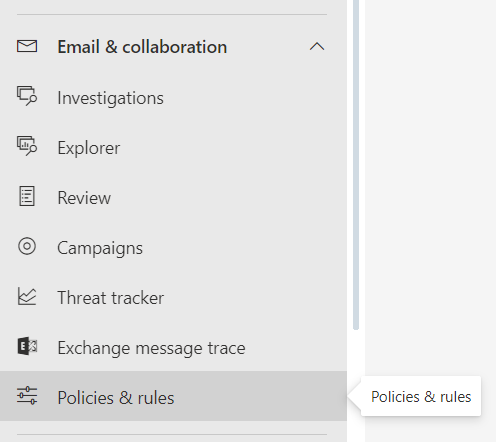
From there, Under Email & Collaboration – click on Policies and Rules –> Threat policies –> Email Authentication Settings
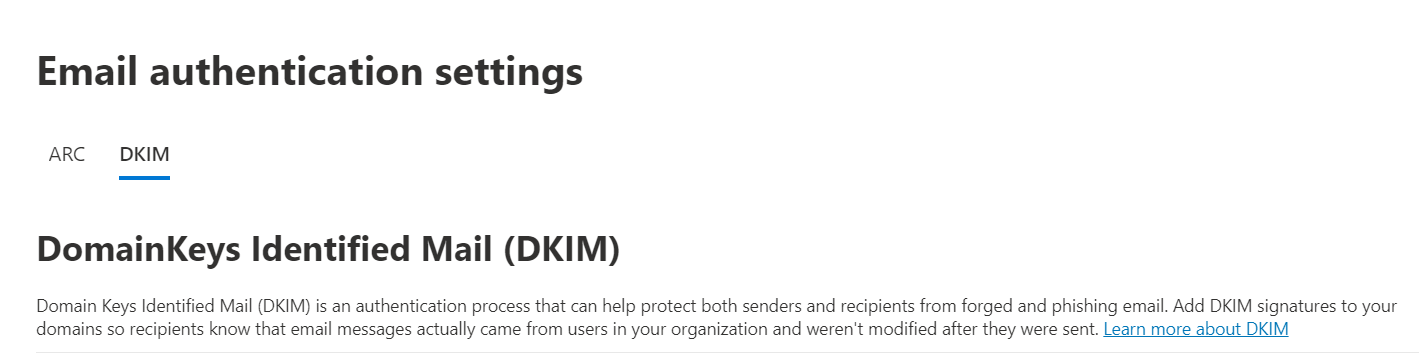
choose the DKIM tab and you’ll see the ‘DomainKeys Identified Mail (DKIM)’ tab with your domain name(s) below it
Click on the domain name you’d like to activate DKIM on and enable the DKIM under ‘Sign messages for this domain with DKIM signatures’
At this point, you will probably be shown an error message saying that the required CNAME records do not exist. Within this error message you’ll be shown the CNAME records you need – add them to your domain DNS. Once they have been added, updated and they have resolved, you will need to go back to step 1 and follow the instructions again (see below for the client error message example)
How to configure and add a DMARC to your domain:
Your DMARC record will need to be generated before being added to your domain name. Many hosts will do this for you. Here is how to do it manually:
Generate your DMARC record using a third party record generator such as: https://dmarcian.com/dmarc-record-wizard/ (this is a third-party website and the link opens in a new tab)
Once your record has been generated, add your DMARC record to your DNS
Microsoft 365 Admin Centre – DKIM error message example
As mentioned above, if you try to activate DKIM before you have the correct CNAME records within your DNS, you will get an error message. Here is an example of that message where you will find your CNAME records:
Client Error
|Microsoft.Exchange.Management.Tasks.ValidationException|CNAME record does not exist for this config.
Please publish the following two CNAME records first.
Domain Name : *****.***
Host Name : selector1._domainkey
Points to address or value: selector1-*****.***._domainkey.********.onmicrosoft.com
Host Name : selector2._domainkey
Points to address or value: selector2-*****.***._domainkey.********.onmicrosoft.com .
If you have already published the CNAME records, sync will take a few minutes to as many as 4 days based on your specific DNS. Return and retry this step later.
The basic syntax of the DKIM CNAME records for custom domains that send mail from Microsoft 365 is:
Hostname: selector1._domainkey Points to address or value: selector1-<CustomDomain>._domainkey.<InitialDomain>
Hostname: selector2._domainkey Points to address or value: selector2-<CustomDomain>._domainkey.<InitialDomain>
If you’re using Shopify and sending emails from your own domain email address, you may have received an email telling you that you need to authenticate and add a DMARC record to continue sending emails from your domain.
Gmail and Yahoo have announced changes that require you to authenticate and add a DMARC record on your domain if you’d like to continue sending emails from a branded email address.
Authenticate and add a DMARC record to continue sending emails from your domain
Currently, your emails are sending from sales@sheffieldengraving.com. To continue, you’ll need to ensure you have a valid DMARC record and have authenticated the email address.
If you take no action, we will rewrite your sender email to store@shopifyemail.com to meet the minimum requirements so that you can continue sending emails to your customers with no interruption.
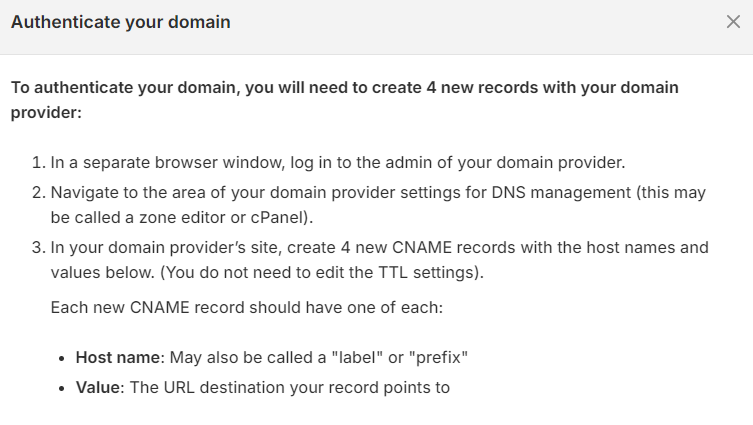
This actually sounds much more complicated than it is. You’ll simply have to add 4 new CNAME records to your domain name. Provided you’ve got access to your domain’s DNS record, all you need to do is the following:
log into Shopify and click on the ‘settings’ option in the bottom-left corner
from the ‘settings’ menu go to ‘notifications’
You’ll see the ‘The email your store uses to send emails to your customers’ and under this there is an option to ‘Authenticate now’. Here you’ll be given 4 x CNAME DNS records to add to your domain DNS
Log into your domain admin panel and edit the DNS to add the 4 new records
Go back to Shopify and confirm you’ve made the changes. Once the DNS has fully resolved and propagated, your domain is now authenticated and can send to GMAIL and YAHOO addresses again
What is DMARC?
DMARC stands for Domain-based Message Authentication, Reporting, and Conformance. It’s a powerful email authentication protocol that helps protect your domain from email spoofing, phishing attacks, and other forms of email fraud.
A DMARC record is a TXT record that you publish in your domain’s DNS (Domain Name System). It contains instructions for email receivers on how to handle emails that fail authentication based on SPF (Sender Policy Framework) and DKIM (DomainKeys Identified Mail) checks.
A browser cache, sometimes called a web cache, is like a temporary storage space for your internet browser. It stores copies of website files, like images, scripts, and HTML code, on your computer or device. This means the next time you visit the same website, your browser doesn’t have to download everything all over again. It can just grab the files from the cache, which makes the website load much faster.
Think of it like having a pantry in your kitchen. You keep frequently used ingredients readily available so you don’t have to visit the grocery store every time you need to cook. Similarly, the browser cache keeps commonly used website elements easily accessible for quicker future visits.
Here are some benefits of a browser cache:
Faster page loading: Websites load much quicker because the browser doesn’t have to download everything from scratch.
Reduced internet usage: Less data needs to be downloaded, saving you bandwidth and potentially data charges.
Improved browsing experience: Websites feel snappier and more responsive thanks to the cached files.
However, there are also some downsides to consider:
Outdated content: If a website updates its content but your browser has a cached version, you might not see the latest changes.
Troubleshooting issues: Sometimes cached files can be corrupted or incompatible with new website updates, leading to glitches or errors.
If you want to ensure you’re seeing the latest website versions and avoid potential issues, you may need to clear your browser cache.
What is a web browser ‘force refresh’?
A browser force refresh, sometimes referred to as a ‘hard refresh’ or ‘cache bypass’, is like giving your internet browser a clean slate for a specific webpage. This means it bypasses the cached version of the page you’re seeing and fetches everything directly from the website’s server again, ensuring you’re viewing the latest version of the website.
Think of it like taking all the ingredients out of your pantry and going directly to the grocery store for fresh ones, even if you have some left over. By completely ignoring the stored copies, you can be sure you’re not relying on potentially outdated or corrupted information.
How do I perform a force refresh on my desktop browser?
Here’s how to perform a hard refresh on different browsers:
Desktop browsers, view the page you’d like to force refresh
If you’re using the Chrome, Firefox, Edge, or Opera internet browsers on Microsoft Windows: Hold down the Ctrl key and click the Reload button (refresh icon). Alternatively, hold down Ctrl and press F5.
if you’re using the Safari browser on Mac: Hold down the Option key and click the Reload button.
Remember, a hard refresh only affects the specific page you’re on. It won’t clear your entire browser cache.
How do I perform a force refresh on my mobile browser?
Performing a force refresh on mobile browsers involves similar steps to desktop browsers, but the exact methods vary depending on the browser app you’re using. Here’s a guide for the most popular mobile browsers:
Chrome:
Android:
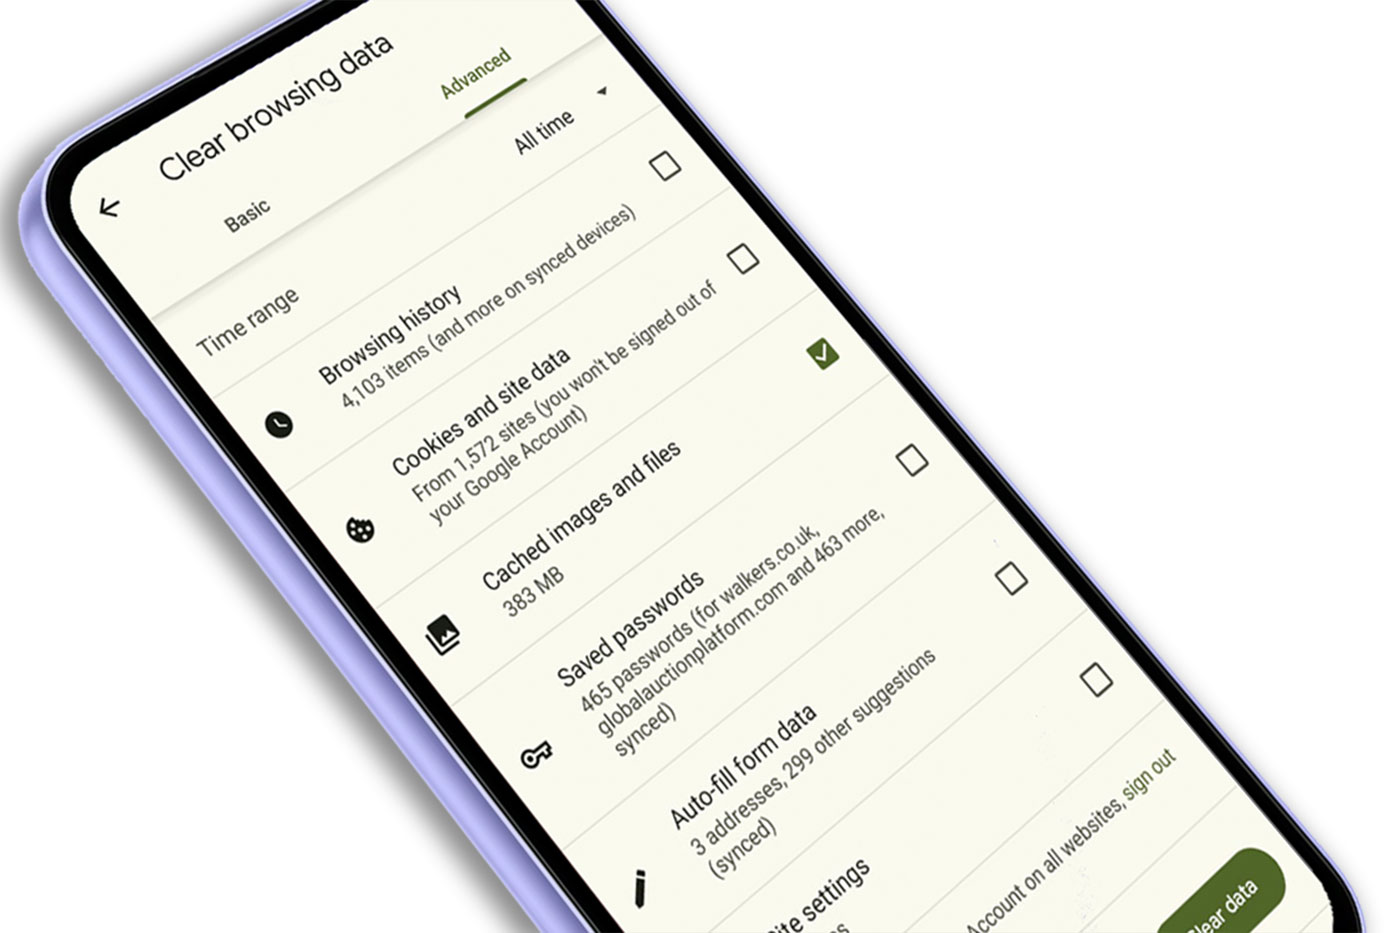
Tap the three dots menu (⋮) in the top right corner.
Select “Settings” from the menu.
Go to “Privacy” and then “Clear Browsing Data”.
Choose the time range for clearing data (e.g., “Last hour”, “Last 24 hours”, etc.).
Ensure “Cached images and files” is checked.
Tap “Clear Data” to confirm.
iOS:
Tap the three dots menu (⋯) in the bottom right corner.
Select “History” and then “Clear Browsing Data”.
Choose the time range for clearing data (e.g., “Today”, “Last Week”, etc.).
Make sure “Cache” is checked.
Tap “Clear Browsing Data” to confirm.
Firefox:
Android:
Tap the three dots menu (⋮) in the top right corner.
Select “Settings” from the menu.
Go to “Privacy” and then “Clear Browsing Data”.
Choose the time range for clearing data (e.g., “Last Hour”, “Last Week”, etc.).
Ensure “Cache” is checked.
Tap “Clear Browsing Data” to confirm.
iOS:
Tap the menu button (≡) in the bottom right corner.
Select “Settings” from the menu.
Go to “Privacy” and then “Clear Private Data”.
Choose the time range for clearing data (e.g., “Today”, “Last Week”, etc.).
Make sure “Cache” is checked.
Tap “Clear Data” to confirm.
Safari:
iOS:
Open the Settings app on your iPhone or iPad.
Scroll down and tap “Safari”.
Tap “Clear History and Website Data”.
Confirm by tapping “Clear History and Data”.
Additionally:
Many mobile browsers also offer a “Clear Site Data” option within the website’s settings menu. This allows you to clear cached data specifically for that website without affecting other browsing data.
Force-quitting the browser app and then reopening it can also sometimes work as a soft refresh, though it won’t guarantee completely bypassing the cache.
Remember, clearing your browsing data will also remove cookies and other website preferences, so consider backing up important login information before proceeding.
WebP is a modern digital image format developed by Google that offers significant advantages over traditional formats like JPEG and PNG. However, editing and saving this new type of image in Photoshop isn’t always as fast or straight-forward as you’d hope.
Problem 1 – Photoshop doesn’t natively support WebP files
Versions of Photoshop prior to 23.2 don’t not natively support WebP files, so the first thing you’ll need to do is install a new plugin. The good news is, however, that the Photoshop plug-in is free. See this page on the Adobe website for download links
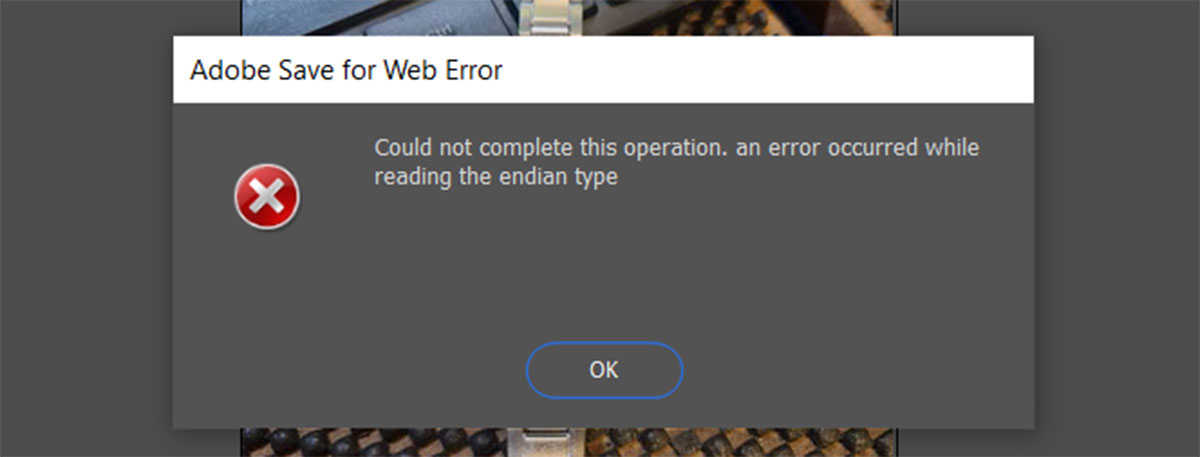
Problem 2 – Photoshop error when trying to save the WebP image “Could not complete this operation. An error occurred while reading the endian type”
The Photoshop ‘Save for web’ function is what’s known as a legacy feature. I’ve been using Photoshop for about 25 years so I’ll instinctively just press CTRL+SHIFT+ALT+S, but this is no longer being updated which is where the problem lies (you might notice this option isn’t in the file menu anymore). The most recent ‘Save for Web’ update precedes the WebP technology. Sadly there’s no way to update this.
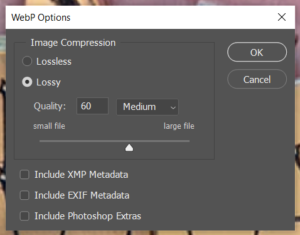
To save your WebP image you’ll need to use the more modern ‘Save as’ or CTRL+SHIFT+S. Here you’ll get the option to compress the image as you do with JPEGs in the old ‘Save for web’ function.
More about the WebP technology
Web technology is improving and changing at an incredible speed, and WebP is a modern image format developed by Google that offers significant advantages over traditional formats like JPEG and PNG.
It offers superior Compression:
Lossy and Lossless options: WebP offers both lossy and lossless compression, allowing you to choose the trade-off between file size and image quality.
Smaller file sizes: In general, WebP images can be 25-34% smaller than JPEGs and 26% smaller than PNGs while maintaining comparable quality. This makes websites load faster and saves bandwidth.
Advanced algorithms: WebP utilizes algorithms optimized for specific image types, like photos, graphics, and text, further enhancing compression efficiency.
WebP additional Features include:
Transparency: WebP supports alpha transparency, allowing you to create images with transparent backgrounds for logos, icons, and overlays.
Animation: WebP can also be used for simple animations, offering an alternative to GIFs with significantly smaller file sizes.
Open Format: WebP is an open-source format, meaning it’s free to use and implement by anyone.
WebP is increasing in popularity but there are still some challenges:
Growing Popularity: WebP is seeing increasing adoption on the web, with major browsers and content delivery networks supporting it.
Compatibility Issues: Some older browsers and applications may not yet support WebP natively, but workarounds and converters are available.
Ultimately, WebP is a powerful and versatile image format that can significantly improve website performance and image quality. It’s a strong contender for replacing older formats like JPEG and PNG, and its popularity is likely to continue growing in the future.
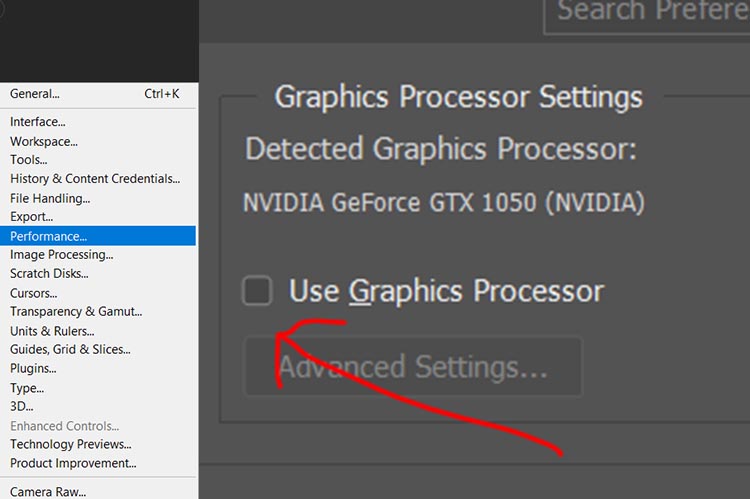
I currently use Photoshop on my HP Intel i7, GEFORCE GTX laptop (relevant), however, it would almost always crash or ‘close unexpectedly’ whenever I tried to re-size and image. I use Photoshop a lot so it was a big problem for me. At first, and after doing some research, it looked to me like this was probably to do with an incompatibility with the processor – not something I could fix without replacing my laptop. However, I was able to fix the problem in the end by simply changing ‘graphic processor’ option within Photoshop’s settings.
Photoshop unexpectedly crashing when resizing images – solution:
Start Photoshop
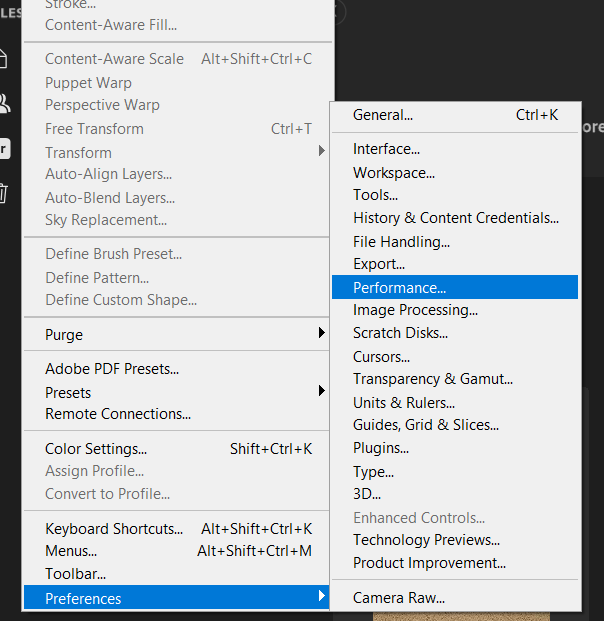
Open the ‘Edit’ menu
Open the ‘Preferences’ sub menu
Select ‘Performance’
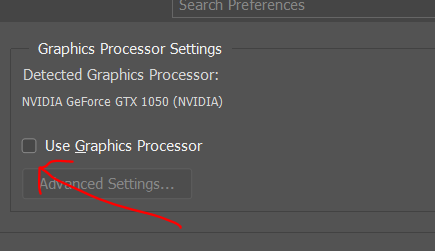
You’ll now see the ‘Performance’ options. Simply untick the ‘Use Graphics Processor’ option. Save, and then restart Photoshop
Other causes of Photoshop closing whilst editing images
Photoshop is a powerful image editing tool that is used by millions of people around the world. However, it can sometimes be unstable, and this problem of crashing when users try to resize images seems to be quite a common one. This can be frustrating and disruptive, especially when working to a deadline!
Here are some other problems and reasons why Photoshop crashing when resizing images:
Outdated software: Photoshop is regularly updated to fix bugs and improve performance. If your version of Photoshop is out of date, it may be more prone to crashes.
Insufficient system resources: Photoshop is a demanding program, and it requires a powerful computer with enough RAM and processing power. If your system is not up to the task, you may experience crashes.
Corrupted image files: If the image file is corrupted, Photoshop may not be able to handle it properly and may crash when you try to resize it.
Hardware problems: If your computer has hardware problems, such as a faulty graphics card, it may cause Photoshop to crash.
Other troubleshooting Steps
If Photoshop is crashing when you try to resize images, there are a few things you can do to try to fix the problem:
Update Photoshop to the latest version. This will often fix any bugs that may be causing the crashes.
Free up system resources. Close any other programs that you are not using and make sure that you have enough RAM and processing power available for Photoshop.
Repair the image file. If the image is corrupted, you may be able to repair it using a photo editing software or online tool.
Check for hardware problems. Run diagnostics to check for any hardware problems that may be affecting Photoshop.
If you are still having problems after trying these steps, you can contact Adobe customer support for further assistance.
Still having the same problem? Try this
To help prevent Photoshop crashing when resizing images, you can also try the following:
Resize images in smaller batches: Instead of trying to resize all of your images at once, resize them in smaller batches to reduce the strain on your computer.
Use the Smart Object feature: When resizing large or complex images, consider using the Smart Object feature. This will convert the image into a smart object, which can be resized without losing quality or causing crashes.
Save your work frequently: This will help to minimize the loss of data if Photoshop does crash.