It’s the year 2000. We’re at work. We sit in front of our computer, reading and replying to our emails. At the end of the day we turn the computer off. Everything is done… except it’s not! We’re driving home and remember that really important email we forgot to reply to. Did we press send on that email to the printer? Has the email about the contract arrived? Even worse – we’re on the first day of our two-week holiday and we suddenly start to feel anxious wondering what emails are arriving whilst we’re away and knowing that we’ll not see them until we’re back.
Fortunately, it’s not 2000 anymore and it doesn’t have to be like that. We now have the option to check our emails anywhere or anytime we want – whether sent, received, or in folders. We have smart phones in our pockets, tablet computers in our bags and laptops we can take with us – all is OK… or is it? The problem is that the email system that most people use is still from the year 2000. It simply wasn’t designed for modern devices and certainly not for multiple devices. It was designed for a time when we only used one computer which didn’t move – it’s 2020, why can’t we see sent items?! Why can’t we access our folders and email archives?!
And even worse than that, what happens when our computer dies or our phone gets stolen! Is everything is lost?
There is a solution – a great solution!
Not very long ago, it was only the big, wealthy companies used Microsoft Exchange for email. It was very expensive, difficult to configure, and needed an IT department to maintain it. But they knew how powerful it was and how valuable it was to their organisations so they made the investment… and it paid dividends for them! Send an email from one computer and it’s immediately also there, synchronised in ‘sent items’ on all your devices. You’re at home and can’t remember if you sent that important email? Check the tablet computer and you can instantly see. Need to look at an email from a few years ago? You can do it wherever you are at any time. Put a meeting in the diary on your computer when you were at work? Your phone dings to let you know it’s coming up in to hours. No more missing emails. No more duplicate diaries. No more having to wait to view old emails. No more frustration!
Roll on a few years to now and that same system is now available to all of us no matter how big or small our companies. And it’s much, much cheaper and, once set up, takes virtually no maintenance. One email address or one-hundred email addresses – it just works, brilliantly!
Your emails, folders, calendars instantly synchronised across all your devices and available when you want them to be. And even better than that,
Get a great nights sleep!
Actually, we can’t guarantee you’ll get a great nights sleep knowing your emails are all fully backed-up in the cloud and that all your documents are safe no matter what happens to your computer, however, I’m sure it’s going in the right direction.
Microsoft Exchange and OneDrive is the system I use and you can’t get a better recommendation than that! Free yourself up from email frustration or worry and allow yourself to focus on your business.
Find out more today by calling me on 0114 383 0711
This is a simple guide to fixing the problem where your images appear to upload to your WordPress site but don’t display properly in the media manager
This is a simple guide to fixing the problem where your images appear to upload to your WordPress site but don’t display properly in the media manager
Ever experienced that problem where you upload an image through the WordPress media-manager, but they don’t appear properly? It appears like it has uploaded but there is just a blank space where the image should display? This is normally a relatively easy problem to fix provided you have access to your web server or access to your site via FTP.
This is most commonly a problem to do with file permissions.
What are file permissions?
File permissions are web server system settings which apply to all web server files and determine who can access specified files and what they can do with those files.
In terms of ‘who’ or which ‘user’ can access the files, they are:
The ‘owner’ of the file – The person who created the files.
The ‘administrator’ – The person responsible for managing and updating files, as well as setting permission levels.
The ‘Group’– referring to specific groups of users with unique settings specific to them.
The ‘global’ group which is also sometimes referred to as anyone or public – Provides access to all users.
The ‘individual’ user – allowing you to create a specific level of access at the individual user level.
Or sometimes you’ll only have these options:
Owner
Group
Public or others
In terms of permissions, these are (basically):
Read – this level of permission assigned to a file allows respective user to view and copy files but can’t make changes to the file or create new files.
Write – this level of permission allows the user to edit, rename, and move files. In most cases, they can also create new files.
Execute –this level of permission can run a specific program or type of program file.
You’ll also probably see the permissions most commonly referenced as numbers which refer to:
7 – read, write and execute (in other words, everything)
6 – read and write
5 – read and execute
4 – read only
3 – write and execute
2 – write only
1 – execute only
0 – none
Note the ‘permissions’ are also sometimes referred to as ‘properties’ or ‘CHMOD’
Why does this mean that my WordPress images don’t display?
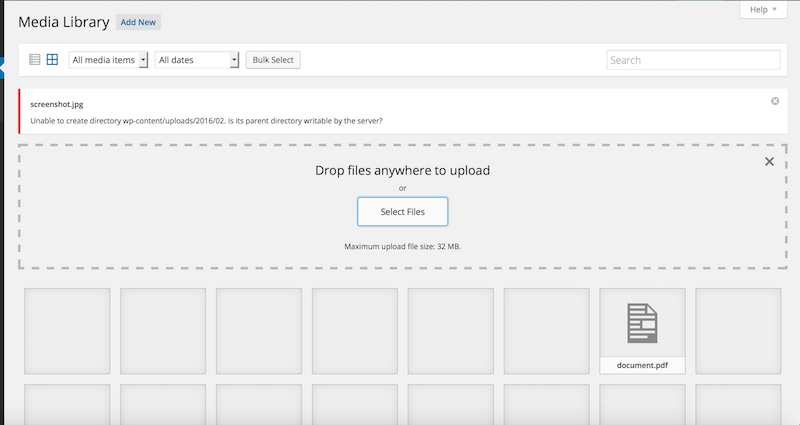
When you upload a file to the web server (as you do with the WordPress Media Manager) it places the file in a folder and applies user ‘permissions’ to the file. When the media manager tries to display the file, if the permissions are not adequate for what it needs to do (in this instance, display the image in the dashboard), it won’t work and you’ll see an error (in this instance an empty grey box where the image should be.)
You also may be experiencing a problem where, when you try to upload an image, you get the error message along the lines of ‘unable to create directory wp-content/uploads… Is its parent directory writable by the server?’ – if this is the case it’s the same problem with the same fix.
How do I fix this problem?
To get the image to display properly, you’ll need to change the image file permissions for the appropriate users to ones that let the image display publicly on the server.
Before you attempt the fix, please remember that aome files are very dangerous if run on a webserver (such as executables or ‘.exe’ files) so make sure you know what you’re doing or get professional advice before you change the permissions for files like this. However, basic image files, such as JPGs or PNGs, are usually innocuous.
You can change the permissions for a single file, a whole folder (directory) and its contents, or a whole folder and its contents including all files, sub-directories, and the contents of sub directories
To fix the problem, change the required folder or image or images permissions to 744 (or 0744) – this is ‘owner can read, write and execute’, ‘group can read’ and ‘public can read’
You’ll need to access the website files using FTP or via your hosting control panel.
If accessing through FTP, navigate to your ‘uploads’ folder which is in the default ‘wp-content’ folder located in the public root directory of your WordPress installation.
For example, I only have images in my media manager so to change the file permissions for all the uploaded images, I access my web server using my FTP client, I navigate to the ‘wp-content’ folder, I then right-click on the ‘uploads’ folder, I then select the ‘properties / CHMOD’ option, I then change the permissions to ‘to should allow you to change the permissions of the folder to ‘744’ or ‘0744’ and click ‘apply’
Although individual FTP clients differ, this method normally allows to you change the permissions as required on any individual file or folder and contents.
To change the permissions using a file manager, I log into my hosting account, navigate to my file manager, navigate to the required folder or file and then use the file manager tools to change the permissions as above. I can’t give individual instructions here as there are too many individual hosting accounts with different file managers.
if, when trying to upload a new image, you’re getting the error message ‘unable to create directory wp-content/uploads… Is its parent directory writable by the server?’, this means that WordPress cannot make a new folder on the server to upload the new image to. In order to create a new folder (aka directory), the containing folder must be writable by the server. In this instance it’s normally the ‘uploads’ folder which is inside the ‘wp-content’ folder. Change the permissions for the ‘uploads’ folder to ‘744’ or ‘0744’ and try again.
If you’re unable to change the permissions for images or folders using this method, it may be that you don’t have sufficient permissions to make these changes. If this is the case, talk to your hosting provider or give us a call if you need a hand
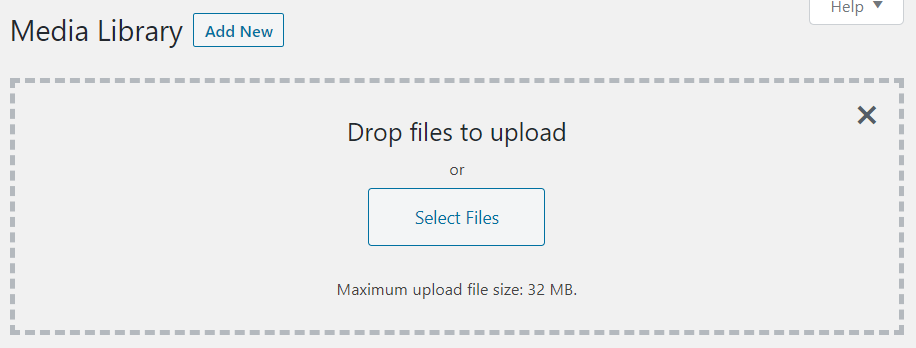
As default, many WorePress installations have a limit of 32MB maximum file upload limit for uploading via the media manager. To see what your maximum upload file size is, log into your WordPress site, go to your media library, and click ‘add new’. Often you’ll see ‘Maximum upload file size: 32 MB’ or similar depending on your defaults.
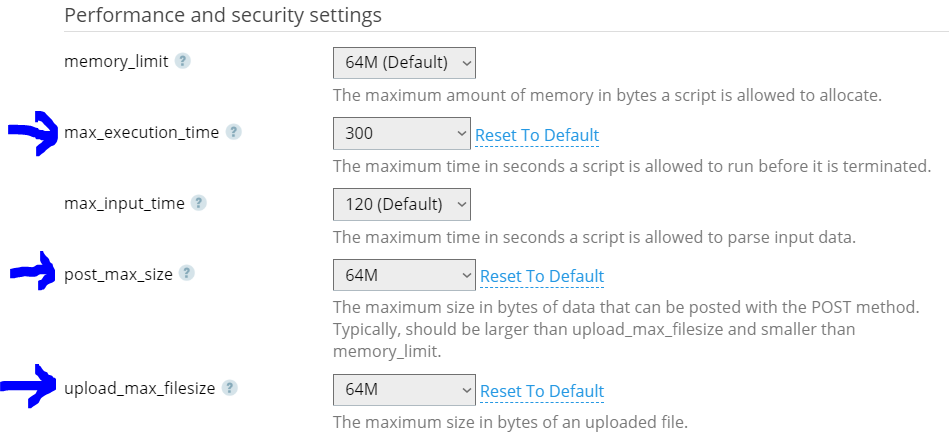
Increasing the ‘maximum upload file size’ for your media library isn’t always straight forward or easy but here in this post there are some options to try.
Please note that if your site is hosted on a shared host then the global server settings may be the only way to increase limits. If this is the case you need to contact your web hosting provider. Need a new hosting provider? Call us on 0114 383 0711
Before you start, please note this tutorial is designed for people who are already very proficient at editing important server files and updating server settings. Please remember to backup everything before you start as mistakes can cause the loss of your site. Get expert help if in doubt.
Edit your theme functions file
Occasionally you’re able to change the maximum upload size by simply adding a few lines of code to your WordPress functions.php file:
If your functions file hasn’t fixed things, you can try changing your PHP settings directly on the server:
Edit your PHP.INI file
If you’re able to access your PHP.INI file (located in your WordPress site’s root folder) you can add the following. If you’re on a shared host, thought, it’s unlikely you’ll be able to access this so instead create a file called PHP.INI, add the following, and upload it to the site root:
How to install Contact Form 7 with a CAPTCHA in WordPress
Contact Form 7 is a great choice when it comes to including a contact form in your WordPress website, however, it can be a bit fiddly when extending the functionality to include a CAPTCHA. Here is a simple guide to installing Contact Form & with a CAPTCHA and message log:
The vast majority of unwanted website contact form messages (spam) are created by ‘bots’ – software that finds contact forms and sends messages through them. Google’s reCAPTCHA is a way of protecting you against this spam and other types of automated abuse as it attempts to verify that the form is being filled in by a human and blocks attempts that it decides are from a machine. It’s pretty clever stuff so if you have a few spare minutes, it’s very interesting to read about how it does this. However, most of us just need to cut down the spam. If you’re using the excellent Contact Form 7 plug-in on your site, the reCAPTCHA integration has become much simpler and easier. Here’s how you do it.
The latest version of the reCAPTCHA API is v3 and Contact Form 7 version 5.1 upwards use this. reCAPTCHA v3 works in the background so no longer displays the ‘are you human’ box or users blurred text. Integration is also quite straight forward:
Step one is upgrade your version of Contact Form 7 to the latest one (must be at least version 5.1 or above)
Next on your site, remove any old reCAPTCHA references from the site code such as the old v.2 script and the CAPTCHA tag from the contact form.
From your site dashboard, go to the Contact Form 7 options and select ‘integration’. Here is where you’ll need to add the ‘site key’ and ‘secret key’ from step 3.
On occasion I’ve come across WordPress installations that don’t have English (UK) as an available language and it turns out it’s not such a straight-forward problem to fix.
The default WordPress installation comes with all manner of languages including Spanish, Japanese, Indonesian, and Korean, however, English (UK) isn’t always there. I suppose the reasoning behind this is that us native English speakers can get by just fine with the English (US) version, however, from a search engine localisation perspective it may not be so good.
Many of the tutorials tell you to update your ‘wp_config.php’ file to update your site default language but this more-than-often doesn’t actually work. The other problem is that the language files you need are not particularly easy to get hold of unless you’re quite technical.
Therefore, here is a simple tutorial on installing the English (UK) language files and setting this as your default ‘site language.’
Setting English (UK) as your default WordPress site language when it’s not available from the dashboard
To begin with you’ll need the correct language files. You can download them here: WP-english-GB-files
Unzip the files to a folder
Log into your site via FTP
Navigate to the public directory (the one containing the files index.php, wp_config.php, wp_login.php etc.)
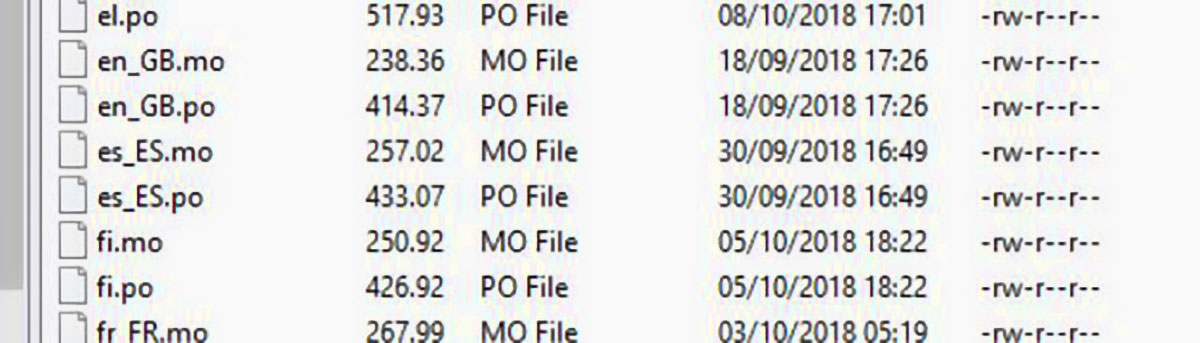
Open the ‘wp-content’ folder then the ‘languages’ folder. You should now see two folders called ‘plugins’ and ‘themes’ along with lots of files with the ‘.mo’ extension
Upload the English (UK) language files to this directory
Log into your WordPress dashboard through a browser
Go to ‘settings’
In the ‘General’ section, from the ‘site language’ drop-down list you’ll now find ‘English (UK)’
Update and save. Done
Need a hand?
Give us a call if you need a hand on 0114 383 0711
Moving a WordPress website to SSL is something we’ll all have to do at some point for existing sites and it can cause a lot of problems. Here is a list of some of the most common problems you may encounter when moving to SSL and HTTPS and how to deal with them.
Before we start, here is a little about SSL and HTTPS
SSL and HTTPS is a method of encryption that secures the connection between user’s browser and your WordPress server. This makes it much more difficult for anyone to intercept information sent between the two and therefore harder for anyone to eavesdrop on your connection.
Each SSL and HTTPS enabled site has a unique SSL certificate for identification purposes. This is very useful in identifying legitimate websites from spoof sites, meaning for example, your less likely to be caught scams like in phishing attempts.
WordPress site does not have a green padlock
This is the most common problem you’ll encounter after installing an SSL certificate on your WordPress site and is not always so straight forward to fix. The cause of this is non-secure content being called by your site such as external JavaScript files – in other words, your page is trying to include content from HTTP sources as opposed to HTTPS sources. This can usually be fixed by very simply updating the URL your calling to HTTPS. Load the problem web page or website, press CTRL+U to view the source, press CTRL+F and search for ‘https://’ – this will show you the URLs that are not secure. Once you’ve identified the problem URL, edit the template or site content to update them. Alternatively, a faster but riskier option is to do a blanket database search-and-replace ‘HTTP:’ with ‘HTTPS:’ as this normally fixes the majority of the problems.
WordPress site won’t load any more after changing the site URL to HTTPS
Updating the site URL and address via the dashboard settings is pretty straight forward, however, if your site is redirecting to the wrong address, you may no longer be able to log in. Therefore, you may need to change this setting directly in the database. To access the relevant table, log in to the database using PHPMyAdmin via your control panel. The site URL, as specified in the WordPress settings > General Settings > WordPress / site address, can be accessed directly through the database in the table wp_options > siteurl. If you’ve not got experience editing the database you should take a backup first just in case!
Too many redirects WordPress error message after moving to SSL
This can be caused by several configuration errors often within HTACCESS or your hosting control panel. However, If you’re forcing SSL and HTTP via the wp_config.php file, you may need to add an extra line of code to fix this:
The line of code added to the wp_config.php file to force SSL and HTTP is:
define('FORCE_SSL_ADMIN', true);
To fix the redirects error that can be caused by this code, add the following after the above line
if (strpos($_SERVER['HTTP_X_FORWARDED_PROTO'], 'https') !== false)

       $_SERVER['HTTPS']='on';
Note that this is the Chrome specific error but other browsers will give a similar error. This is to do with the fact that the browser has rejected the site’s SSL certificate. This is usually because the SSL certificate is for a different domain, the certificate has expired, or the browser doesn’t recognise the certificate issuing authority. This may mean reinstalling your certificate or getting he,p directly from the certificate provider.
—
If you’re having trouble moving your site to an SSL and HTTPS connection and need our help, call us today on 0114 383 0711 or send us a message through our contact page
10 signs there might be a problem with your website
You’ve got a successful business, you’ve got a website, but is your site bringing in as much business as it could? Here are 10 signs to look out for that mean there may be a problem!
Please note; I’m using Google here when referring to a search engine as it’s the largest and therefore the one we generally focus on when optimising for the web.
1 – You’re not getting many visitors to your site
It’s often difficult to gauge how many visitors you should be getting to your website for many reasons – maybe your products or services are very niche, or maybe the majority
The first thing you need to do is identify your keywords and phrases – the things your target customers will be typing into Google when they’re looking for your products and services. This isn’t always as black & white as you’d imagine, however, with a bit of time you can usually get a good comprehensive list of these phrases. Don’t forget to also get an idea of the average search volumes.
Now you need to see where you appear in Google when you search for these phrases. If you appear as the first result on page one of Google, you should be getting around 30% of the clicks, for example, if 10000 people per month search for the key phrase you’re at position 1 for, you should be getting in the region of 10 visits a day for that phrase (i.e. ((10000/30)*0.3)).
Get your site’s SEO analysed ASAP
2 – You’ve got a high bounce rate
Many websites get the traffic but that traffic is not properly qualified through Google so they immediately leave the site without clicking internally – otherwise known as a bounce.
It’s very important to monitor your keyword density to make sure Google is getting an accurate picture of your products and services. Many people neglect the search engine in favour of the site visitor and often end up with a site that has high usability but poor search engine optimisation. The trick is to take account of both!
If your bounce rate is higher that 40 to 50%, it’s time to look at your search engine optimisation, conversion rate optimisation and usability ASAP
3 – Your phone isn’t ringing
The job of a website is varied and depends on the business. For many it’s to help establish credibility as a supportive sales tool, however, if your site should be generating leads for you and it’s not, we need to find out why!
Usability testing sounds expensive but can actually be very simple to do. For many business owners, they spend so much time within their industry that they forget that the jargon and acronyms they use in their day-to-day lives might not be understood by everyone else! Get someone who knows nothing about your industry to go through your website. Give them a task and get them to tell you when they hit a dead-end, get frustrated, get confused or even give up in exasperation – you may be very surprised at the results! Are your contact forms working? Are your contact details easy to find? Does your site work on all browsers? These are just a few of the things that make the difference between an enquiry and an exit.
Visitors arriving at your site combined with a low bounce rate but no phone calls means there could be a problem with your calls to action, conversion rate optimisation and usability.
4 – You can’t find your site in Google
It might sound obvious but have you searched for your site within Google? Even if it was once there doesn’t necessarily mean it will still be there now!
As Google’s algorithm get’s cleverer, any mistakes that may have been made may suddenly become evident and your site may be being penalised. For example, if you’ve traditionally paid for the type of SEO that has relied on inbound links, you may have recently disappeared from the rankings due to Google penalisation! Even if your site is still there, it may mean that your results are being suppressed!
Not being able to easily find your site from a Google search you should get your SEO looked at ASAP
5 – Exits from contact form but no enquiries
You’re getting the visitors, you’ve got a low bounce rate but you’re not getting the enquiries. Have you tested your contact form? Are your contact details correct? Does your form work? Does your page work on the main web and mobile browsers?
Another one that sounds simple but you’d be amazed how few people actually spend a few minutes each month testing the functionality of their websites.
Send yourself a test message and try the number otherwise it could mean there is a problem!
6 – High percentage of visitors from abroad
There is a lot of information within a website that most people would never even give a second thought to. For example, how does Google know your site is UK English? Maybe it is American English or Australian! I suppose it could look at your server location or domain name and hazard a guess, however, don’t forget that Googlebot is just a piece of software that only has a very short amount of time to assess and categorise your site!
Unless the hidden information within your site is included and correct, your site may not be optimised for its target geographical location and therefore may not be appearing in the right country. It’s important to get this checked and corrected if necessary.
7 – Getting enquiries for products or services you don’t provide
This one seems quite simple on the surface but is actually quite complex. A good website will not only index well within Google for the correct search terms and turn the visitors into enquiries, it should also help your site visitors to properly qualify themselves – or in other words, help them to decide if this is the site they need.
If you bore your visitors with difficult to read text and fail to tell them what you do in a simple, concise and fast manner, the majority of them are going to do one of two things – leave or contact you to ask you what you do – Will you paint my kitchen? No, we only sell paint! What are your opening hours? No, we don’t have a shop! You end up doing what your site could be doing – letting people know if you’re what they’re looking for!
Getting enquiries for products or services you don’t provide means you should test your site’s usability.
8 – Slow loading times
When was the last time you checked to see how quickly your site loads? Clear your cache and give it a go. Googlebot only spends a short time visiting your site and if a proportion of that time is spent waiting for your site to load, it’s not going to be indexing properly.
Another one of the most common problems is badly optimised images. Simply specifying a width to resize an image is a terrible idea! Whether it’s laziness or inexperience, it will still cost you heavily in terms of Google ranking, bandwidth and usability!
Check your bandwidth usage against your visitor numbers and see if they tally. Make sure your images are optimised and that your server is in the UK.
Slow site loading times mean you should have your hosting and site optimisation checked.
9 – Site not displaying properly on mobile devices
Even if you don’t know the statistics you can probably guess that the number of people using mobile devices to access the web has recently exploded and is only set to increase!
Even here at Seven Creative we use Android’s browser; Chrome for Android; Safari for iPad and iPhone; Silk for Kindle; and this is just us!
It can be costly to optimise a site for mobile – especially when it comes to cross browser compatibility – however, there are a few simple things to look out for!
Check your visitor statistics and see what browsers they’re using. Test your site on yours and your friends’ mobile devices. If your site uses Flash, oh dear… time for a new one! If you do find an issue, it might only be a small job to update your site’s CSS to accommodate the new mobile browsers.
There is also talk that Google may be about to start penalising sites that have a bad or absent mobile version so now is the time to act!
10 – Your site looks tired and out-of-date
Just as in person, you only get a very short time to make a good impression. When was the last time you updated your site? Does it look old or outdated? Are your images poor quality? If the answer to any of those questions is yes, then that is the image of your business you are projecting. Of course, if that visitor met you in real life you’d impress them with your wealth of experience and industry knowledge, but the bad news is you’ll never get that opportunity. The visitor will hit ‘back’ and click on the next link – your competitor.
Help is at hand!
If you would like help with any of the potential website problems listed here, get in touch with us on 0114 383 0711 or contact us through out contact page

 It’s the year 2000. We’re at work. We sit in front of our computer, reading and replying to our emails. At the end of the day we turn the computer off. Everything is done… except it’s not! We’re driving home and remember that really important email we forgot to reply to. Did we press send on that email to the printer? Has the email about the contract arrived? Even worse – we’re on the first day of our two-week holiday and we suddenly start to feel anxious wondering what emails are arriving whilst we’re away and knowing that we’ll not see them until we’re back.