Tag: Tutorial

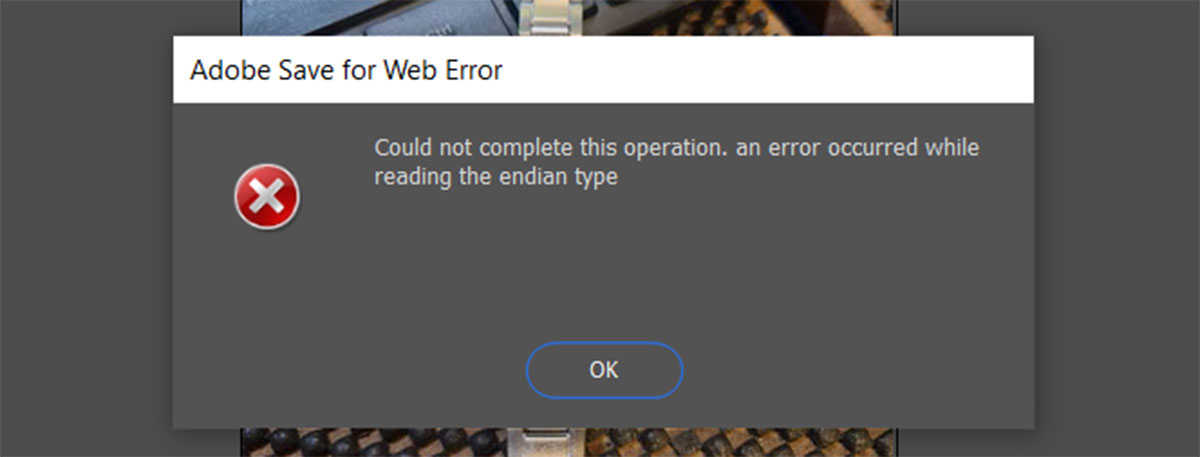
  • Photoshop error – Could not complete this operation. An error occurred while reading the endian type

    Photoshop error – Could not complete this operation. An error occurred while reading the endian type

    WebP is a modern digital image format developed by Google that offers significant advantages over traditional formats like JPEG and PNG. However, editing and saving this new type of image in Photoshop isn’t always as fast or straight-forward as you’d hope.
    Problem 1 – Photoshop doesn’t natively support WebP files

    Versions of Photoshop prior to 23.2 don’t not natively support WebP files, so the first thing you’ll need to do is install a new plugin. The good news is, however, that the Photoshop plug-in is free. See this page on the Adobe website for download links

    Problem 2 – Photoshop error when trying to save the WebP image “Could not complete this operation. An error occurred while reading the endian type”

    The Photoshop ‘Save for web’ function is what’s known as a legacy feature. I’ve been using Photoshop for about 25 years so I’ll instinctively just press CTRL+SHIFT+ALT+S, but this is no longer being updated which is where the problem lies (you might notice this option isn’t in the file menu anymore). The most recent ‘Save for Web’ update precedes the WebP technology. Sadly there’s no way to update this.

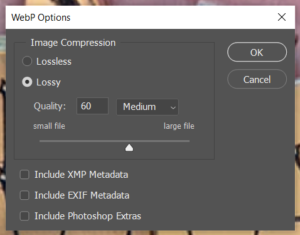
    To save your WebP image you’ll need to use the more modern ‘Save as’ or CTRL+SHIFT+S. Here you’ll get the option to compress the image as you do with JPEGs in the old ‘Save for web’ function.


    More about the WebP technology

    Web technology is improving and changing at an incredible speed, and WebP is a modern image format developed by Google that offers significant advantages over traditional formats like JPEG and PNG.

    It offers superior Compression:

    • Lossy and Lossless options: WebP offers both lossy and lossless compression, allowing you to choose the trade-off between file size and image quality.
    • Smaller file sizes: In general, WebP images can be 25-34% smaller than JPEGs and 26% smaller than PNGs while maintaining comparable quality. This makes websites load faster and saves bandwidth.
    • Advanced algorithms: WebP utilizes algorithms optimized for specific image types, like photos, graphics, and text, further enhancing compression efficiency.

    WebP additional Features include:

    • Transparency: WebP supports alpha transparency, allowing you to create images with transparent backgrounds for logos, icons, and overlays.
    • Animation: WebP can also be used for simple animations, offering an alternative to GIFs with significantly smaller file sizes.
    • Open Format: WebP is an open-source format, meaning it’s free to use and implement by anyone.

    WebP is increasing in popularity but there are still some challenges:

    • Growing Popularity: WebP is seeing increasing adoption on the web, with major browsers and content delivery networks supporting it.
    • Compatibility Issues: Some older browsers and applications may not yet support WebP natively, but workarounds and converters are available.

    Ultimately, WebP is a powerful and versatile image format that can significantly improve website performance and image quality. It’s a strong contender for replacing older formats like JPEG and PNG, and its popularity is likely to continue growing in the future.
  • How to take a screen capture and send it by email

    This tutorial is about taking a shot of your computer screen and sending it – very useful when asking for technical support by email. This assumes you are using a PC and a local email client such as Outlook.

    1. Get whatever it is you’d like to get a screen capture of up on your screen
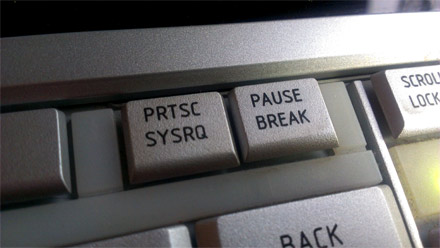
    2. Press the ‘PRTSC’ button. This is short for ‘Print Screen’ and will take a snapshot of your computer screen before sending it. Note: if you’re sending a screen capture of a website, you can press F11 to go full screen before taking the capture (press F11 again to exit full screen mode)

      PRTSC - press to take a screen capture
      PRTSC – press to take a screen capture
    3. Open your email client and open a new email
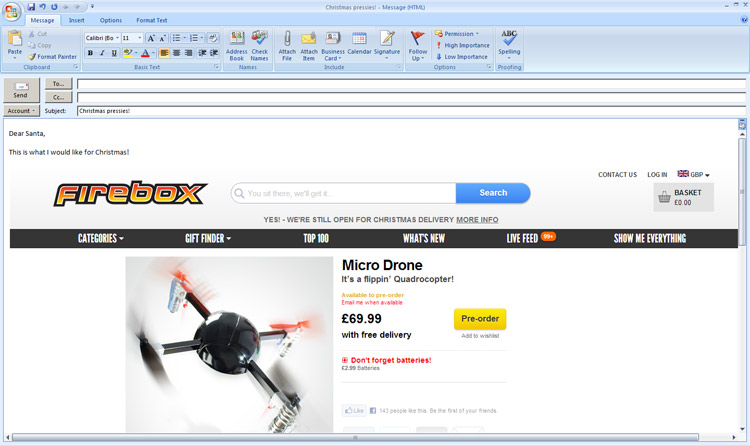
    4. With the cursor in the body of the email at the appropriate place, press and hold ‘CTRL’ then press ‘v’ once. This will paste the screen capture from your clipboard into the email.

      Insert screen capture into your email
      Insert screen capture into your email
  • Updating your password in Outlook 2010 tutorial

    It is very simple to update your email collection (POP3) password in Outlook 2010 by following the steps below:

    1. Open Outlook
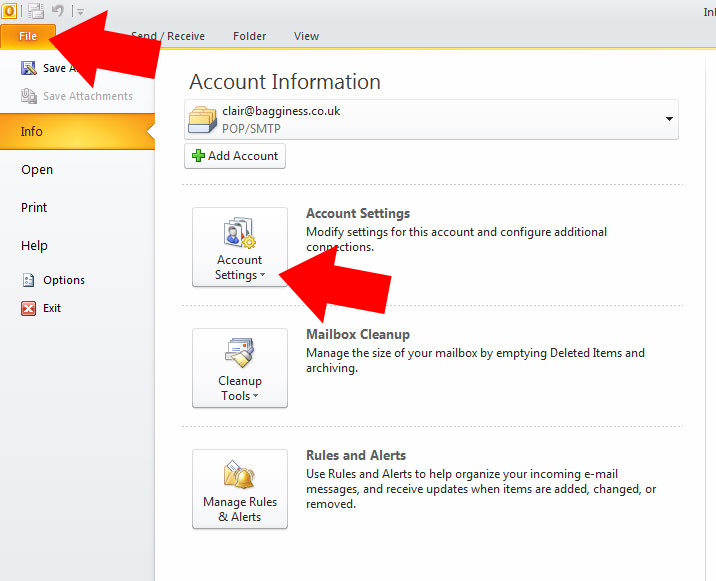
    2. Click on the ‘File’ option at the top of the page
    3. you’ll now have an option for ‘account settings’ – click here

      Open Outlook 2010, click 'file' option at the top of the screen, then click on 'account settings'
      Open Outlook 2010, click ‘file’ option at the top of the screen, then click on ‘account settings’
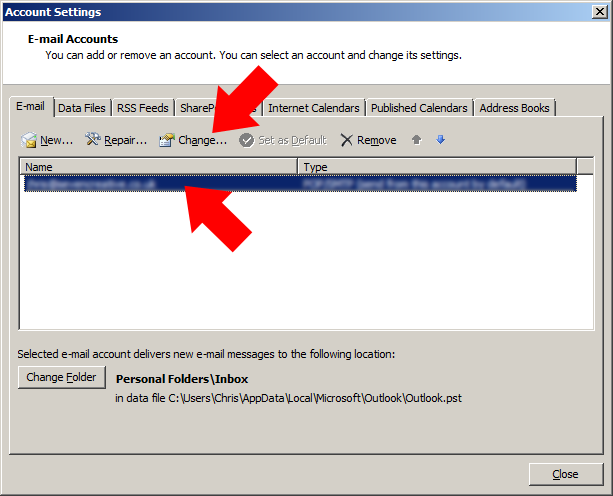
    4. click on the account you’d like to change then select ‘change’

      Click on the email account you's like to change then select 'change'
      Click on the email account you’s like to change then select ‘change’
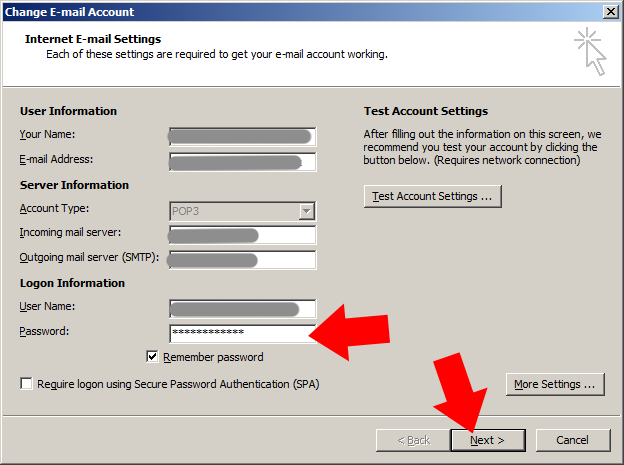
    5. from the ‘account settings page, type in your new password in the ‘password’ box

      From the 'account settings' page, type in your new password into the 'password' box then press 'next'
      From the ‘account settings’ page, type in your new password into the ‘password’ box then press ‘next’
    6. click ‘next’
    7. click ‘finish’
  • Short-cut to easily clear formatting from text in a Word document

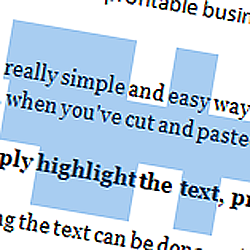
    Clearing formatting from a Word document
    Clearing formatting from a Word document

    Here is a really simple and easy way to clear formatting from text in a Microsoft Word document, for example, when you’ve cut and pasted from a website or another document

    Very simply highlight the text, press and hold CTRL then press the ‘space bar’

    Highlighting the text can be done easily in one of three ways:

    1. Press CTRL + A to select all
    2. place the cursor just before the text you’d like to highlight, press and hold the left-mouse button and drag the hightlighted area over the text you’d like to highlight
    3. Place the cursor at the start of the text you’d like to highlight, press and hold the ‘SHIFT’ button and use the arrow keys to move the highlighted area to the right place
    Please note, if you’d like to select non-adjoining areas of text at the same time, press and hold the ‘CTRL’ key while you’re selecting text
  • Outlook 2007 – adding SMTP authentication

    When using a laptop or mobile device, you’re potentially going to be sending emails over many different internet networks. In order to make sure that only the allowed users are using a particular SMTP to send email, they commonly require a user-name and password to log into the SMTP server every time an email is sent. This is not something you’d normally notice as your computer should do this automatically in the background, however, if that authentication fails, you’ll not be able to send emails

    If your outgoing email server on Outlook 2007  requires authentication, use the following steps to add the user-name and password:

    1. Open Outlook
    2. Click the ‘tools’ tab from the top menu then click ‘account settings’
    3. Highlight the account you’d like to edit then select ‘change’
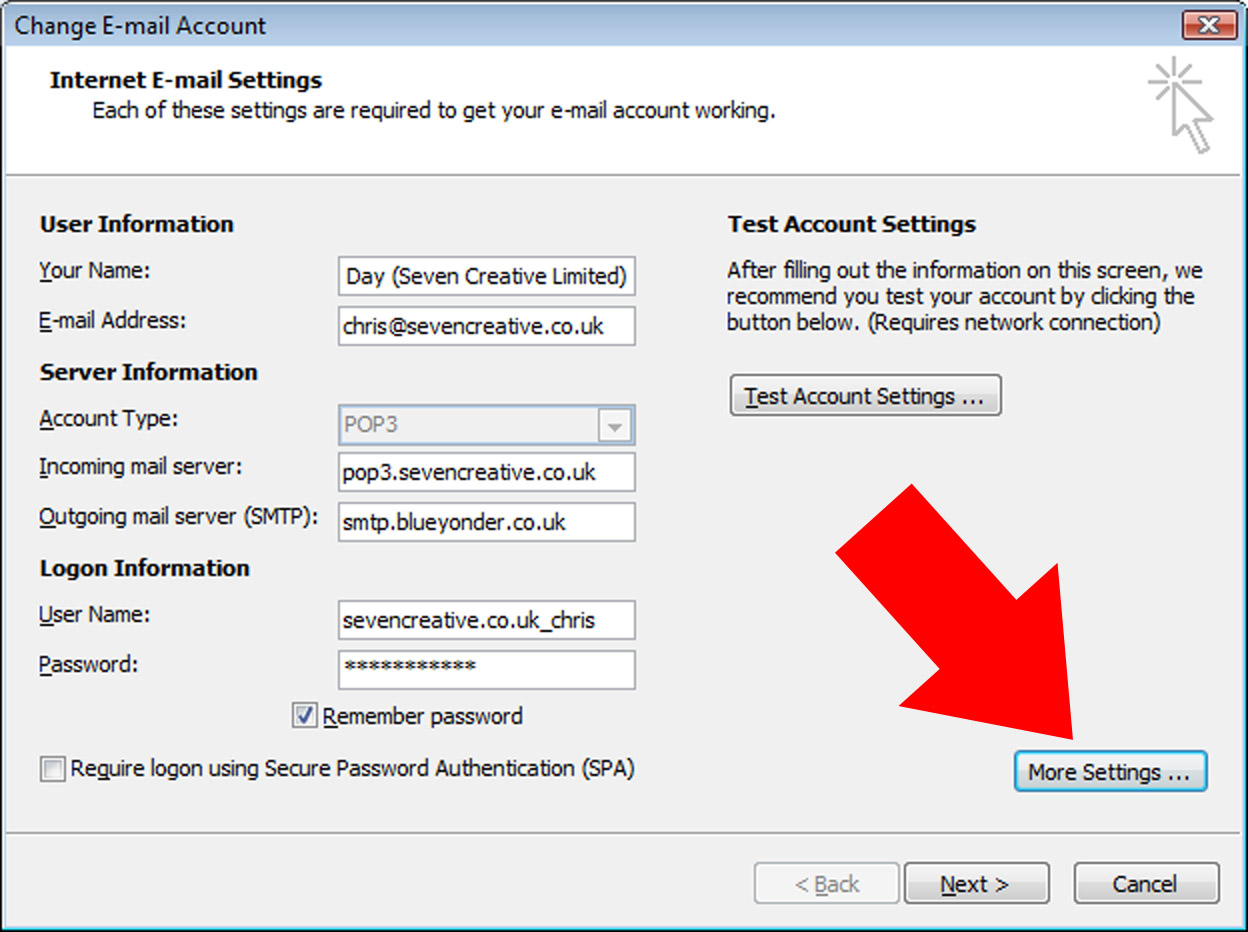
    4. On the internet e-mail settings page click ‘more settings’

      On the internet e-mail settings page click ‘more settings’
      On the internet e-mail settings page click ‘more settings’
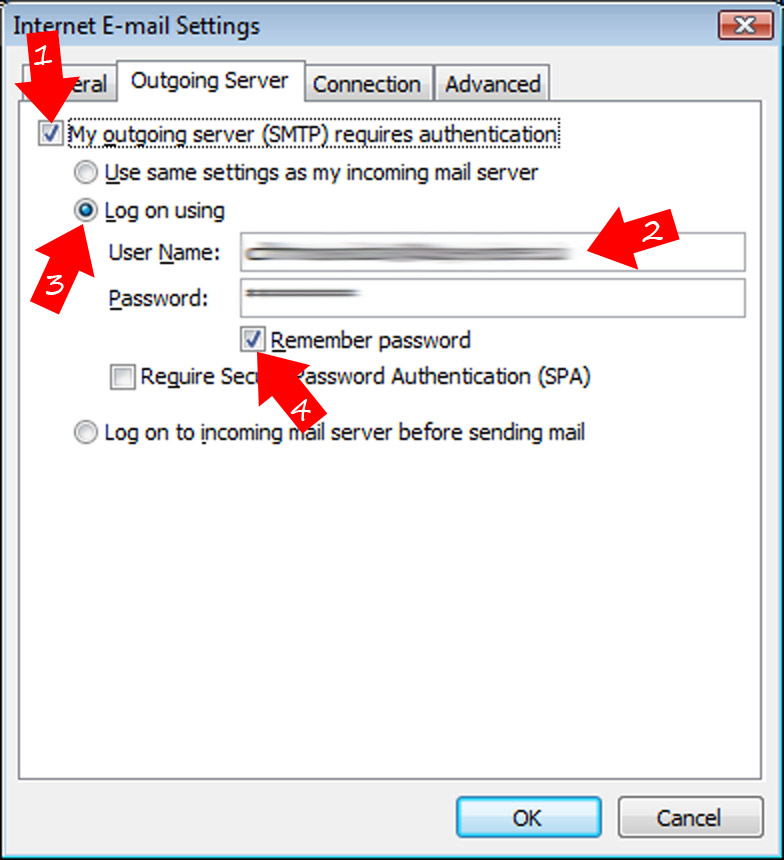
    5. On the new window, click the ‘outgoing server’ tab

      On the new window, click the ‘outgoing server’ tab
      On the new window, click the ‘outgoing server’ tab
    6. Change the following settings:
      1. Tick the box ‘my outgoing server requires authentication’
      2. Tick the ‘log on using’ button
      3. Type in your normal username and password
      4. Tick the ‘remember password’ button
    7. Click ‘OK’ which will take you back to the main ‘email settings’ page
    8. Click ‘next’
    9. Click ‘finish’
  • 553 sorry, that address is not in my list of allowed recipients email problem

    553 sorry, that address is not in my list of allowed recipients email problem

    if you’re regularly getting emails bounced back to you with the error ‘553 sorry, that address is not in my list of allowed recipients’ this might help.

    In our experience, the problem is usually down to a BT issue not allowing emails to be delivered.

  • How to create an outlook email template

    How to create an outlook email template

    If you use Outlook and often have to write similar emails, Instead of re-writing them every time it might be a better idea to create a template.

    This is very simple to do and might save you a lot of time! Here’s how to do it:

    1. Write your email as normal including subject and content
    2. Click the Outlook button and choose ‘save as’
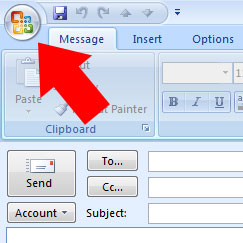
    3. Click the Outlook button
      Click the Outlook button

    4. When the save dialogue box appears, save the message on your computer.
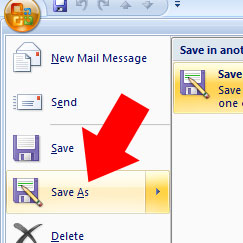
    5. Choose 'save as' from the drop down menu
      Choose 'save as' from the drop down menu

    Now, when you want to use your template, just double click the saved email and you can use as many times as you like