
Category: Wordpress

  • How to fix WordPress error “Updating failed. Could not update post in the database”

    How to fix WordPress error “Updating failed. Could not update post in the database”

    The WordPress error message “Updating failed. Could not update post in the database” appears when the system is unable to save changes to a post or page. This error typically involves a breakdown in communication between WordPress and its underlying database, preventing updates from being committed.

    How to fix WordPress error “Updating failed. Could not update post in the database”

    However, if this problem has occurred ‘out of the blue’ and ony affects certain posts or pages, there may be a very simple fix.

    How to fix WordPress error “Updating failed. Could not update post in the database”

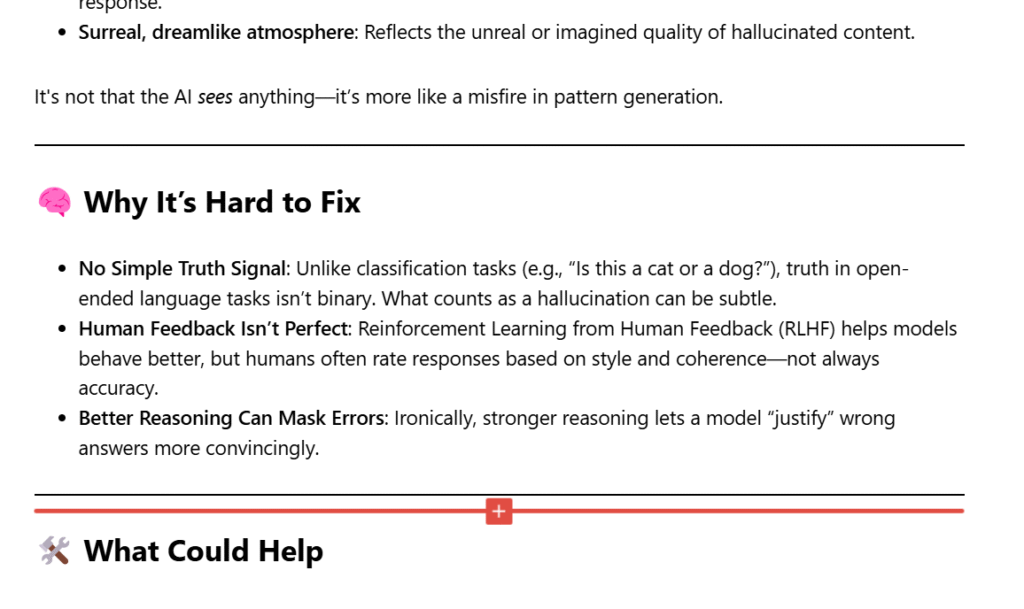
    Check your whole post or page for invalid characters (e.g. Unicode Characters, symbols, emojis, etc.). The contents of the post or page will be added to the database when you hit ‘publish’ but there are some characters which can’t be included – this will return an ‘Updating failed. Could not update post in the database’ error. Here is an example of a post that wouldn’t save until I removed the ‘brain’ and ‘tools’ icons.
    How to fix WordPress error “Updating failed. Could not update post in the database”

    This problem with invalid characters most commonly happens when you’re pasting in contents from another website, e.g. ChatGPT

    Still having trouble with your WordPress site? Get in touch with us
  • How to reactivate the WordPress Links Manager

    If like me you’ve been using WordPress since the beginning – or at least prior to December 2012, you might remember the old WordPress Links Manager (sometimes also known as Blogroll). However, this functionality was removed by default from WordPress version 3.5 onward. Yes, on the one-hand, links like that are a bit old-fashioned, however, there are occasions when it does come in very useful.

    The links manager will allow you to easily create and manage links on your site that are (normally) simply added to the sidebar using a widget.

    This functionality is still available within he core WordPress functionality, it’s just turned off now. However, it is pretty easy to ‘turn it back on again’, and here’s how.

    How to re-activate or add the WordPress Links Manager to your site

    Firstly, you need to access your theme ‘functions.php’ file. The easiest way to do this is through the site’s in-built ‘theme editor’. Find this file for your current live WordPress theme and open the file for editing. If this ‘theme edit’ option isn’t available, try accessing the file via FTP (it’s in the theme files)

    Secondly, add the following line of code to the file and save:

    add_filter( 'pre_option_link_manager_enabled', '__return_true' );

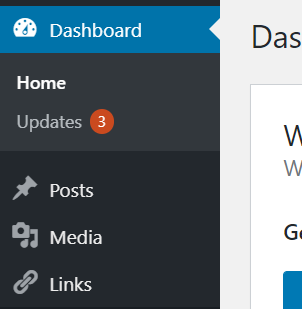
    Now head back to your dashboard and you should now find ‘Links’ (the old ‘links manager’) as an option under the ‘Media’ option.

    Still unable to activate the WordPress Links Manager?

    If you need help with your WordPress site including WordPress hosting and WordPress maintenance, give us a call on 0114 383 0711

  • WordPress – Install Contact Form 7 and Minimise Spam Without Missing Messages

    WordPress tutorial – how to install Contact Form 7 with message logging, Google CAPTCHA V2 integration and extra anti-spam measures

    Step 1 – install the required plug-ins

    1. From your WordPress dashboard, go to the plug-ins menu and select ‘add new.’ Search for, install and then activate the following:
      1. Contact Form 7
      2. Really Simple Captcha
      3. Insert Headers and Footers
      4. Akismet
      5. Flamingo

    Step 2 – integrate the CAPTCHA

    Contact Form 7 is a simple plugin that allows you to quickly and easily include contact forms within your WordPress website. 

    Contact Form 7 also allows you to insert a CAPTCHA into your contact forms to prevent bots from submitting forms and therefore reduce spam. Contact Form 7 utilises Really Simple CAPTCHA as its officially-sanctioned CAPTCHA module.

    Insert Headers and Footers is a plug-in that provides you with a is a simple interface allowing you to insert code (like Google CAPTCHA code or Google Analytics) into to your WordPress site header and footer without having to edit your theme files directly.

    1. Open a new tab in your browser and go to the Google reCAPTCHA site
      1. Follow the instructions to log in, register your domain and generate a site key and secret key
      2. Copy the ‘site key’ and ‘secret key’ from the Google site to the Really Simple Captcha integration page before saving
    2. From within your WORDPRESS dashboard, go to CONTACT > INTEGRATION
      1. add the site key and secret key in the relevant boxes
    3. From within your WORDPRESS dashboard, go to SETTINGS > INSERT HEADERS AND FOOTERS
      1. Paste the script link below into the ‘header’ section then save changes
    4. From within your WORDPRESS dashboard, go to CONTACT > CONTACT FORMS
      1. Create a new contact form
      2. Right before the ‘SEND’ button of your form, paste the code below (don’t forget to add your unique SITE KEY where specified)
      3. Configure the form fully and save changes
    5. Create your contact page
      1. Integrate the contact form as normal within your site

    (step 4.1) Paste the following code into the header section

    <script src='https://www.google.com/recaptcha/api.js'></script>
    

    (step 5.2) Paste the following code into your new form just before the ‘send’ button (don’t forget to add your unique ‘site key’)

    <div class="g-recaptcha" data-sitekey="<<your unique 'site key'>>"></div>

    Step 4 – integrate the HoneyPot

    Contact Form 7 Honeypot is a WordPress plugin that adds honeypot anti-spam functionality to Contact Form 7 forms. Honeypot is a technique that adds a hidden field to a form that is essentially a trap set for spambots.

    1. go to CONTACT and edit your contact form
    2. within the contact form, before the ‘send’ button tag, use the TAG generator to add a ‘honey pot’ tag
    3. save the form

    Step 5 – activate Akismet

    Akismet checks your comments and contact form submissions against their global database of spam to prevent your site from publishing malicious content.

    1. Go to SETTINGS > AKISMET ANTI-SPAM and follow the instructions to create an account, generate an API key, and activate your site
    2. Enter the API key, choose your settings, then save changes

    Step 6 – test the message log

    Flamingo is a message storage plugin for created for Contact Form 7. When any message is sent to you via the contact form, it will also be stored in the Flamingo database allowing you to check for missed or deleted messages.

    1. test your contact form my sending yourself a message
    2. once this is working and the message has been received, go to Flamingo from your WordPress site dashboards and view the sent message

    — 

    If you have any trouble with any of the above instructions, get in touch with us via our main website

  • WordPress – change the default ‘from’ information

    The default email address and from name in WordPress notification emails can be easily changed by editing your functions.php file

    Simply add the following code (remembering to change the email address and name to the ones you want to use instead)

     add_filter('wp_mail_from', 'new_mail_from');
     add_filter('wp_mail_from_name', 'new_mail_from_name');
    
    function new_mail_from($old) {
     return 'yourname@yourdomain.com';
     }
     function new_mail_from_name($old) {
     return 'Your Name';
     }

    We’re based in Sheffield, UK. If you’d like help updating your WordPress site or any other WordPress maintenance, give us a call on 0114 383 0711