If like me you’ve been using WordPress since the beginning – or at least prior to December 2012, you might remember the old WordPress Links Manager (sometimes also known as Blogroll). However, this functionality was removed by default from WordPress version 3.5 onward. Yes, on the one-hand, links like that are a bit old-fashioned, however, there are occasions when it does come in very useful.
The links manager will allow you to easily create and manage links on your site that are (normally) simply added to the sidebar using a widget.
This functionality is still available within he core WordPress functionality, it’s just turned off now. However, it is pretty easy to ‘turn it back on again’, and here’s how.
How to re-activate or add the WordPress Links Manager to your site
Firstly, you need to access your theme ‘functions.php’ file. The easiest way to do this is through the site’s in-built ‘theme editor’. Find this file for your current live WordPress theme and open the file for editing. If this ‘theme edit’ option isn’t available, try accessing the file via FTP (it’s in the theme files)
Secondly, add the following line of code to the file and save:
Sometimes you just can’t reset your WordPress password. Maybe you don’t have access to the associated email address or maybe the site isn’t able to relay reminder emails. Whatever the reason, it’s possible to change manage WordPress users and your username and password directly in the database.
However, before you start, firstly, make sure you’ve got a full backup of the database and know how to restore it as mistakes can kill your site! Secondly, make sure you’re confident you know what you’re doing. Any problems or worries, give us a call and we’re happy to help. Anyway, on with the tutorial.
1. Access your database
The most common way to access and edit your database is using PHPMyAdmin. This server-based software gives you a user-friendly interface to view and edit the data within your site. You’ll need the PHPMyAdmin address, the database name, your username and your password. The latter three items can be found in your wp-config.php file in the site root directory. The former will probably need to be accessed via the website hosting dashboard.
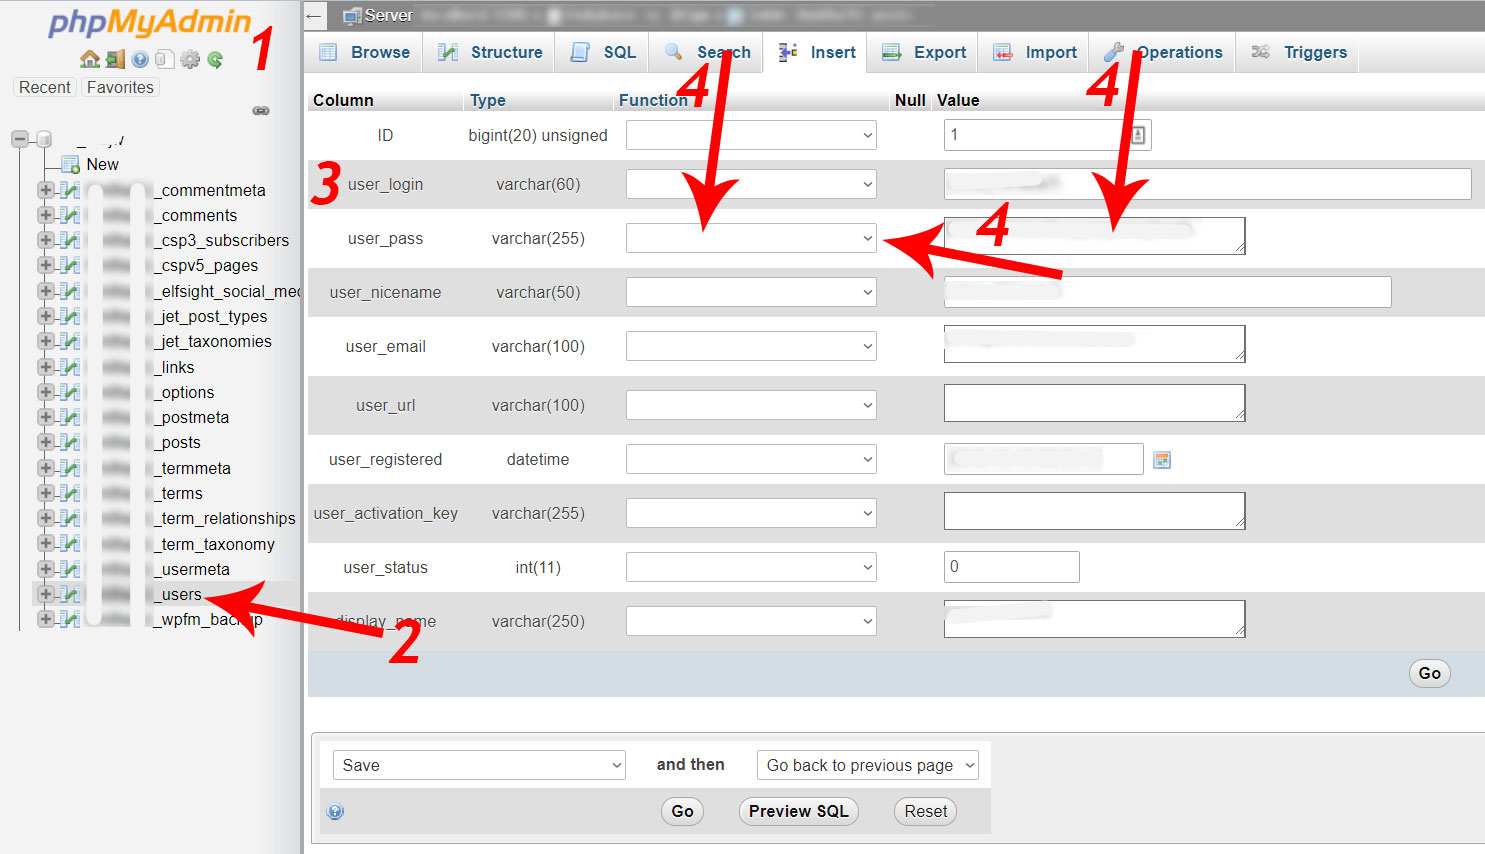
2. Find the ‘users’ table
This table will usually have a prefix ending in ‘_users’. For example, if the prefix is ‘mysite’, the table you’re looking for will be called ‘mysite_users’. Sounds complicated but it isn’t – you’ll see when you view the database.
3. Locate the user you want to update
Within the ‘users table you may find 1 or more records depending on how may users your WordPress site has. Next to the one you want edit, click ‘edit’. This is also a good opportunity to clear out old users you no longer need.
4. Edit the ‘user_pass’ line
You should now be viewing the user for which you want to update the password. On the line ‘user_pass’, choose ‘MD5’ from the function drop-down options and add the new password in the following field before clicking ‘go’ to save the new info.
5. Done
You should now be able to log into the site using the email address or username and the new password.
If the ‘theme edit’ option has disappeared from your WordPress dashboard and you’re unable to edit themes from the website back-end, try the following tutorial as it’s a common problem with (what is usually) a simple, quick fix. Being able to edit your site themes is useful, however, it can be a big security vulnerability which is why there are many plugins designed to remove the ability to edit themes from the dashboard. When the ‘theme edit’ functionality is disabled, the changes are often made permanent regardless of whether you’ve uninstalled or deactivated the original plugin that made these changes.
In order to complete this tutorial, you’ll need:
FTP access to your site
Admin access to your WordPress site’s dashboard
How to reactivate the ‘edit theme’ option in WordPress
Firstly, a bit of housekeeping. If you’re not sure what your doing, remember you can easily damage your site by editing the theme files. If you’re not sure, should you get professional help to do this? Also, make sure you have a full backup of your site just in case. Before you edit any files directly, have you checked the plugin settings to allow theme editing? For example, iThemes Security you need to go to Security > Settings > WordPress Tweaks and enable ‘file editor’ then save the changes.
If the above didn’t work and you still can’t edit your WordPress theme, deactivate any of the plugins via the WordPress dashboard that you think may have disabled access to the ‘theme edit’ function such as WordFence or iThemes Security.
Access your site via FTP
Open the ‘wp-config.php’ file to edit (you may need to download it depending on your FTP client)
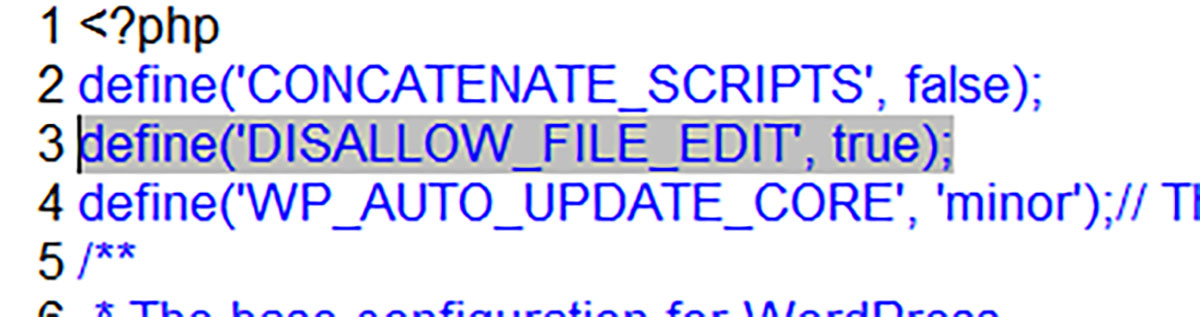
Find the line of code in the file ‘define(‘DISALLOW_FILE_EDIT’, false);’. Here you can switch WordPress dashboard theme editing on or off by editing this line to:
define(‘DISALLOW_FILE_EDIT’, true);
define(‘DISALLOW_FILE_EDIT’, false);
Save the updated file on the server again. Remember that there is a potential security risk allowing the theme to be edited via the dashboard as anyone with an admin login can do this. To disable theme editing again. Follow step 5
Is your WordPress hosting secure?
The reason why we prefer to host the WordPress sites we look after includes the following reasons:
We provide ongoing 6-hourly, 7-day server backups. This is besides any offline backups we store. If the worst does happen and your site is hacked or damaged, we can have it back up and running in minutes
Our server is secure and designed for WordPress hosting. We have a minimum 40-point server security protocol we apply to every site. This is on-top of the best-practice site management we provide too.
Our servers are premium and in the UK. This means that your site visitors benefit from fast display speeds; you can administer your site quickly and easily; and you also get the Google SEO benefit that comes along with the geo-location and fast display speeds
If you ever lose your login details, we’re able to quickly and easily access your database directly to reset them and restore access
Disgruntled employee attempting to sabotage your site? It’s a real and common potential problem! We can quickly and easily stop access to anyone unauthorised
Are you at risk of a DDOS attack? We’re able to block these automatically
And many more reasons!
Call us for more information about any of the points here or if you need some help editing your WordPress theme. We’re available on 0114 383 0711 or by email
This is a simple guide to fixing the problem where your images appear to upload to your WordPress site but don’t display properly in the media manager
This is a simple guide to fixing the problem where your images appear to upload to your WordPress site but don’t display properly in the media manager
Ever experienced that problem where you upload an image through the WordPress media-manager, but they don’t appear properly? It appears like it has uploaded but there is just a blank space where the image should display? This is normally a relatively easy problem to fix provided you have access to your web server or access to your site via FTP.
This is most commonly a problem to do with file permissions.
What are file permissions?
File permissions are web server system settings which apply to all web server files and determine who can access specified files and what they can do with those files.
In terms of ‘who’ or which ‘user’ can access the files, they are:
The ‘owner’ of the file – The person who created the files.
The ‘administrator’ – The person responsible for managing and updating files, as well as setting permission levels.
The ‘Group’– referring to specific groups of users with unique settings specific to them.
The ‘global’ group which is also sometimes referred to as anyone or public – Provides access to all users.
The ‘individual’ user – allowing you to create a specific level of access at the individual user level.
Or sometimes you’ll only have these options:
Owner
Group
Public or others
In terms of permissions, these are (basically):
Read – this level of permission assigned to a file allows respective user to view and copy files but can’t make changes to the file or create new files.
Write – this level of permission allows the user to edit, rename, and move files. In most cases, they can also create new files.
Execute –this level of permission can run a specific program or type of program file.
You’ll also probably see the permissions most commonly referenced as numbers which refer to:
7 – read, write and execute (in other words, everything)
6 – read and write
5 – read and execute
4 – read only
3 – write and execute
2 – write only
1 – execute only
0 – none
Note the ‘permissions’ are also sometimes referred to as ‘properties’ or ‘CHMOD’
Why does this mean that my WordPress images don’t display?
When you upload a file to the web server (as you do with the WordPress Media Manager) it places the file in a folder and applies user ‘permissions’ to the file. When the media manager tries to display the file, if the permissions are not adequate for what it needs to do (in this instance, display the image in the dashboard), it won’t work and you’ll see an error (in this instance an empty grey box where the image should be.)
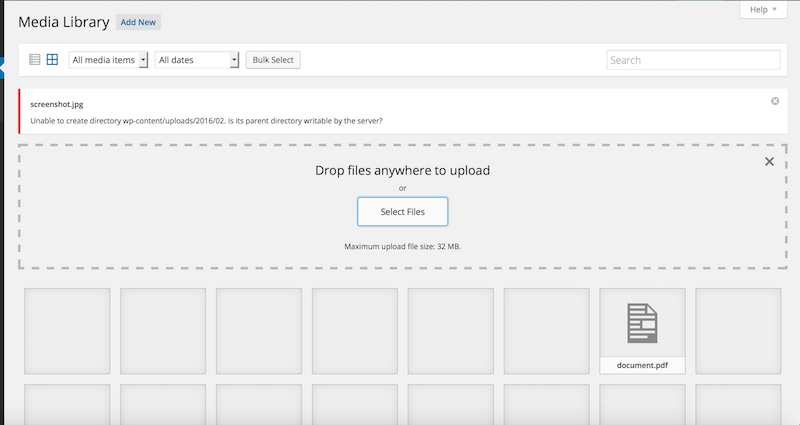
You also may be experiencing a problem where, when you try to upload an image, you get the error message along the lines of ‘unable to create directory wp-content/uploads… Is its parent directory writable by the server?’ – if this is the case it’s the same problem with the same fix.
How do I fix this problem?
To get the image to display properly, you’ll need to change the image file permissions for the appropriate users to ones that let the image display publicly on the server.
Before you attempt the fix, please remember that aome files are very dangerous if run on a webserver (such as executables or ‘.exe’ files) so make sure you know what you’re doing or get professional advice before you change the permissions for files like this. However, basic image files, such as JPGs or PNGs, are usually innocuous.
You can change the permissions for a single file, a whole folder (directory) and its contents, or a whole folder and its contents including all files, sub-directories, and the contents of sub directories
To fix the problem, change the required folder or image or images permissions to 744 (or 0744) – this is ‘owner can read, write and execute’, ‘group can read’ and ‘public can read’
You’ll need to access the website files using FTP or via your hosting control panel.
If accessing through FTP, navigate to your ‘uploads’ folder which is in the default ‘wp-content’ folder located in the public root directory of your WordPress installation.
For example, I only have images in my media manager so to change the file permissions for all the uploaded images, I access my web server using my FTP client, I navigate to the ‘wp-content’ folder, I then right-click on the ‘uploads’ folder, I then select the ‘properties / CHMOD’ option, I then change the permissions to ‘to should allow you to change the permissions of the folder to ‘744’ or ‘0744’ and click ‘apply’
Although individual FTP clients differ, this method normally allows to you change the permissions as required on any individual file or folder and contents.
To change the permissions using a file manager, I log into my hosting account, navigate to my file manager, navigate to the required folder or file and then use the file manager tools to change the permissions as above. I can’t give individual instructions here as there are too many individual hosting accounts with different file managers.
if, when trying to upload a new image, you’re getting the error message ‘unable to create directory wp-content/uploads… Is its parent directory writable by the server?’, this means that WordPress cannot make a new folder on the server to upload the new image to. In order to create a new folder (aka directory), the containing folder must be writable by the server. In this instance it’s normally the ‘uploads’ folder which is inside the ‘wp-content’ folder. Change the permissions for the ‘uploads’ folder to ‘744’ or ‘0744’ and try again.
If you’re unable to change the permissions for images or folders using this method, it may be that you don’t have sufficient permissions to make these changes. If this is the case, talk to your hosting provider or give us a call if you need a hand
On occasion I’ve come across WordPress installations that don’t have English (UK) as an available language and it turns out it’s not such a straight-forward problem to fix.
The default WordPress installation comes with all manner of languages including Spanish, Japanese, Indonesian, and Korean, however, English (UK) isn’t always there. I suppose the reasoning behind this is that us native English speakers can get by just fine with the English (US) version, however, from a search engine localisation perspective it may not be so good.
Many of the tutorials tell you to update your ‘wp_config.php’ file to update your site default language but this more-than-often doesn’t actually work. The other problem is that the language files you need are not particularly easy to get hold of unless you’re quite technical.
Therefore, here is a simple tutorial on installing the English (UK) language files and setting this as your default ‘site language.’
Setting English (UK) as your default WordPress site language when it’s not available from the dashboard
To begin with you’ll need the correct language files. You can download them here: WP-english-GB-files
Unzip the files to a folder
Log into your site via FTP
Navigate to the public directory (the one containing the files index.php, wp_config.php, wp_login.php etc.)
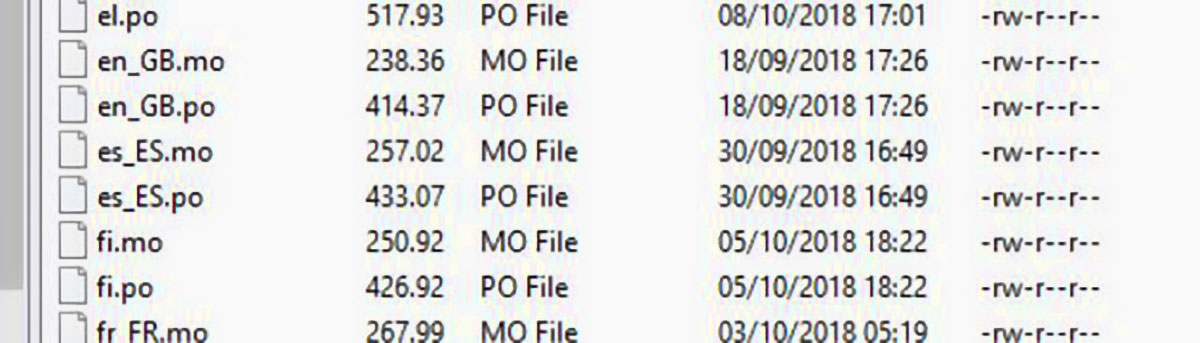
Open the ‘wp-content’ folder then the ‘languages’ folder. You should now see two folders called ‘plugins’ and ‘themes’ along with lots of files with the ‘.mo’ extension
Upload the English (UK) language files to this directory
Log into your WordPress dashboard through a browser
Go to ‘settings’
In the ‘General’ section, from the ‘site language’ drop-down list you’ll now find ‘English (UK)’
Update and save. Done
Need a hand?
Give us a call if you need a hand on 0114 383 0711
Contact Form 7 is a simple plugin that allows you to quickly and easily include contact forms within your WordPress website.
Contact Form 7 also allows you to insert a CAPTCHA into your contact forms to prevent bots from submitting forms and therefore reduce spam. Contact Form 7 utilises Really Simple CAPTCHA as its officially-sanctioned CAPTCHA module.
Insert Headers and Footers is a plug-in that provides you with a is a simple interface allowing you to insert code (like Google CAPTCHA code or Google Analytics) into to your WordPress site header and footer without having to edit your theme files directly.
Contact Form 7 Honeypot is a WordPress plugin that adds honeypot anti-spam functionality to Contact Form 7 forms. Honeypot is a technique that adds a hidden field to a form that is essentially a trap set for spambots.
go to CONTACT and edit your contact form
within the contact form, before the ‘send’ button tag, use the TAG generator to add a ‘honey pot’ tag
save the form
Step 5 – activate Akismet
Akismet checks your comments and contact form submissions against their global database of spam to prevent your site from publishing malicious content.
Go to SETTINGS > AKISMET ANTI-SPAM and follow the instructions to create an account, generate an API key, and activate your site
Enter the API key, choose your settings, then save changes
Step 6 – test the message log
Flamingo is a message storage plugin for created for Contact Form 7. When any message is sent to you via the contact form, it will also be stored in the Flamingo database allowing you to check for missed or deleted messages.
test your contact form my sending yourself a message
once this is working and the message has been received, go to Flamingo from your WordPress site dashboards and view the sent message

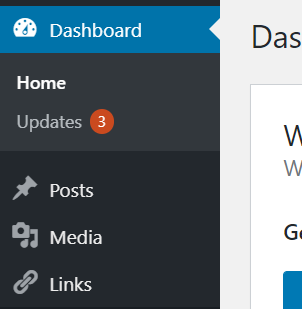 If like me you’ve been using WordPress since the beginning – or at least prior to December 2012, you might remember the old WordPress Links Manager (sometimes also known as Blogroll). However, this functionality was removed by default from WordPress version 3.5 onward. Yes, on the one-hand, links like that are a bit old-fashioned, however, there are occasions when it does come in very useful.