Category: Email tutorial

  • Microsoft Exchange – how to update your SPF, DKIM and DMARC records

    Microsoft Exchange – how to update your SPF, DKIM and DMARC records

    If you’re domain is using the Microsoft 365 email – otherwise known as MS Exchange – it’s likely you will need to update your SPF, DKIM and DMARC records within your domain DNS at some point. From February 2024, Yahoo (Yahoo Mail) and Google (Gmail) require email validation for large volume email senders, but it’s good practice to add these records now nevertheless as they’re also often used by spam filters to distinguish between junk and legitimate email. As far as I’m aware, there are no current plans to require these changes for everyday email users, however, in my opinion it’s only a matter of time.

    Microsoft Exchange – add required SPF record

    Your domain DNS should already contain the following SPF record:

    • Record: TXT
    • Host Name: @
    • Points to address or value: v=spf1 include:spf.protection.outlook.com -all
    • TTL: 1 hr

    Microsoft Exchange – enable / add DKIM

    Generate DKIM keys within the Microsoft 365 Admin Centre:

    1. Sign-in through the M365 admin centre as a global administrator
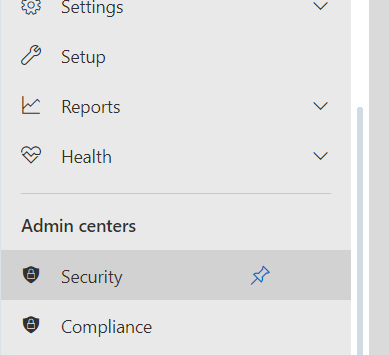
    2. In the left-hand menu, click on Security under Admin Centres. This will take you to the Microsoft Defender Portal.
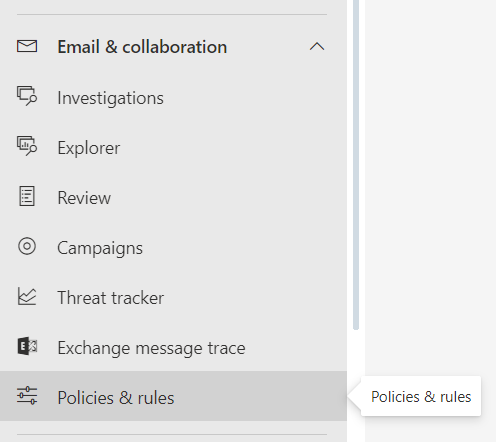
    3. From there, Under Email & Collaboration – click on Policies and Rules –> Threat policies –> Email Authentication Settings
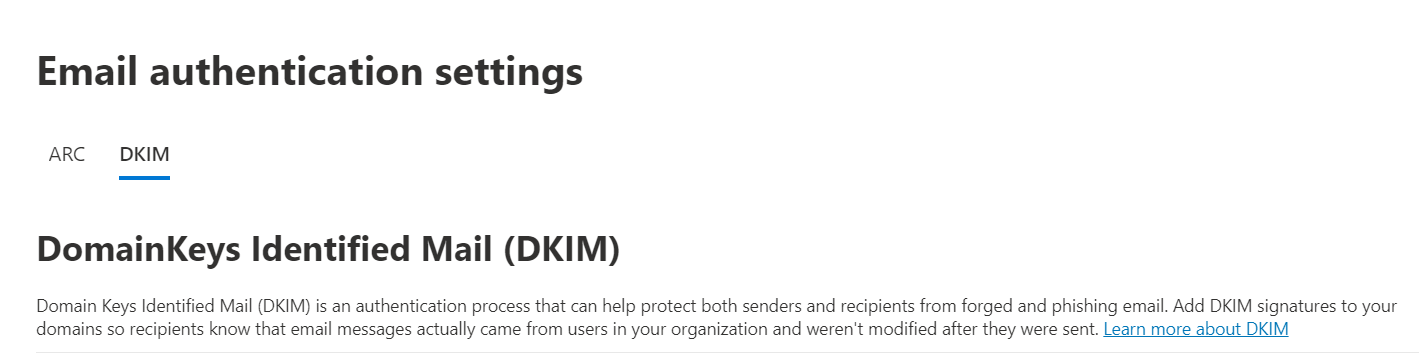
    4. choose the DKIM tab and you’ll see the ‘DomainKeys Identified Mail (DKIM)’ tab with your domain name(s) below it
    5. Click on the domain name you’d like to activate DKIM on and enable the DKIM under ‘Sign messages for this domain with DKIM signatures’

    At this point, you will probably be shown an error message saying that the required CNAME records do not exist. Within this error message you’ll be shown the CNAME records you need – add them to your domain DNS. Once they have been added, updated and they have resolved, you will need to go back to step 1 and follow the instructions again (see below for the client error message example)
    How to configure and add a DMARC to your domain:

    Your DMARC record will need to be generated before being added to your domain name. Many hosts will do this for you. Here is how to do it manually:

    1. Generate your DMARC record using a third party record generator such as: https://dmarcian.com/dmarc-record-wizard/ (this is a third-party website and the link opens in a new tab)
    2. Once your record has been generated, add your DMARC record to your DNS

    Microsoft 365 Admin Centre – DKIM error message example

    As mentioned above, if you try to activate DKIM before you have the correct CNAME records within your DNS, you will get an error message. Here is an example of that message where you will find your CNAME records:

    Client Error

    |Microsoft.Exchange.Management.Tasks.ValidationException|CNAME record does not exist for this config.

    Please publish the following two CNAME records first.

    Domain Name : *****.***

    Host Name : selector1._domainkey

    Points to address or value: selector1-*****.***._domainkey.********.onmicrosoft.com

    Host Name : selector2._domainkey

    Points to address or value: selector2-*****.***._domainkey.********.onmicrosoft.com .

    If you have already published the CNAME records, sync will take a few minutes to as many as 4 days based on your specific DNS. Return and retry this step later.

    The basic syntax of the DKIM CNAME records for custom domains that send mail from Microsoft 365 is:

    Hostname: selector1._domainkey Points to address or value: selector1-<CustomDomain>._domainkey.<InitialDomain>

    Hostname: selector2._domainkey Points to address or value: selector2-<CustomDomain>._domainkey.<InitialDomain>

    Further healp

    Here is the Microsoft help page for how to Set up DKIM to sign mail from your Microsoft 365 domain: https://learn.microsoft.com/en-gb/microsoft-365/security/office-365-security/email-authentication-dkim-configure?view=o365-worldwide
  • Protected: Apple email problem – alternative solution

    This content is password-protected. To view it, please enter the password below.

  • Protected: Adding your Seven Creative email address to Hotmail

    This content is password-protected. To view it, please enter the password below.

  • Protected: Setting up Seven Creative email on Android

    This content is password-protected. To view it, please enter the password below.

  • Protected: How to setup Seven Creative email on iPhone or iPad

    This content is password-protected. To view it, please enter the password below.

  • Microsoft Outlook email signature locations

    Editing and updating your Microsoft Outlook email signature using the in-built signature editor can be fiddly, especially if you want to add anything other than plain-text. Also you may need to backup your signatures once in a while, for example, if you’re changing computers or reinstalling Outlook, and that’s also not-so-easy. Therefore, this article shows you the different options available when needing to access, edit, update or create new Outlook signature files directly. Please note this tutorial is designed for Windows users using Outlook 2016.

    Editing the Outlook signatures through the in-built Outlook signature editor

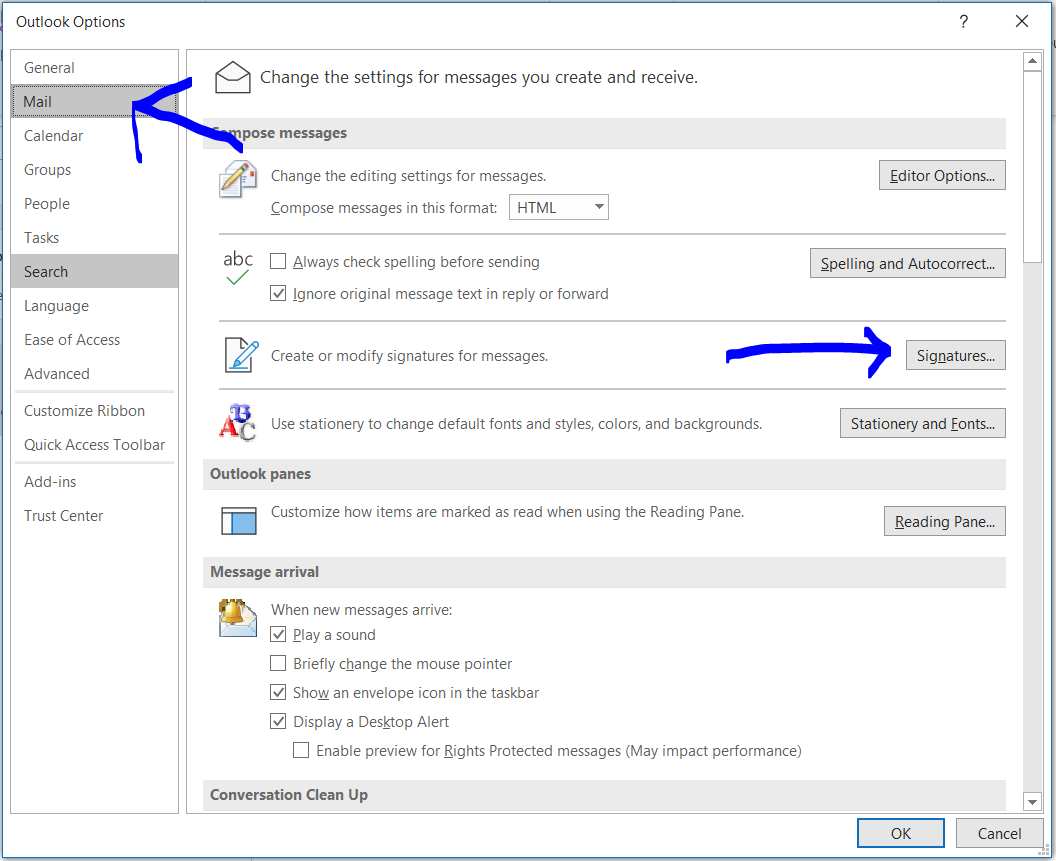
    The standard way to view, edit, update or create new Outlook email signatures is by using the Outlook signature editor within Outlook:

    1. open Outlook
    2. click ‘file’ (top left corner)
    3. click ‘options’ (left column)
    4. click ‘mail’ (left column on the new window)
    5. click ‘signatures’

    Microsoft Outlook email signature locations – where are the actual Outlook signature files located?

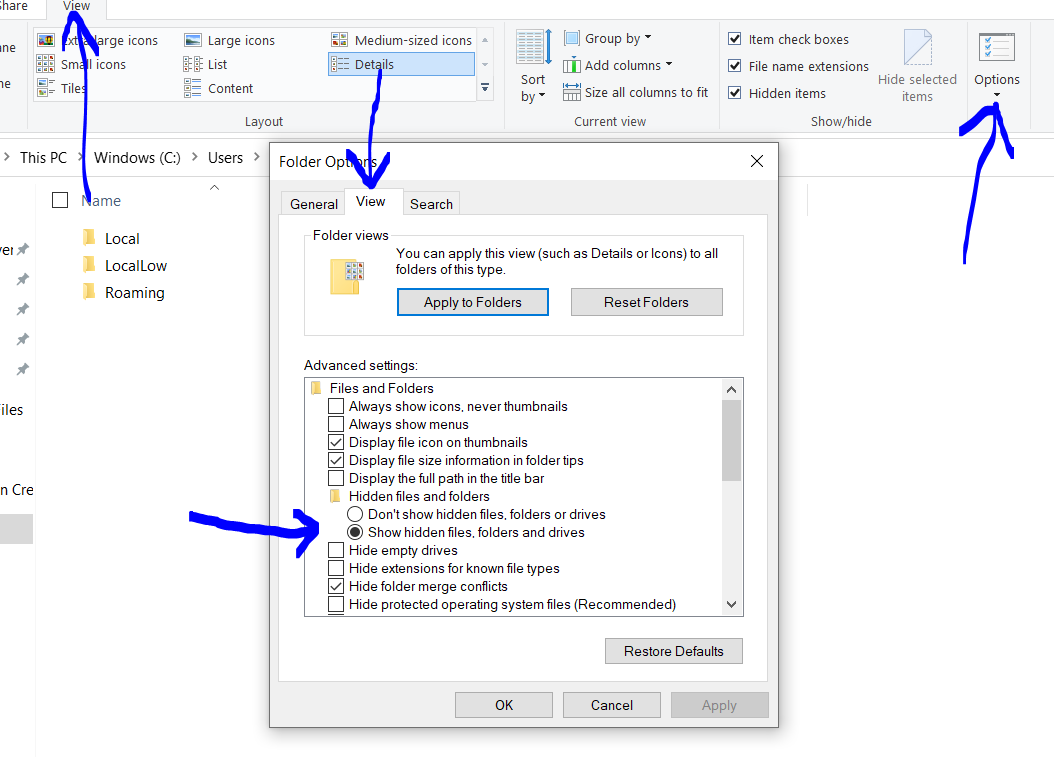
    First of all you’ll need to be able to see the hidden files & folders within your file system.

    • Open up an explorer window and click the ‘view’ options
    • update the option to view ‘hidden folders, files and drives’
      • View tab > options > view tab on the new window > click the radio button > apply.
    • It’s also probably a good idea to un-tick the ‘hide extensions for known file types’ option whilst your here.

    All of this can be undone when you’ve finished:

    Next navigate to the following addresses to find the right folder:

    Using Windows XP: C:\Documents and Settings\%username%\Application Data\Microsoft\Signatures

    Using Windows Vista, 7, 8 or 10: C:\Users\%username%\AppData\Roaming\Microsoft\Signatures

    Editing your Outlook email signature files directly

    Each of the signatures you’ve created will have several associated files and a folder – these relate to the different format of emails you might send, or more often, reply to.

    • signature.txt – this is the signature file for plain text emails as it contains no formatting. You can edit this file directly with a text editor
    • signature.rtf – this is a ‘rich text format’ file and contains formatting. You can edit this using Microsoft WORD
    • signature.htm – this is the HTML version of your email signature and is formatted using HTML tags. This one will require some coding knowledge but you can edit it with Microsoft NOTEPAD. However, this one is easiest edited through the built-in Outlook email signature editor
    • a folder containing other files such as colorschememapping.xml, filelist.xml, image001.png or themedata.thmx – these are the automatically generated files associated with the other HTML and rich text files.

    How to create a new Microsoft Outlook signature the expert way

    As the Microsoft Outlook email editor is so difficult to use, here is my preferred way to create a new email signature:

    1. open up Microsoft Word and create your signature exactly how you want it to look including all images, links and text
    2. copy everything to the clipboard (CTRL+A, then CTRL+C)
    3. open the Microsoft Outlook email signature editor
    4. create a new blank email signature
    5. paste in the signature you copied from Word
    6. Save, allocate to which emails you want it to display in, save again, and close the signature editor
    7. open the signature location as outlined above and edit your plain text version then save

    Email signature best practice – help avoid your email going to junk mail

    Modern spam filters will often use AI and machine learning to decide what is and isn’t spam. Links, fonts, images, text, etc. are all used as signals to evaluate your email so getting these things right is important. Therefore, for the best chance of getting into the recipients inbox (as opposed to their ‘junk’ mail), here is my list of good practice for email signatures.

    • include the minimum number of links possible or preferably none. If you do include a link, make sure its the same domain as the email has come from.
    • use one font
    • Avoid spelling mistakes
    • If you include images, keep them small, well optimised and appropriate. Most images don’t display automatically anyway
    • avoid the use of any obscene language. And if you do need to include anything x-rated, don’t try to hide it using things like zeros instead of ‘O’s or ones instead of ‘L’s
    • don’t use link shorteners like Bit.ly
    • send in plain text if you can – doesn’t look particularly nice but is more likely to get through the spam filter

    Further help

    If you need any further help Microsoft Outlook or Outlook email signatures or any other subjects such as:

    Please get in touch on 0114 383 0711

  • Protected: Setting up POP and IMAP email on MAC

    This content is password-protected. To view it, please enter the password below.

  • What is an ’email alias’?

    What is an email alias?

    An email address is made up of a recipient (e.g. your name) and a domain (e.g. your domain name) together to create a unique address (e.g. you@yourdomain.com) which are received in its own unique mailbox

    An email ‘alias’ is where you create a different recipient, but instead of the new address having its own mailbox, the emails sent to this address are simply automatically received by a different email address of your choosing.

    An Example

    For example, if your email address is ‘bob@yoursite.com’ you could also setup ‘enquiries@yoursite.com’ as an email alias meaning any emails sent to ‘enquiries@yoursite.com’ would simply arrive in the inbox for ‘bob@yoursite.com’.

    Why use an email alias?

    You can have as many email aliases per email address as you like and they are normally used for the following reasons:

    • merging email addresses – if you have an old email address that is no longer used (for example someone has left your company) but that address may still receive important emails, you can add this address as an alias to an existing email address meaning any emails sent to the old address will still be received and diverted to the existing address you specify
    • reducing the number of mailboxes – no need to have a unique mailbox for ‘info@…’, ‘enquiries@…’, ‘sales@…’ etc. – create one email address and add all the other variations as email aliases
    • to hide your email address – for example if you need to include an email address in  an advert or on a website, you may not want to include your own email address, but nevertheless you’d still like to include an email address. You can therefore instead use an email alias meaning you’re not having to display your own email address

    Limitations of an email alias

    Firstly, having one or more email alias can be very handy, however, you can’t ‘reply’ from an email alias

    Secondly, although creating or removing email aliases can be very quick to do, once it’s been removed, any emails sent to that address will no longer be received. This is important to consider if you’ve used the email alias for something important such as on your linkedIn profile where it may be the only email address for you that potential contacts may have

    Thirdly, an alias can only be used with an address on the same domain. In other words, if your email address is ‘bob@yourdomain.com’ and you’d like to add ‘jim@adifferentdomain.com’, it’ll only work if you have also added ‘adifferentdomain.com’ as a domain alias (as opposed to an email alias). In this example you’d need to use email forwarding instead.

    What do I do with an alias when it’s no longer needed?

    When an email alias has been deleted, any emails sent to that address still need to be handled one way or another. The options are to:

    • ‘blackhole’ the emails – this means they’re just simply deleted as they arrive without any fuss. This is the best option for aliases that are not important and not likely to receive important emails
    • ‘reject’ the emails – this sends a reply email to the sender saying the email was not delivered as no recipient was specified. I normally recommend this option as it means that emails sent from legitimate senders will provide them with a notification that their email was not not delivered meaning they can try to get in touch a different way
    • receive the emails in an ‘un-monitored’ inbox – this will receive the emails as normal in an email inbox. Then, if you like, you can log in and check the emails periodically to make sure nothing important has been missed. This is sometimes used as a transition before finally deleting the old email recipient.
    • Create a standard email account for the alias – maybe the required alias was just temporary and you need the account again or maybe it was so successful you’ve now taken on a new member of staff. Whatever the reason there’s nothing stopping you from simply turning the email alias into a standard email account instead

    How do I set up an email alias?

    An email alias needs to be setup and configured by your hosting or email administrator. As always, we’re happy to help and, if you’re not happy with your current email setup or administrator, we’re always here to help!

    If you need any help or advice setting up or configuring your email services, get in touch on 0114 383 0711 

  • Protected: Email port settings – Standard premium email

    This content is password-protected. To view it, please enter the password below.

  • Protected: Setting email up on Android Mail

    This content is password-protected. To view it, please enter the password below.