Blog

  • All the countries of the world in  text form

    All the countries of the world in text form

    This page lists all the countries of the world in text format with no lists or bullet points making it easier to cut-and-paste

    Click here to download this page contents as a text file

    • Keyboard shortcuts
      • Select all – CTRL+A
      • Copy to clipboard – CTRL+C
      • Paste without formatting – CTRL+SHIFT+V
    • Sections
    • Notes
      • There is some duplication as some countries span two continents such as Egypt, Russia or Turkey
      • Oceania also includes numerous dependent territories and non-sovereign entities, which are associated with other countries (some non-sovereign entities included)
      • I’ve used English (GB) spellings
      • There may be some mistakes (disclaimer!) and some definitions of countries are open to interpretation and political recognition, etc.
      • This list was created for my business use to help manage website access in response the current epidemic of bots & crawlers which are often being used to collect data used in AI

    1. List of continents

    There are seven continents:

    Asia
    Africa
    North America
    South America
    Antarctica
    Europe
    Oceania

    2. Countries by continent

    South America

    Argentina
    Bolivia
    Brazil
    Chile
    Colombia
    Ecuador
    Guyana
    Paraguay
    Peru
    Suriname
    Uruguay
    Venezuela
    French Guiana

    Africa

    Algeria
    Angola
    Benin
    Botswana
    Burkina Faso
    Burundi
    Cabo Verde
    Cameroon
    Central African Republic
    Chad
    Comoros
    Democratic Republic of the Congo
    Republic of the Congo
    Côte d’Ivoire (Ivory Coast)
    Djibouti
    Egypt
    Equatorial Guinea
    Eritrea
    Eswatini (formerly Swaziland)
    Ethiopia
    Gabon
    The Gambia
    Ghana
    Guinea
    Guinea-Bissau
    Kenya
    Lesotho
    Liberia
    Libya
    Madagascar
    Malawi
    Mali
    Mauritania
    Mauritius
    Morocco
    Mozambique
    Namibia
    Niger
    Nigeria
    Rwanda
    Sao Tome and Principe
    Senegal
    Seychelles
    Sierra Leone
    Somalia
    South Africa
    South Sudan
    Sudan
    Tanzania
    Togo
    Tunisia
    Uganda
    Zambia
    Zimbabwe

    Asia

    Afghanistan
    Armenia
    Azerbaijan
    Bahrain
    Bangladesh
    Bhutan
    Brunei
    Cambodia
    China
    Cyprus
    East Timor
    Egypt
    Georgia
    India
    Indonesia
    Iran
    Iraq
    Israel
    Japan
    Jordan
    Kazakhstan
    Kuwait
    Kyrgyzstan
    Laos
    Lebanon
    Malaysia
    Maldives
    Mongolia
    Myanmar
    Nepal
    North Korea
    Oman
    Pakistan
    Palestine
    Philippines
    Qatar
    Russia
    Saudi Arabia
    Singapore
    South Korea
    Sri Lanka
    Syria
    Taiwan
    Tajikistan
    Thailand
    Turkey
    Turkmenistan
    United Arab Emirates
    Uzbekistan
    Vietnam
    Yemen

    North America

    Antigua and Barbuda
    The Bahamas
    Barbados
    Belize
    Canada
    Costa Rica
    Cuba
    Dominica
    Dominican Republic
    El Salvador
    Grenada
    Guatemala
    Haiti
    Honduras
    Jamaica
    Mexico
    Nicaragua
    Panama
    Saint Kitts and Nevis
    Saint Lucia
    Saint Vincent and the Grenadines
    Trinidad and Tobago
    United States of America

    Antarctica

    (no countries)

    Oceania

    Australia
    Fiji
    Kiribati
    Marshall Islands
    Federated States of Micronesia
    Nauru
    New Zealand
    Palau
    Papua New Guinea
    Samoa
    Solomon Islands
    Tonga
    Tuvalu
    Vanuatu
    French Polynesia
    Guam
    Cook Islands

    Europe

    Albania
    Andorra
    Armenia
    Austria
    Azerbaijan
    Belarus
    Belgium
    Bosnia and Herzegovina
    Bulgaria
    Croatia
    Cyprus
    Czechia
    Denmark
    Estonia
    Finland
    France
    Georgia
    Germany
    Greece
    Hungary
    Iceland
    Ireland
    Italy
    Kazakhstan
    Kosovo
    Latvia
    Liechtenstein
    Lithuania
    Luxembourg
    Malta
    Moldova
    Monaco
    Montenegro
    Netherlands
    North Macedonia
    Norway
    Poland
    Portugal
    Romania
    Russia
    San Marino
    Serbia
    Slovakia
    Slovenia
    Spain
    Sweden
    Switzerland
    Turkey
    Ukraine
    United Kingdom
    Vatican City

    3. Full list of countries (alphabetical)

    Afghanistan
    Albania
    Algeria
    Andorra
    Angola
    Antigua and Barbuda
    Argentina
    Armenia
    Armenia
    Australia
    Austria
    Azerbaijan
    Azerbaijan
    Bahrain
    Bangladesh
    Barbados
    Belarus
    Belgium
    Belize
    Benin
    Bhutan
    Bolivia
    Bosnia and Herzegovina
    Botswana
    Brazil
    Brunei
    Bulgaria
    Burkina Faso
    Burundi
    Cabo Verde
    Cambodia
    Cameroon
    Canada
    Central African Republic
    Chad
    Chile
    China
    Colombia
    Comoros
    Cook Islands
    Costa Rica
    Côte d’Ivoire (Ivory Coast)
    Croatia
    Cuba
    Cyprus
    Cyprus
    Czechia
    Democratic Republic of the Congo
    Denmark
    Djibouti
    Dominica
    Dominican Republic
    East Timor
    Ecuador
    Egypt
    El Salvador
    Equatorial Guinea
    Eritrea
    Estonia
    Eswatini
    Ethiopia
    Federated States of Micronesia
    Fiji
    Finland
    France
    French Guiana
    French Polynesia
    Gabon
    Georgia
    Germany
    Ghana
    Greece
    Grenada
    Guam
    Guatemala
    Guinea
    Guinea-Bissau
    Guyana
    Haiti
    Honduras
    Hungary
    Iceland
    India
    Indonesia
    Iran
    Iraq
    Ireland
    Israel
    Italy
    Jamaica
    Japan
    Jordan
    Kazakhstan
    Kazakhstan
    Kenya
    Kiribati
    Kosovo
    Kuwait
    Kyrgyzstan
    Laos
    Latvia
    Lebanon
    Lesotho
    Liberia
    Libya
    Liechtenstein
    Lithuania
    Luxembourg
    Madagascar
    Malawi
    Malaysia
    Maldives
    Mali
    Malta
    Marshall Islands
    Mauritania
    Mauritius
    Mexico
    Moldova
    Monaco
    Mongolia
    Montenegro
    Morocco
    Mozambique
    Myanmar
    Namibia
    Nauru
    Nepal
    Netherlands
    New Zealand
    Nicaragua
    Niger
    Nigeria
    North Korea
    North Macedonia
    Norway
    Oman
    Pakistan
    Palau
    Palestine
    Panama
    Papua New Guinea
    Paraguay
    Peru
    Philippines
    Poland
    Portugal
    Qatar
    Republic of the Congo
    Romania
    Russia
    Rwanda
    Saint Kitts and Nevis
    Saint Lucia
    Saint Vincent and the Grenadines
    Samoa
    San Marino
    Sao Tome and Principe
    Saudi Arabia
    Senegal
    Serbia
    Seychelles
    Sierra Leone
    Singapore
    Slovakia
    Slovenia
    Solomon Islands
    Somalia
    South Africa
    South Korea
    South Sudan
    Spain
    Sri Lanka
    Sudan
    Suriname
    Sweden
    Switzerland
    Syria
    Taiwan
    Tajikistan
    Tanzania
    Thailand
    The Bahamas
    The Gambia
    Togo
    Tonga
    Trinidad and Tobago
    Tunisia
    Turkey
    Turkmenistan
    Tuvalu
    Uganda
    Ukraine
    United Arab Emirates
    United Kingdom
    United States of America
    Uruguay
    Uzbekistan
    Vanuatu
    Vatican City
    Venezuela
    Vietnam
    Yemen
    Zambia
    Zimbabwe

  • How to add Microsoft Exchange to your mobile devices

    How to add Microsoft Exchange to your mobile devices

    Android mobile phone or tablet

    1. Go to the Play Store
    2. Download and install Microsoft Outlook (free)
    3. When installed, open Outlook and add account
    4. Select ‘Exchange’
    5. Add your email address and password. Outlook will find all the settings itself

    iPhone or iPad

    1. Go to the App Store
    2. Download and install Microsoft Outlook (free)
    3. When installed, open Outlook and add account
    4. Select ‘Exchange’
    5. Add your email address and password. Outlook will find all the settings itself

    Adding Microsoft Exchange to your mobile device generally involves a few key steps…

    …regardless of whether you’re using an iPhone, Android, or another smartphone. The primary goal is to configure your device’s mail application to connect to your Exchange server.

    On most devices you’ll typically start by opening your device’s “Settings” app and navigating to the “Mail,” “Accounts,” or “Passwords & Accounts” section. From there, you’ll select the option to “Add Account” and choose “Exchange” or “Microsoft Exchange” from the list of account types.

    The system will then prompt you for your email address. After entering it, the device will normally attempt to automatically discover your server settings. If it’s unable to do so, you’ll need to manually enter information such as your server address, domain, username, and password. We can let you know all these details if you’re not able to add the email address in the traditional way.

    Once the account is configured, you’ll usually be given options to select what data you want to sync, such as mail, contacts, calendars, and reminders. After making your selections, you’ll save the account, and your device will begin synchronizing with your Exchange mailbox. You may also be prompted to set up a passcode or adhere to other security policies mandated by your organization’s Exchange server.

    Get Microsoft Exchange for your business

    If you’d like Microsoft Exchange setting up and managing for your business – including all tech support – give us a call on 0114 383 0711 or get in touch via our contact page

  • How to fix the Photoshop error “The currently selected scratch disks are full. Please modify scratch disk preferences that will come into effect in the next launch”

    How to fix the Photoshop error “The currently selected scratch disks are full. Please modify scratch disk preferences that will come into effect in the next launch”

    How to fix the Photoshop error “The currently selected scratch disks are full. Please modify scratch disk preferences that will come into effect in the next launch”

    Adobe Photoshop relies heavily on RAM (which is an acronym for Random Access Memory) to improve the speed of real-time image processing and application functionalities. However, the physical limitations of installed RAM can become a constraint when manipulating large, high-resolution images or executing complex editing tasks involving numerous layers and effects.

    When the system’s RAM capacity is exceeded, Photoshop employs a mechanism known as a ‘scratch disk’. A scratch disk is a designated area of storage – usually on a hard disk drive (HDD) or a solid-state drive (SSD) – that Photoshop utilizes as supplementary virtual memory. This allows the application to offload temporary data and computations from RAM to the extra storage location. This allows the continuation of operations that would otherwise be slowed down or unable to do by insufficient RAM.

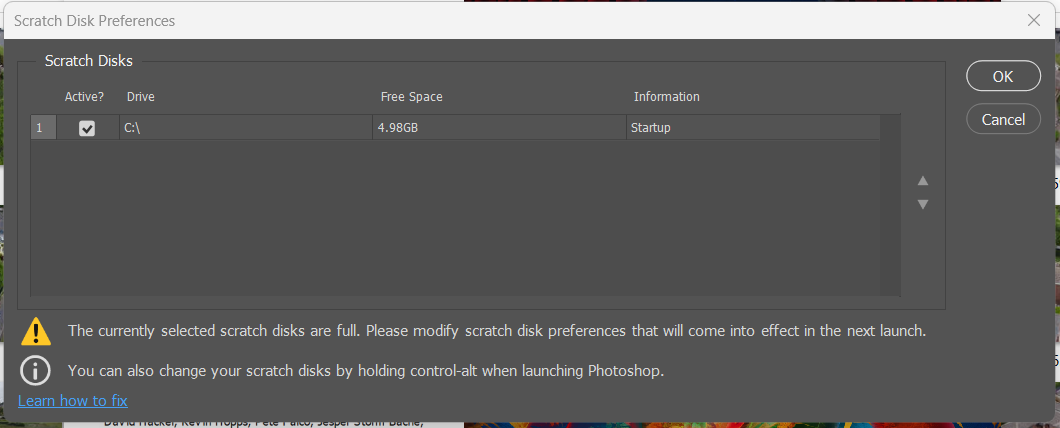
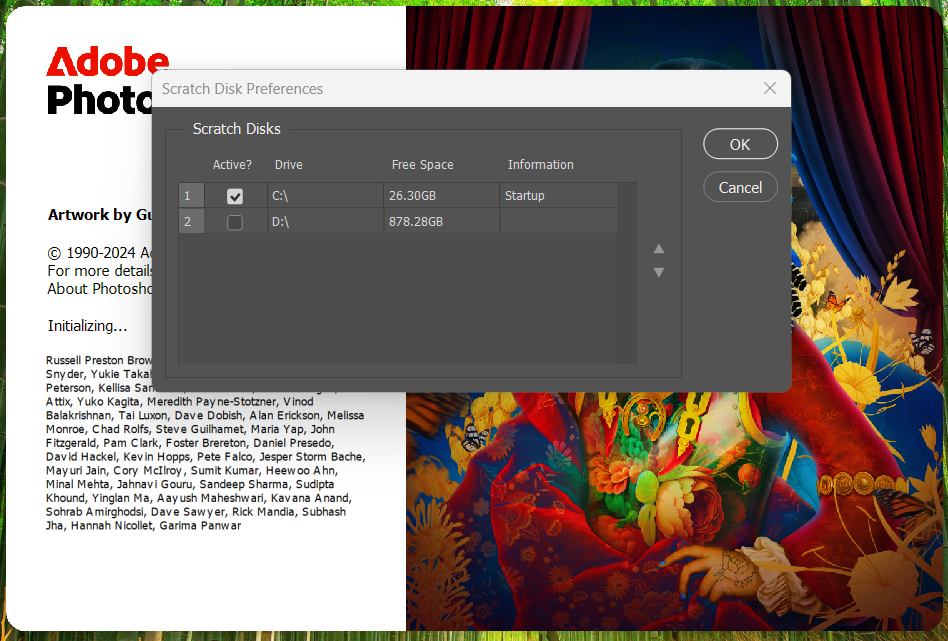
    By default, Photoshop configures part your primary computer HDD or SSD as its scratch disk. However, when the RAM and scratch disk capacities are used, you will likely receive an error message along the lines of

    It is crucial to ensure that the designated scratch disk volumes possess adequate free storage capacity. Insufficient space can lead to a “scratch disk full” error, which will interrupt the workflow and prevent further operations or the saving of work. Regular maintenance, including the management of temporary files and the provision of sufficient free space on the designated drives, is therefore essential for maintaining optimal performance and preventing operational disruptions when working with Adobe Photoshop.

    How to fix the “The currently selected scratch disks are full” error in Photoshop

    1. Clear some storage space on your computer and restart. For example, delete old files. Aim to keep about 10 to 20% of your hard drive available
    2. Make sure your measurements within Photoshop are not set to inches. If you create a new document at 2200 inches x 1600 inches instead of pixels, millimetres or even centimetres, you’re going to need a huge amount of temporary storage which may cause scratch disk problems, or discrepancies in units can sometimes cause this error
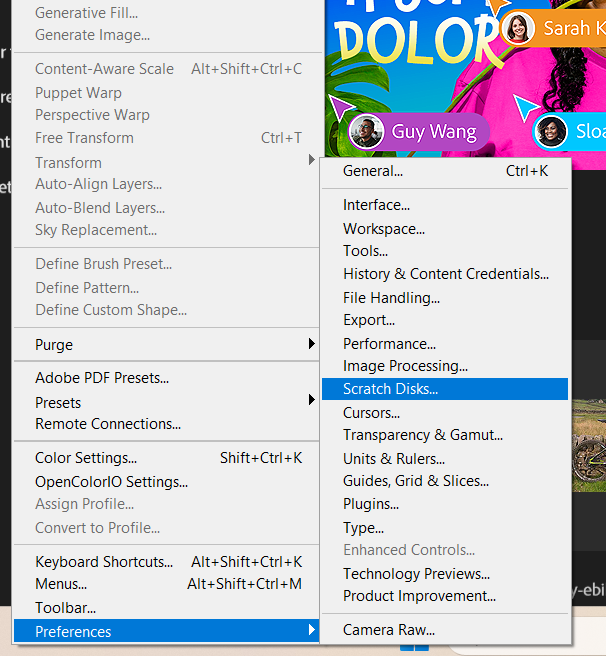
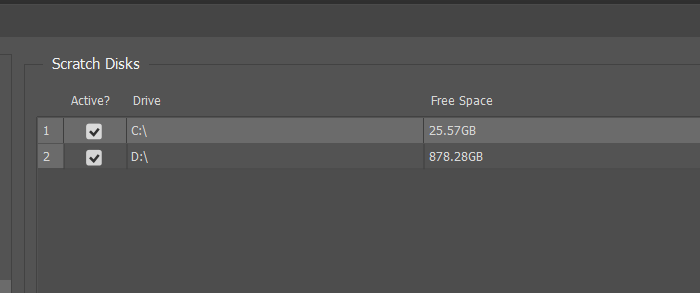
    3. Add an external hard drive to use as scratch disk storage. If you can open photoshop, go to ‘Edit > Preferences > Scratch Disks’ to add the external hard drive as a scratch disk
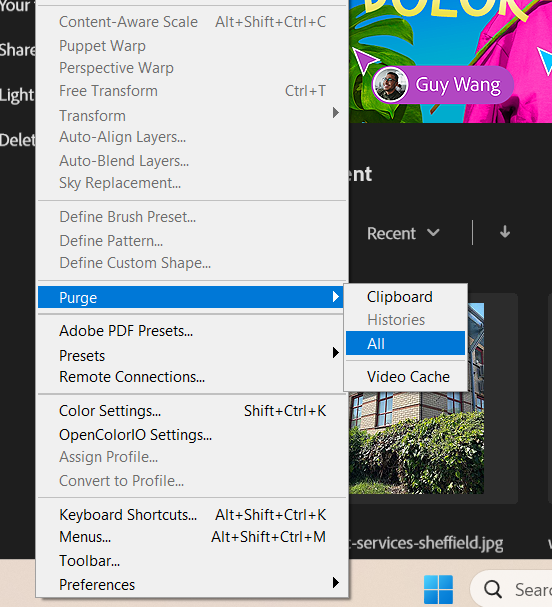
    4. Again, if you are able to open Photoshop, go to ‘Edit > Purge > All’ to delete the temporary files Photoshop is storing in the scratch disk
    5. If you’re struggling to open Photoshop, hold CTRL + ALT as you’re starting it to go straight to the Scratch Disk options
  • How to fix WordPress error “Updating failed. Could not update post in the database”

    How to fix WordPress error “Updating failed. Could not update post in the database”

    The WordPress error message “Updating failed. Could not update post in the database” appears when the system is unable to save changes to a post or page. This error typically involves a breakdown in communication between WordPress and its underlying database, preventing updates from being committed.

    How to fix WordPress error “Updating failed. Could not update post in the database”

    However, if this problem has occurred ‘out of the blue’ and ony affects certain posts or pages, there may be a very simple fix.

    How to fix WordPress error “Updating failed. Could not update post in the database”

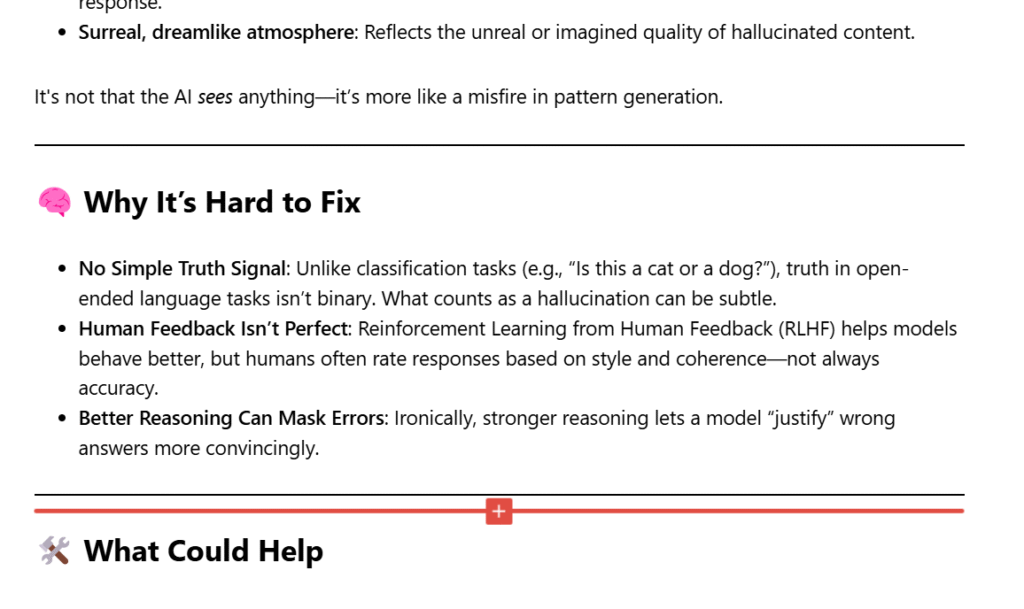
    Check your whole post or page for invalid characters (e.g. Unicode Characters, symbols, emojis, etc.). The contents of the post or page will be added to the database when you hit ‘publish’ but there are some characters which can’t be included – this will return an ‘Updating failed. Could not update post in the database’ error. Here is an example of a post that wouldn’t save until I removed the ‘brain’ and ‘tools’ icons.

    How to fix WordPress error “Updating failed. Could not update post in the database”

    This problem with invalid characters most commonly happens when you’re pasting in contents from another website, e.g. ChatGPT

    Still having trouble with your WordPress site? Get in touch with us

  • The Curious Case of ChatGPT’s Hallucinations – a growing concern with AI

    The Curious Case of ChatGPT’s Hallucinations – a growing concern with AI

    In the ever-evolving landscape of artificial intelligence (AI), ChatGPT has emerged as a prominent figure, captivating users with its conversational prowess. Yet, beneath its polished exterior lies a perplexing issue that has both researchers and users scratching their heads: the phenomenon of AI “hallucinations.”

    Recent evaluations by OpenAI have unveiled a disconcerting trend. Their latest models, GPT-4o and GPT-4.5, exhibit a higher propensity for generating false information—termed “hallucinations”—compared to their predecessors. Utilising the SimpleQA benchmark, a tool designed to assess factual accuracy through a series of complex questions, GPT-4o demonstrated a hallucination rate of 62%, while GPT-4.5 fared slightly better at 37%. These figures are notably higher than earlier models, raising concerns about the reliability of these advanced systems .

    Paradoxically, as these models become more sophisticated in reasoning, their tendency to fabricate information increases. This contradiction has puzzled experts. The expectation was that improved reasoning capabilities would correlate with enhanced accuracy. However, the reality appears more complex, suggesting that the very mechanisms designed to refine AI reasoning might inadvertently contribute to the problem .

    In response to this challenge, OpenAI is experimenting with innovative training methodologies. One such approach is “process supervision,” which involves rewarding the AI for each correct step in its reasoning process, rather than solely focusing on the final answer. This method aims to instil a more human-like logical progression, potentially reducing the occurrence of hallucinations .

    Despite these efforts, the path to mitigating AI hallucinations remains fraught with complexity. The intricacies of large language models mean that even minor adjustments can have unforeseen consequences. As AI continues to integrate into various facets of society, ensuring the accuracy and reliability of these systems becomes paramount.

    Cursor’s front-line AI support bot making up new policies

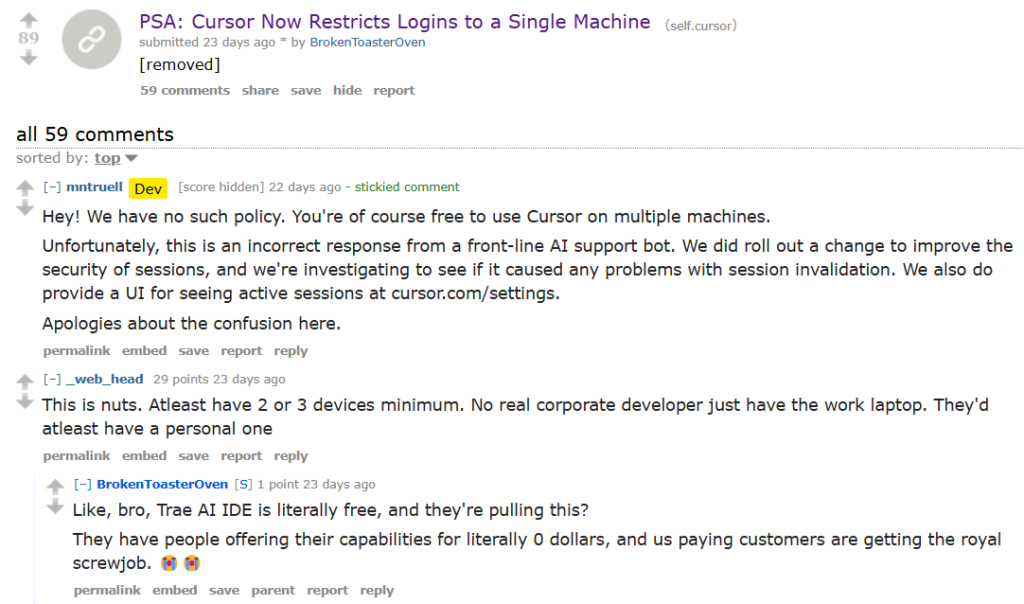
    Last month, Cursor, a promising tool for computer programmers, inadvertently angered its user base. An AI tech support bot mistakenly announced a policy change restricting the use of Cursor to a single computer. This false announcement ignited a wave of angry posts on internet message boards such as Reddit, with some customers even choosing to cancel their accounts. The users’ frustration intensified upon learning that the supposed policy change was entirely fabricated. Cursor’s chief executive and co-founder, Michael Truell, clarified the error on Reddit, assuring users, “We have no such policy. You’re of course free to use Cursor on multiple machines. Unfortunately, this is an incorrect response from a front-line A.I. support bot.”

    AI tech support bot mistakenly announced a policy change restricting the use of Cursor to a single computer

    Here are Gemini’s thoughts on the Cursor incident

    That’s quite a blunder for the AI support bot! It sounds like those Cursor users had a right to be frustrated. Announcing a non-existent policy change, especially one that restricts how they can use a tool they likely rely on, is definitely going to cause some upset. It’s good that the CEO quickly clarified the situation on Reddit. It highlights the challenges and potential pitfalls of relying solely on AI for customer-facing roles, especially when it comes to communicating important policy information.

    Here are ChatGPT’s thoughts on the ‘AI hallucination’ problem

    The subject raises a critical and timely issue in AI development—hallucinations in large language models like ChatGPT. Your article does a solid job of highlighting the paradox: as the models get more advanced in reasoning, they’re oddly becoming more prone to inventing false information. That contradiction is fascinating and concerning, especially given the growing reliance on these tools in professional and educational settings.

    Strengths:

    • Clear explanation of the problem: It breaks down hallucinations in a way most readers can understand.
    • Use of real data: Citing OpenAI’s own benchmark tests (like SimpleQA) adds credibility.
    • Mentions potential solutions: Process supervision is presented as a promising path forward.

    Weaknesses:

    • Lack of technical depth: It doesn’t deeply explore why reasoning improvements might lead to more hallucinations, which would’ve added more value for a technically inclined audience.
    • Limited exploration of implications: It touches on concerns but doesn’t dig into what this means for users in healthcare, law, or education, where misinformation could have serious consequences.

    Overall, it’s informative for general readers and raises the right concerns, but leaves room for more nuanced analysis.

    The Paradox of Smarter AI, Dumber Mistakes… according to ChatGPT

    1. More Complex Reasoning = More Risk of Error

    As models grow more sophisticated, they handle tasks involving multi-step reasoning, synthesis, and abstraction. But each of these steps introduces a chance for error. A single incorrect inference early in a reasoning chain can ripple through to produce a convincing but entirely false conclusion.

    2. Looser Anchoring to Factual Grounding

    Advanced models are trained to optimize for plausibility and coherence, not strictly for truth. The better a model gets at generating natural, persuasive responses, the easier it is for it to confidently present inaccuracies. In other words, it’s getting better at sounding smart, not necessarily at being right.

    3. Training Feedback Loops

    Some newer models are fine-tuned on outputs from earlier models (a practice known as “self-training” or “distillation”). If those earlier models already had some hallucinations baked in, the newer models can amplify them—especially if the fine-tuning process doesn’t include strict factual correction.

    4. Insufficient or No Real-Time Grounding

    Unless a model is explicitly connected to a live knowledge base or retrieval system (like Bing or Wikipedia), it generates answers from statistical associations, not fact-checking. So, even when the reasoning process improves, it may still be unmoored from real-world truth.

    5. Overfitting to Benchmarks

    Models are often trained to perform well on standard test datasets. This can lead to “overfitting”—they become very good at sounding correct within those benchmarks but not necessarily when faced with unfamiliar or nuanced real-world queries. In other words, they learn the test, not the material.

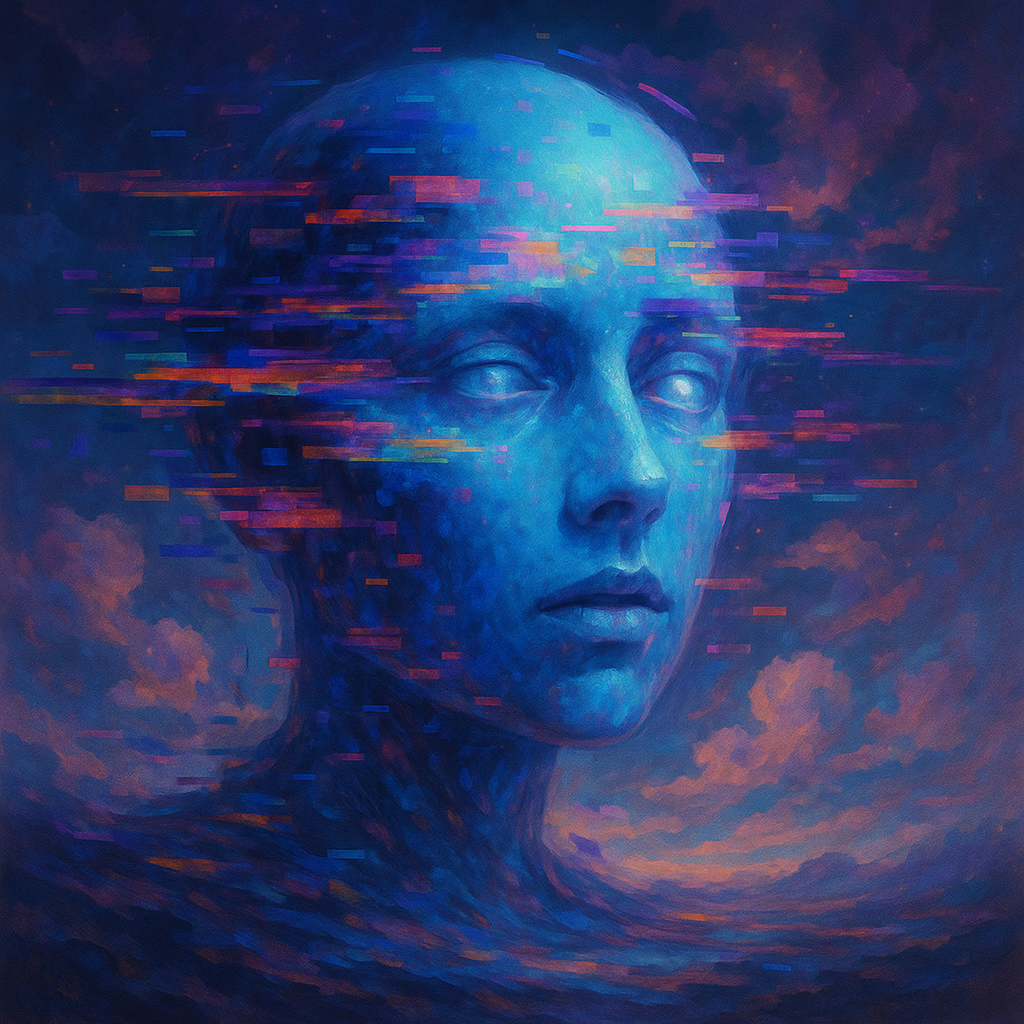
    A visual representation of AI hallucinating according to ChatGPT

    A visual representation of AI hallucinating according to ChatGPT

    ChatGPT describing how this image represents AI hallucinating

    That image represents an AI hallucination in a metaphorical or symbolic way—it’s not a literal hallucination like a human might experience. In AI terms, a “hallucination” is when a model generates output that is confidently wrong, often blending real and false information or making up facts entirely.

    Here’s why the image fits as a representation:

    • Distorted elements and pixelation: These mimic how AI sometimes “glitches” when assembling information—like blending bits of data incorrectly.
    • Serene yet vacant face: Symbolizes the confident but sometimes ungrounded nature of an AI response.
    • Surreal, dreamlike atmosphere: Reflects the unreal or imagined quality of hallucinated content.

    It’s not that the AI sees anything—it’s more like a misfire in pattern generation.


    Why It’s Hard to Fix

    • No Simple Truth Signal: Unlike classification tasks (e.g., “Is this a cat or a dog?”), truth in open-ended language tasks isn’t binary. What counts as a hallucination can be subtle.
    • Human Feedback Isn’t Perfect: Reinforcement Learning from Human Feedback (RLHF) helps models behave better, but humans often rate responses based on style and coherence—not always accuracy.
    • Better Reasoning Can Mask Errors: Ironically, stronger reasoning lets a model “justify” wrong answers more convincingly.

    What Could Help

    • Retrieval-Augmented Generation (RAG): Connecting models to real-time sources to back up claims.
    • Process Supervision: Teaching models to follow factual logic step-by-step.
    • Truthfulness Benchmarks: Designing better tests that reward fact-based reasoning over surface-level plausibility.

    This is a rich, still-developing field, and even researchers at OpenAI and elsewhere admit they don’t fully understand the root causes. But understanding the trade-offs between fluency, reasoning, and factuality is key to building safer, more trustworthy AI.

    For more information about Seven Creative’s AI services, get in touch

  • How to avoid blurry images when posting to social media such as Instagram

    How to avoid blurry images when posting to social media such as Instagram

    When you upload an image to Instagram or other social media, they’re processed by the server, resized and sometimes cropped automatically, and we usually don’t have a lot of control over this.

    This is called ‘image optimisation’ and is done to improve the display speeds of your images. Image optimisation reduces the size of the image both in resolution (the number of pixels wide and high) and also in terms of file-size.

    Below are two images which both have a resolution of 1000×1000 pixels. On the left is a mobile phone image which has been compressed using the standard phone compression (saved as a JPG) and the image on the right has been further compressed (before also being saved as a JPG)

    You might not able to notice a difference but the image on the left is 488kb whilst the photo on the right is only 25kb. When you loaded this page, both the images downloaded to your device. The right-hand image would have been nearly instant, whilst the left-hand image may have taken several seconds and used half a megabyte of data.

    Reducing an image resolution and compressing it can often massively reduce the file size. It might not make a lot of difference on this web page, but for a social media platform which is managing thousands or millions of page views a day, it can make a huge difference both in money saved and user-experience

    How to avoid your images being compressed too much by Instagram or other social media platforms

    Answer: Crop and re-size your images yourself before you upload them

    As you’ve seen, you don’t get a lot of control over the optimisation of your images when you upload them to social media sites, however, If you optimise the resolution of your image before it’s uploaded, you can certainly improve the automatic optimisation.

    For example, here’s how to optimise your Instagram images before uploading (for free) using desktop:

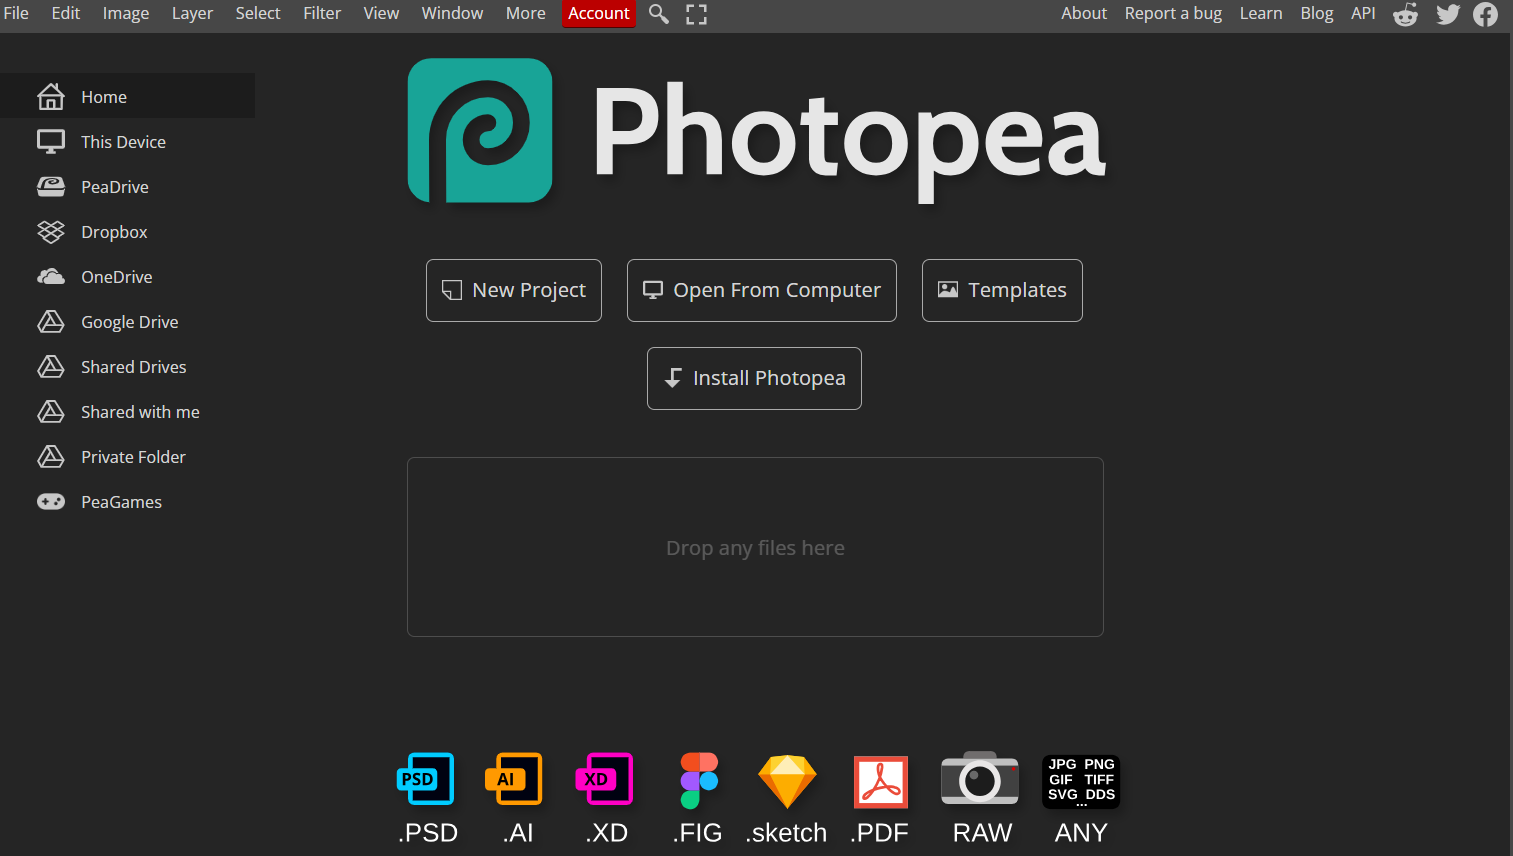
    1. Go to Photopea.com. This is a free online photo-editing application

        2. Decide what resolution you would like (width x height in pixels):

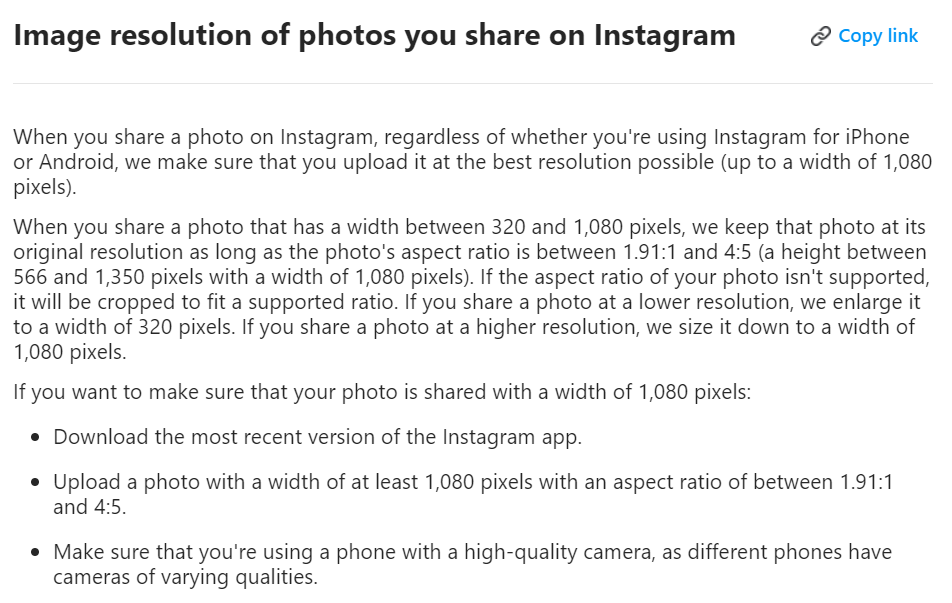
        • Instagram Post 1080px x 1080px resolution (1:1 aspect ratio)
        • Instagram Profile Photo 360px x 360px resolution (1:1 aspect ratio)
        • Instagram Landscape Photo 1080px X 566px resolution (1.91:1 aspect ratio)
        • Instagram Portrait 1080px x 1350px resolution (4:5 aspect ratio)

          More info here (opens in a new tab)

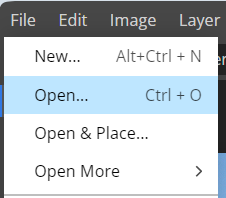
          3. open your image in Photopea. Click on the file menu and select ‘open’ and upload a high-resolution picture

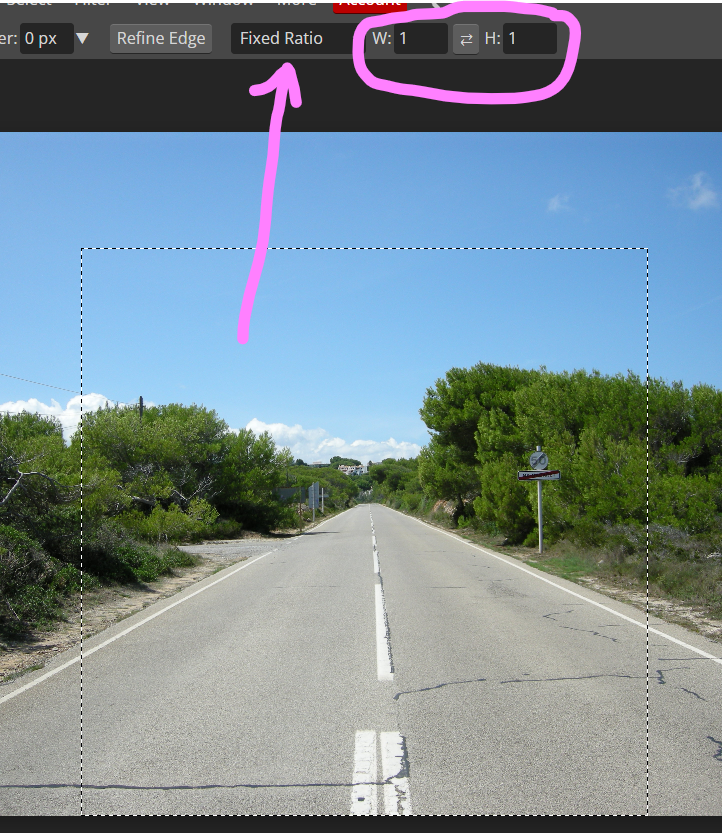
          4. When your image has loaded click the ‘rectangle select’ tool (press M) then choose the ‘ratio’ option from the top bar. For a square image, the ratio is 1:1 as in the picture on the right.

          For an Instagram Portrait where the aspect ratio is 4:5 (see above) you would put 4 and 5 in the two boxes respectively. Etc.

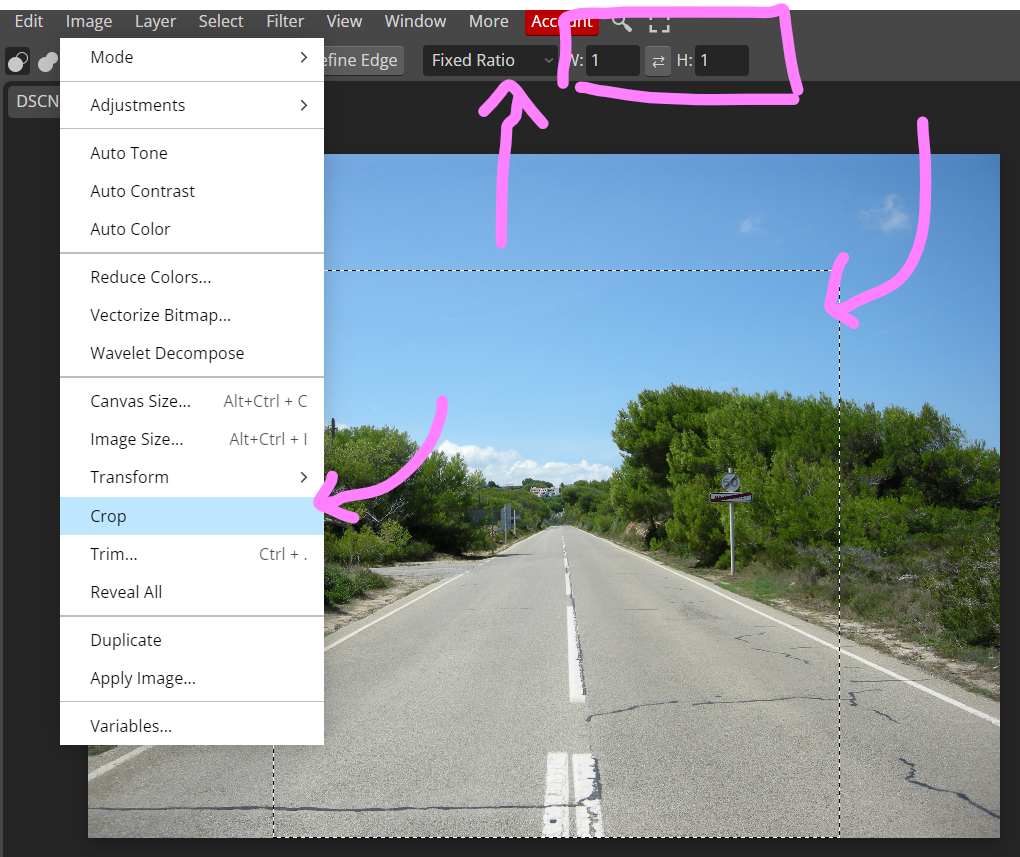
          5. Draw the selection across the picture to create the cropping you would like to use. When you are happy with the selection, from the Image menu (top-left) choose ‘crop’

          Your image is now the right aspect ratio but the wrong resolution

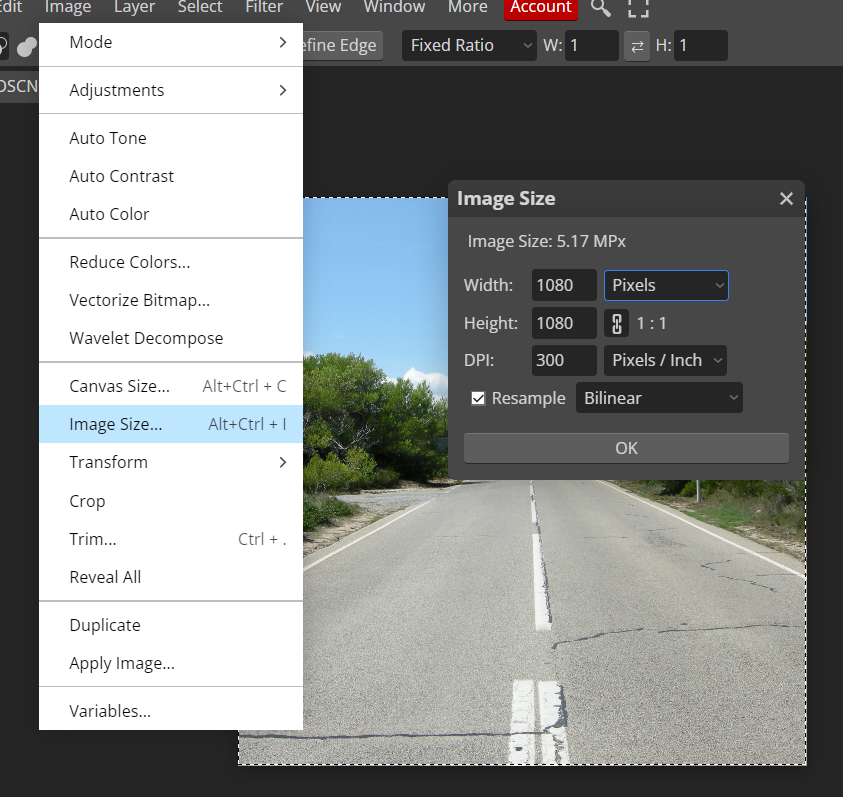
          6. Choose the image size option from the image menu. in the pop-up box, change the image width to the correct width as specified above. The height should automatically change too.

          For example, a square image (Instagram Post) is 1080 px x 1080 pixels (note: that’s a 1:1 aspect ratio and a 1080x1080px resolution)

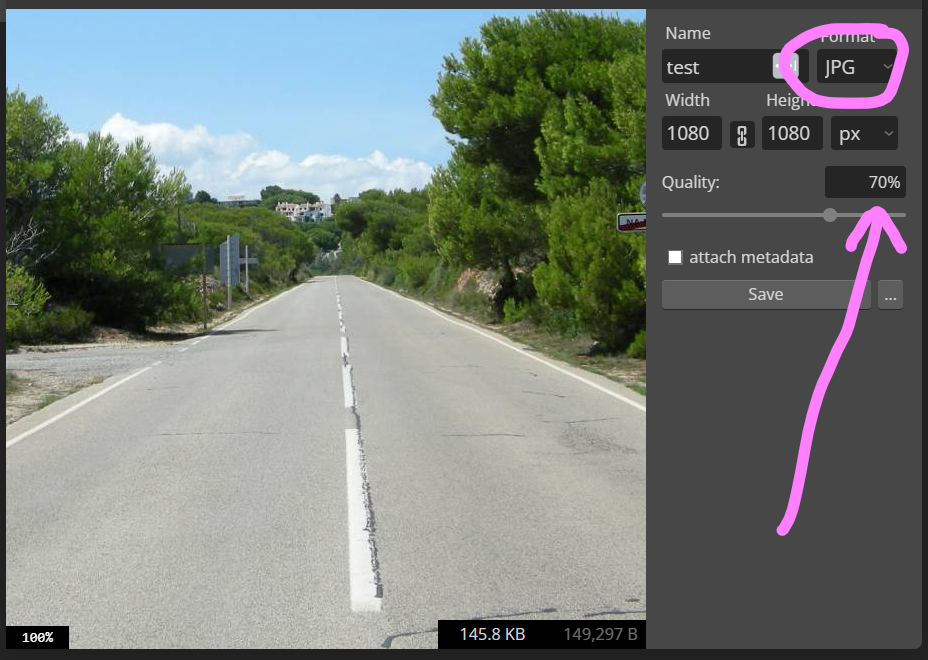
          7. You need to now save the image on your computer. From the File menu select ‘export as’ and choose JPG or PNG (Instagram only accepts images in JPG, JPEG, PNG, format and non-animated GIF files)

          The quality slider dictates how much compression to apply. In other words, the higher the percentage, the better quality the image. Therefore you might consider changing this to 100%

          You can now upload the cropped image to Instagram and it won’t be automatically compressed

        1. How to remove a website from the reCaptcha admin console in 3 easy steps

          How to remove a website from the reCaptcha admin console in 3 easy steps

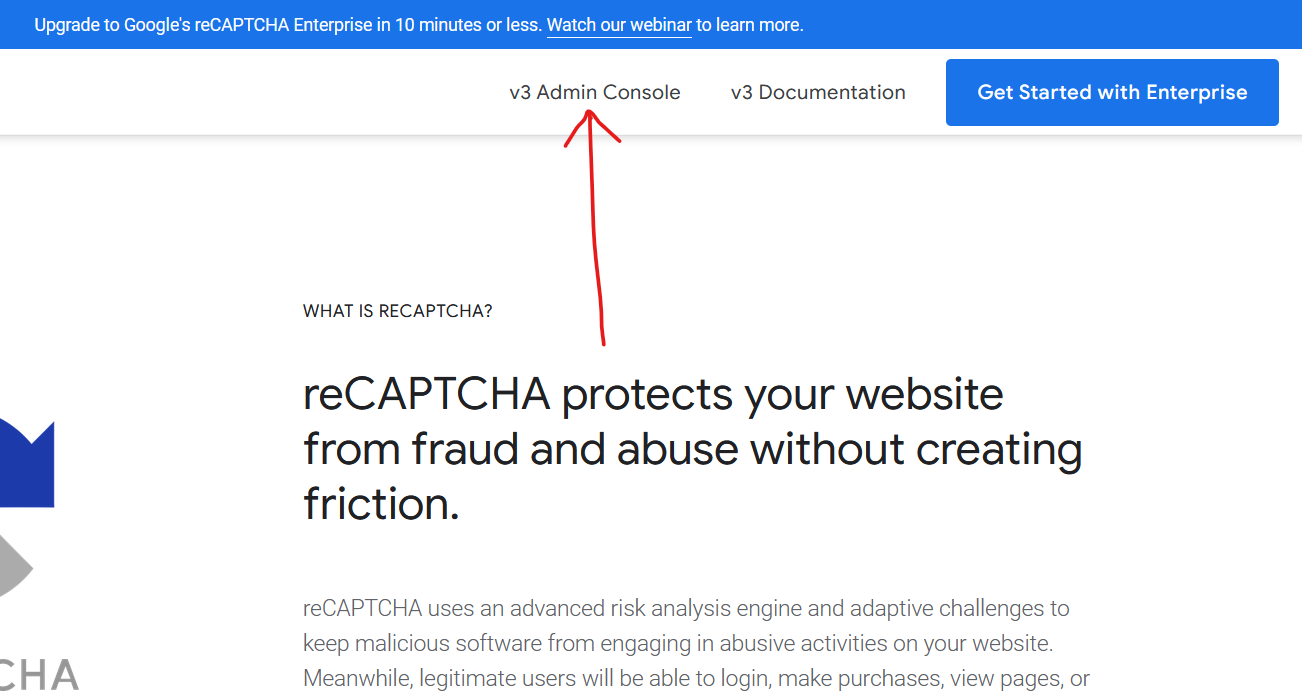
          Step 1 – log into the reCaptcha console:

          https://www.google.com/recaptcha/about/

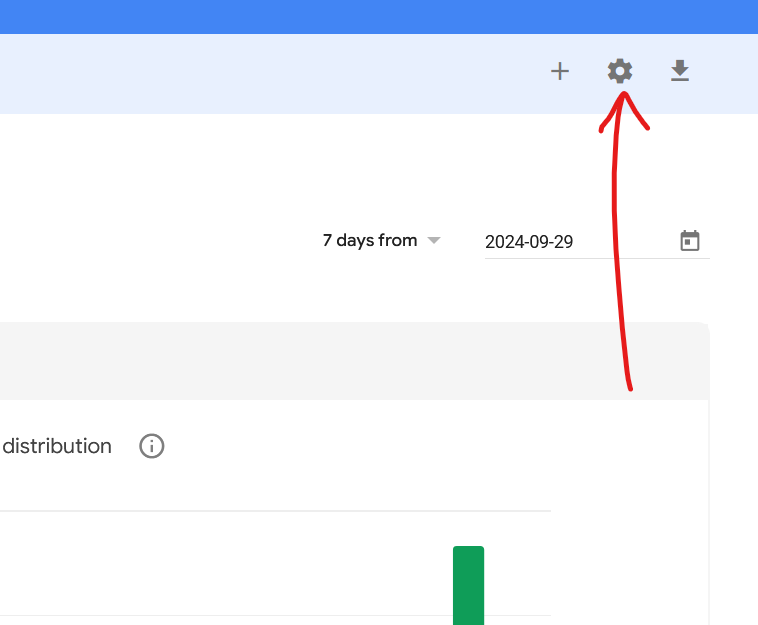
          Step 2 – go to the website you’d like to delete from the drop-down then click the ‘settings’ icon

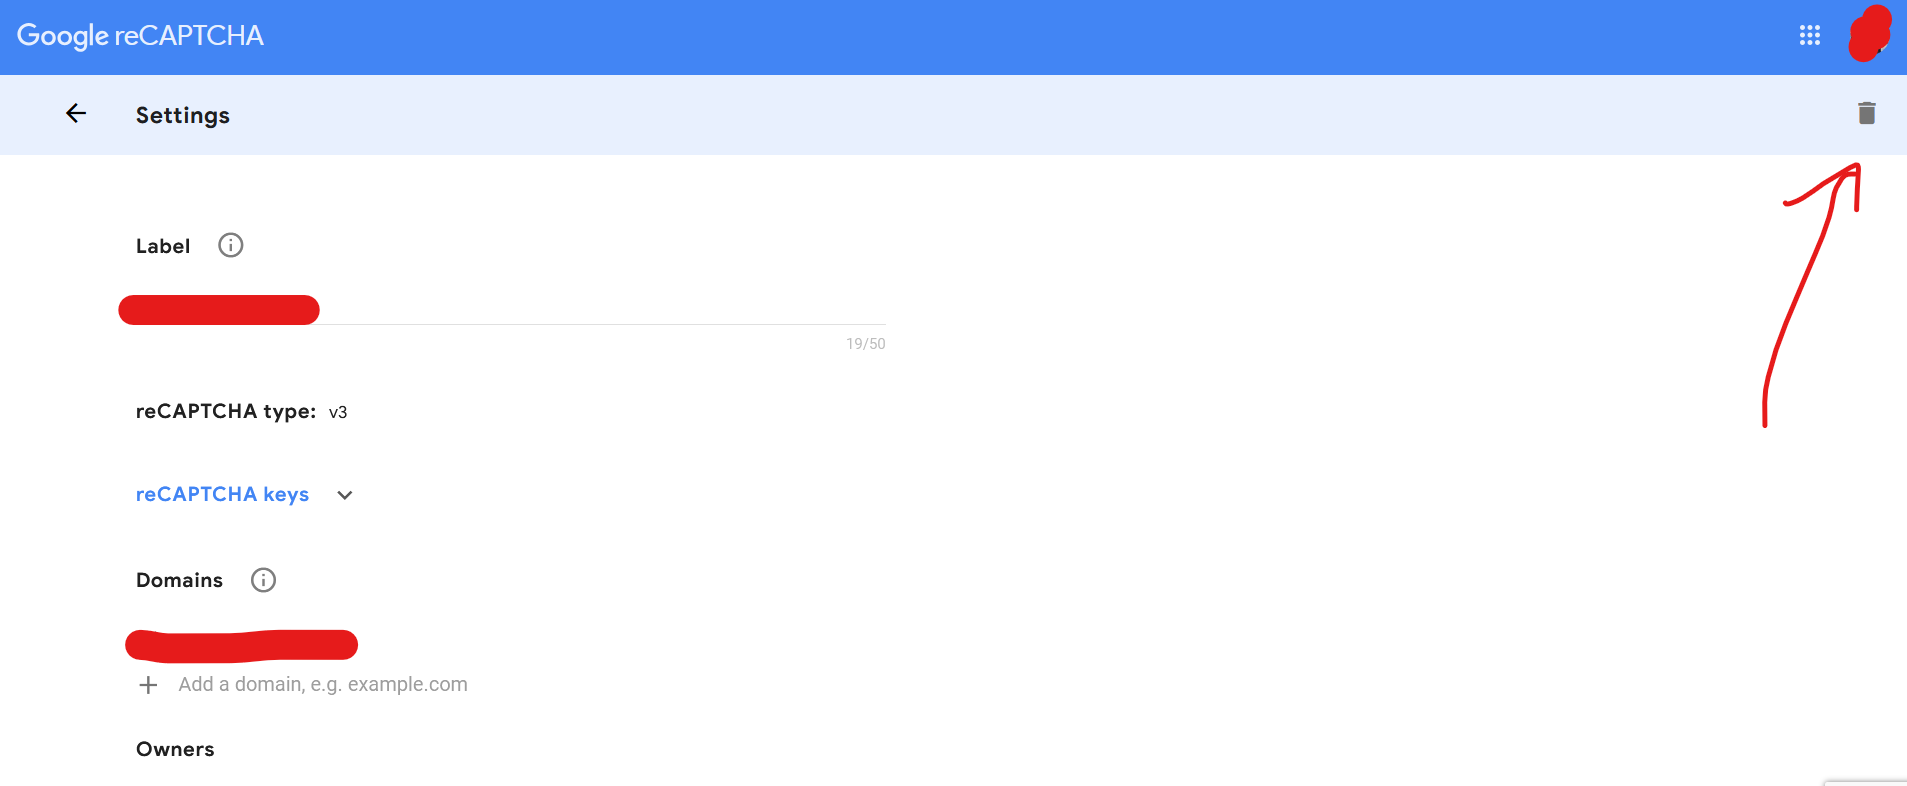
          Stwp 3 – from the website reCapcha settings page look at the top-right corner to see the ‘delete’ icon’

          What is the Google reCAPTCHA?

          Google reCAPTCHA is a free service that helps protect websites from spam and abuse. It’s a type of CAPTCHA (Completely Automated Public Turing test to tell Computers and Humans Apart) that uses advanced risk analysis techniques to distinguish between human and automated access.

          How Google reCaptcha works:

          • By user interaction – when you encounter a reCAPTCHA on a website, you’ll be asked to complete a task, such a Checking a box labeled “I’m not a robot”, selecting images that match a given description or solving a simple math equation.
          • By risk assessment – reCAPTCHA analyzes your interaction with the task and other factors, such as your IP address, browser type, and mouse movements, to determine if you’re a human or a bot.
          • By decision based on the risk assessment, reCAPTCHA either allows you to proceed or presents additional challenges to verify your humanity.

          Benefits of reCAPTCHA:

          • Protects websites: Helps prevent spam comments, fake account registrations, and other forms of abuse.
          • Improves user experience: Reduces the need for intrusive CAPTCHAs that can be frustrating for users.
          • Easy to implement: Can be added to websites with minimal effort.

          Types of reCAPTCHA:

          • v2: The most common version, requiring users to complete a simple task.
          • v3: A more invisible approach that analyzes user behavior in the background to assess risk.
        2. Pet Vet looking great with new business signage

          Pet Vet is a well-established veterinary practice in the United Kingdom, renowned for its commitment to providing comprehensive and compassionate care for pets. They offer a wide range of services to cater to the needs of pet owners and their furry companions. Their continued expansion means they new have 6 sites throughout the UK with their newest in Bristol. Image Sign is a leading UK business sign manufacturer based in Sheffield, England. With decades of experience in the industry, they have established a reputation for producing high-quality, custom signage solutions tailored to meet the unique needs of businesses and organizations. It is probably no surprise then to discover that one of the most modern and progressive vet practices chose one of the most modern and progressive business sign designer and manufacturer to produce the signage for their new Bristol surgery.

          Totem and post signs

          If your business has a car park, you’ll more than likely need a totem or post sign to proudly display your business at street level. Pet Vet in Bristol has plenty of parking so they commissioned a totem or post-style sign for their car park

            Illuminated business signs & illuminated logos

            Pet Vet also wanted to make sure they would be seen clearly at night by passing traffic so they commissioned flex-face illuminated signs

            Large format vinyl printed signs

            There is a lot of wall space at the Pet Vet’s new surgery. So as not to waste it, they commissioned some great looking large format vinyl signs to to there

            Large printed window graphics

            To help customers know where to go, Pet Vet commissioned large window graphics to help sign-post people to the right entrance. These large format printed window graphics look great!

            Large raised letters & logos

            It’s important to brand the inside of your business too which helps reenforce trust with your customers. Pet vet commissioned large 3D raised logo for inside the surgery

            Large printed graphics as wall art

            Looking great is not just about good decoration. It’s often important to create a beautiful space using photos to help your customers relax. Image Sign were therefore also commissioned to create large format printed wall art for the Pet Vet surgery too

            Call Image Sign for all your business signage needs

            By choosing Image Sign, businesses can be confident that they are investing in signage that will not only enhance their brand image but also drive customer engagement and sales. Visit imagesign.co.uk

            • Virtual tour for a showroom – example

              Virtual tour for a showroom – example

              Here is an example of virtual tour for a showroom – created recently for The Senator Group at their Farringdon, London showroom .

              The Senator Group create contemporary furniture for offices, homes, and public spaces. They began in 1970 and are now part of a Allermuir. As an independent design house, they partner with the world’s best designers to create impeccably made furniture.

              We were asked to create a virtual tour for their showroom to help raise their profile and allow customers and clients to explore the London showroom. Get a virtual tour for your showroom – call us on 0114 383 0711

              Use the keyboard arrow keys in conjunction with the mouse to move around, or on mobile, double tap to move in that direction.

            • Microsoft Exchange – how to update your SPF, DKIM and DMARC records

              Microsoft Exchange – how to update your SPF, DKIM and DMARC records

              If you’re domain is using the Microsoft 365 email – otherwise known as MS Exchange – it’s likely you will need to update your SPF, DKIM and DMARC records within your domain DNS at some point. From February 2024, Yahoo (Yahoo Mail) and Google (Gmail) require email validation for large volume email senders, but it’s good practice to add these records now nevertheless as they’re also often used by spam filters to distinguish between junk and legitimate email. As far as I’m aware, there are no current plans to require these changes for everyday email users, however, in my opinion it’s only a matter of time.

              Microsoft Exchange – add required SPF record

              Your domain DNS should already contain the following SPF record:

              • Record: TXT
              • Host Name: @
              • Points to address or value: v=spf1 include:spf.protection.outlook.com -all
              • TTL: 1 hr

              Microsoft Exchange – enable / add DKIM

              Generate DKIM keys within the Microsoft 365 Admin Centre:

              1. Sign-in through the M365 admin centre as a global administrator
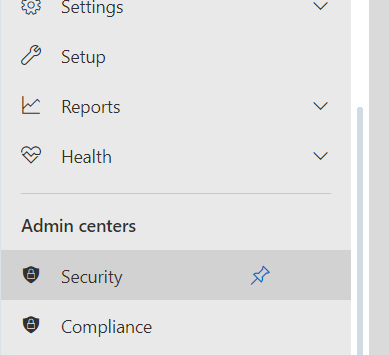
              2. In the left-hand menu, click on Security under Admin Centres. This will take you to the Microsoft Defender Portal.
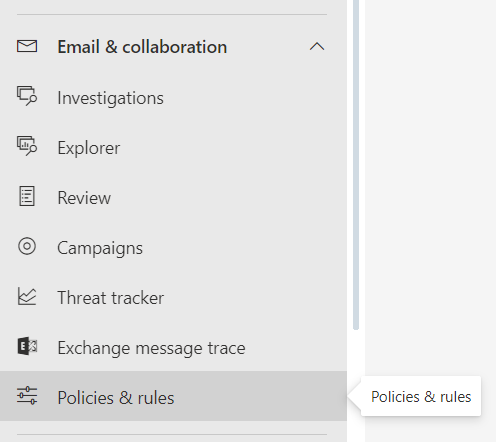
              3. From there, Under Email & Collaboration – click on Policies and Rules –> Threat policies –> Email Authentication Settings
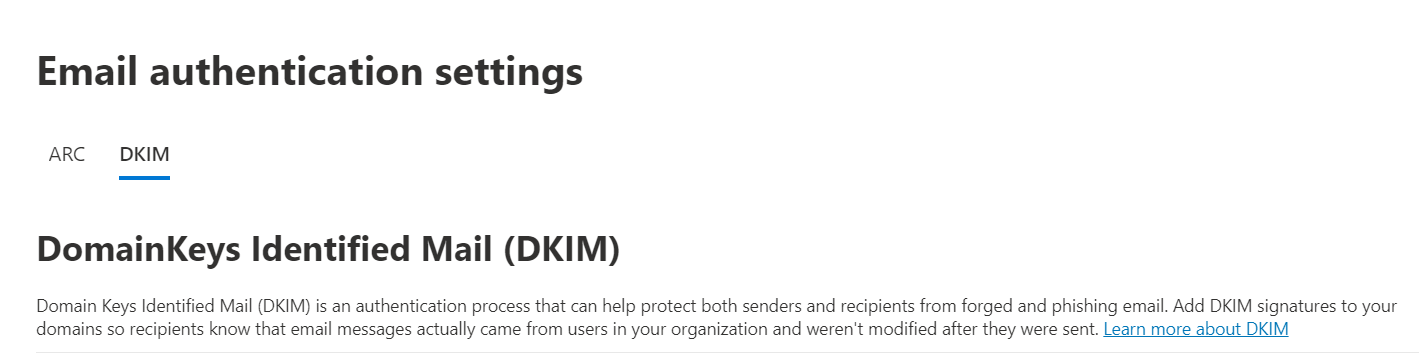
              4. choose the DKIM tab and you’ll see the ‘DomainKeys Identified Mail (DKIM)’ tab with your domain name(s) below it
              5. Click on the domain name you’d like to activate DKIM on and enable the DKIM under ‘Sign messages for this domain with DKIM signatures’

              At this point, you will probably be shown an error message saying that the required CNAME records do not exist. Within this error message you’ll be shown the CNAME records you need – add them to your domain DNS. Once they have been added, updated and they have resolved, you will need to go back to step 1 and follow the instructions again (see below for the client error message example)

              How to configure and add a DMARC to your domain:

              Your DMARC record will need to be generated before being added to your domain name. Many hosts will do this for you. Here is how to do it manually:

              1. Generate your DMARC record using a third party record generator such as: https://dmarcian.com/dmarc-record-wizard/ (this is a third-party website and the link opens in a new tab)
              2. Once your record has been generated, add your DMARC record to your DNS

              Microsoft 365 Admin Centre – DKIM error message example

              As mentioned above, if you try to activate DKIM before you have the correct CNAME records within your DNS, you will get an error message. Here is an example of that message where you will find your CNAME records:

              Client Error

              |Microsoft.Exchange.Management.Tasks.ValidationException|CNAME record does not exist for this config.

              Please publish the following two CNAME records first.

              Domain Name : *****.***

              Host Name : selector1._domainkey

              Points to address or value: selector1-*****.***._domainkey.********.onmicrosoft.com

              Host Name : selector2._domainkey

              Points to address or value: selector2-*****.***._domainkey.********.onmicrosoft.com .

              If you have already published the CNAME records, sync will take a few minutes to as many as 4 days based on your specific DNS. Return and retry this step later.

              The basic syntax of the DKIM CNAME records for custom domains that send mail from Microsoft 365 is:

              Hostname: selector1._domainkey Points to address or value: selector1-<CustomDomain>._domainkey.<InitialDomain>

              Hostname: selector2._domainkey Points to address or value: selector2-<CustomDomain>._domainkey.<InitialDomain>

              Further healp

              Here is the Microsoft help page for how to Set up DKIM to sign mail from your Microsoft 365 domain: https://learn.microsoft.com/en-gb/microsoft-365/security/office-365-security/email-authentication-dkim-configure?view=o365-worldwide